Cold Weather Protection for Vegetable Gardens Class-this Saturday

Here’s the flyer info for my class this Saturday April 5th-Hope many of you can come-it should be good!


WOW pic for blog


Saturday, April 5
Cold Weather Protection for Vegetable Gardens
Protecting your crops in spring
Time: 10 am-12 pm
Instructor: Jannine Cabossel
Location: Whole Food’s Community Room (St. Francis location)
Please RSVP to 505-983-9706 or email: homegrownnewmexico1@gmail.com

Jannine Cabossel, a Master Gardener and ‘The Tomato Lady’ at the Santa Fe Farmers Market will teach a class about how to use row cover, cloches, hoop houses, wall of waters, and other items to get your garden in earlier with protection.

Jannine has extensive experience in growing vegetables on her 3000 square foot garden using all organic methods. Follow her blog at giantveggiegardener.com. Suggested $10 donation. Become a 2014 Member for $35 with $250 value-includes all classes, potlucks and tour.

Tough year in the vegetable garden

IMG_3215

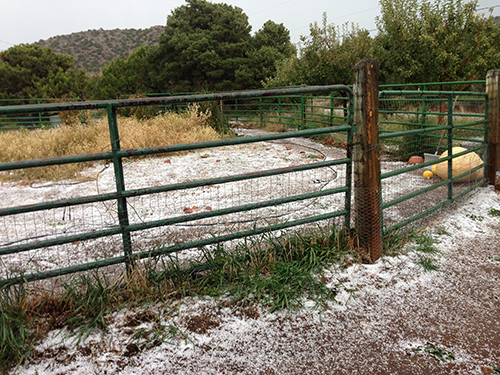
Yesterday’s hail storm-October 11, 2013

This has been one of the most challenging years in the veggie garden that I can remember.

First the leafhoppers arrived in spring to infect the tomato plants with the curly top virus they carry, a fatal disease for tomato plants. They particularly get bad during drought years because they like it dry and hot. I pretty much thwarted them by covering all but 4 of my tomatoes with row cover (I ran out) which acts as a physical barrier until they left in July when the rains came. So my loss was minimal-maybe 10% compared to the 50% loss of tomato plants last year for me. Luckily I always grow more than I need. I will definitely will cover them again next year.

IMG_3210

Biggest pumpkin ‘Honey Boo Boo’ only 176 lbs at end

A squirrel ate my best and fastest growing giant pumpkin plant which put me out of commission to be a contender for our state record, putting me 2 months behind when growing the back-up pumpkin. Here is a pic with my total pumpkins-biggest this year-named ‘Honey Boo Boo’ – 176 lbs-bummer…

We had one of the worst hail storms I can remember in early July but again since the tomato plants were still covered, they were protected. Everything else really got set back but did come back eventually. Many of my gardener friends got hit really hard and lost many crops in that one storm.

IMG_3218

Hail damage-tomato on left, cracks (now healed) from too much water tomato on right

Then in August we finally started getting a lot rain which we desperately needed. Unfortunately we got 3 inches of rain in one week which the plants couldn’t handle all at once and many, including rock hard green ones split or cracked from too much water. (Ahh, whata ya going to do? First too little water, then too much water all at once!) The tomatoes were a little watery for about a week until they absorbed the extra water and healed their cracks. Now they are good again. Most of the uglies became sauce.

Then another devastating hailstorm this time with the row cover off so the tomato plants took it hard and many started to succumbed to fungal diseases because the hail damage weakens the plants and makes them susceptible. Kinda like us getting a severe beating opening up many wounds.

IMG_3212

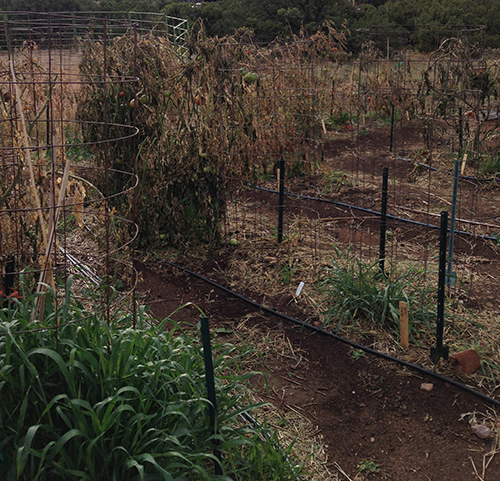
Hard freeze in late September finished off tomatoes

While I was on vacation, we got our first hard freeze in the last week of September which basically finished off the garden except for the chard and the grass growing under the tomato plants. Pretty unbelievable that we got such an early freeze in Sept when usually it doesn’t come till the second or third week of October. So the season has ended up very short. Usually I can go to the Farmers Market through the first week of November now I’m not sure I can get thru the 3rd week of October. I will go tomorrow to the market as I still have 8 boxes of good tomatoes but we will see after that. I just picked the green ones that were starting to ripen and see if they will still ripen.

IMG_3214

Pumpkin patch almost cleaned up before hail hit.

And finally yesterday we had another hail storm-in October no less! Unheard of to have hail so late. Luckily I had finished picking any tomatoes, eggplants, peppers and a few squash that made it just yesterday morning before the hail hit. So that’s it-THE END. (although I think I may still have some chard left-gotta see how beat up it got…)

Which brings up a point as I am rather calm about all this. I use to get super upset but I learned 11 years ago when we had our 3 year bark beetle infestation due to a severe 4-year drought that basically wiped out 98% of our pinon trees (I lost 300) that we really can’t fight Mother Nature. We can only beat our heads against the wall for so long. We try to do our best and then at some point I learned that I just have to surrender to what is—’you can’t stop an avalanche’ as I was told once. Once I surrender, all stress leaves because I realize I can only do what I can do and that’s it. And surrendering is not so bad as now I can let go and start to plan the next season. Ahh, the life of a little farmer. Luckily my main income comes from glassblowing not farming so I am very lucky in that sense compared to the farmers whose main income is from their crops.

Besides I haven’t been able to write that much in the blog this season as I’ve been so busy in the garden but I did take pics and can catch up on some of the things that took place but didn’t have time to write about. Stay tuned…

Create your own lettuce/mesclun bowl!

What does the cat have to do with the lettuce mesclun bowl?

"Trini" the cat! Photo by Genevieve Russell

‘Mesclun’ is a term that means a ‘mixture of young salad greens’ in French. Last year I created a lettuce/mesclun bowl inside the house while it was still cold outside. I took the bottom from one of my pots (you know so that your pots don’t leak all over when you water), cleaned it with a bleach solution and drilled some holes in the bottom of it so water can drain out.

Then I filled it with some moist potting soil and sprinkled some lettuce mesclun mix all over it and gently tamped it down so the seeds make good contact with the soil. In this first picture I sprinkled sand over the half of the seeds.

Then I finish sprinkling the sand over the seeds-just enough till they were covered.

Next I sprayed the sand so it became moist with a spray bottle so as not to disturb the seeds. Then I put plastic wrap over it to hold in the moisture until the lettuce germinates. I kept it in a cool place in the house until it germinated and then I moved it by a window.

This is when I got in trouble with the cat…

Trini, "I like salad too" Photo by Genevieve Russell

Here is the lettuce bowl. Coming up nicely. Now if I could just keep the cat from eating it! She loves it! I caught her eating it around the edges by the window. I’ll have to thin it this week without her help! Perhaps I’ll have to make her a salad bowl of her own.  In another couple of weeks it should be pretty big.

Here it is ready to eat for it’s first cutting in 32 days and at $6.99/lb in the stores, it’s a deal! Harvest by the ‘cut and come again’ method and it will grow back for several cuttings. To do this, simply take sharp scissors and cut off a bunch of leaves in the amount you need to fill your salad bowl. Cut the leaves off at 1 to 2 inches above the soil. Don’t cut the crowns of the lettuce or it won’t grow back. Bon Appétit!

Lettuce bowl ready for first cutting-32 days

Garden Harvest from July 24

First harvest from July 24

Here’s a picture of the first garden harvest that I actually got on July 24! It was small but tasty! ‘Romanesco Costata’ summer squash, ‘Lungo Bianco di Sicily’ summer squash, ‘Yellow Custard’ scalloped summer squash, ‘Bennings Green Tint’ scallop summer squash, ‘Fairy’ eggplants, bush beans, cucumbers, ‘Shishitos’ and ‘Padron’ peppers are really kicking, and a few tomatoes. Now on August 2, almost everything is going bonkers except the tomatoes-I’m still waiting for the tomatoes to really show up soon in a major way!

Summer Squash-Scalloped ‘Golden Custard’, Lungo Bianco,’Costata Romanesco’

Female flower closed- 'Golden Custard' summer squash

I am growing 4 varieties of summer squash this year that are all new to me. I have two varieties of scalloped summer squash. Here is the first of them called ‘Golden Custard’ which will turn more yellow with time. The other scallop variety I have is Bennings Green Tint which is a light green scallop squash. It is a little behind and I don’t have picture of one of the fruits as it is all leaves so far.

The first picture is a female flower with the baby ‘Golden Custard’ squash attached.  Golden Custard has bright yellow fruit and rich mellow flavor. This is a rare native American squash that might predate Columbian times. I’ve never tried it before and can’t wait to taste it. The female flower has not yet opened to be pollinated. In all squashes, winter and summer, female flowers have the baby squash attached and if they don’t get pollinated, they will drop off.

female squash flower open

The second picture is with the same female flower open.

The third picture is a male flower with a straight stem and no potential baby fruit at base.

male squash flowerThe third picture is of the male flower which has a straight stem and stamen.

The next picture is a Costata Romanesco summer squash with the flower still attached. This one was definitely pollinated as the baby squash has grown to edible size. This is good eating size (about 5 inches) but left on the vine it will get larger and still can be used. Costata Romanesco is a ribbed zucchini from Rome, Italy and a famous Italian heirloom. The long fruit are fluted with medium, green-striped skin. The cut slices are scalloped. They are popular fried whole with the flower still on when still small. They are very flavorful and a perfect, gourmet variety.

Costata Romanesco

Lungo Bianco is a light-green-cream heirloom zucchini and another popular variety from Italy. They are smooth skinned, mild and sweet.

I did a taste test of the Lungo Bianco and Costata Romanesco tonight and they both are wonderful. Both were picked when they were prime-about 5 inches long and had no bitterness. I sauteed them in butter and put a little  Parmesan cheese on them at the table. Yum!

tomato hornworm attack!

tomato hornworm courtesey of W.S. Crenshaw/Colorado State University

I’ve found some tomato hornworms in the garden this morning. I picked them off and gave them to the chickens. Here is some information about them. This pale green caterpillar has white and black markings, is 3 1/2 to 4 inch long and is the larval stage of the Sphinx moth.

sphinx moth courtesey of W.S. Crenshaw/Colorado State University

It is also called the hawk moth or hummingbird moth.  It is called the hummingbird moth because of it’s long “beak” which is not really a beak at all, but a slender, tubular feeding and sucking organ. It is not a hummingbird but an insect. It is a grayish-colored moth with a wing spread of 4 to 5 inches. I see it visiting my flowers at dusk and at night. It is attracted particularly to purple flowering plants. The moth is not harmful to your plants only as the larva caterpillar-the tomato hornworm. A friend of mine called me to say her plants were being visited by the Monarch Butterfly and wanted to know if they would hurt her tomatoes. The answer is no, the Monarch Butterfly lays it eggs on milkweed and when it is a caterpillar feeds on milkweed and feeds on nectar from other plants when it is an adult.

I noticed a couple of things about the hornworm today. First I got out early and caught it sleeping. At least I think it was sleeping as it didn’t move for a long time and it was still really chilly outside (I thought maybe it needed warmth to get up and going or perhaps it had a hangover from eating so many tomato leaves!). The first thing I do after looking to see if the plants look good (as in no disease showing up) is to see if any of the leaves are eaten. The hornworm usually start feeding from the highest part of the plant first. If I see that, then I also look for their poop (called frass) which are quite large pellets about 1/8 inch in size. You can see it sometimes on the branch or on the ground. The hornworms are hard to see as they blend in so well with the foliage but keep looking around the damaged areas and you will find them. Anyways the 3 times I’ve seen them so far this year, they all hang upside down on the tomato branch-so look for them that way. I don’t like to handle them with my bare hands. I usually have gardening gloves on so I’m not so squeamish about picking them off. They are so large they give me the creeps but they are quite beautiful. I will have to do more inspections to catch them.

I luckily haven’t had huge amounts of them so I prefer handpicking them but if I found I had tons of them, I would spray with Bt for caterpillars. Bt is short for Bacillus thuringiensis. It is a live bacteria that kills caterpillars only. It doesn’t harm bees, or birds or humans-only caterpillars. It is perfectly safe for organic growers. When the caterpillar takes a bite of your leaf, it dies. It interferes with their digestive system. You can buy it at a nursery. Usually the big box stores don’t carry it. The only bad thing about Bt, is that is washes off with the rain and must be reapplied.

hornworm with wasp cocoons

The other thing that is helpful comes from nature itself.  If you see little white cocoon things on the hornworm, leave them alone as a helpful parasitic wasp has layed their eggs on them and the caterpillar will soon die. An added bonus is all the little wasps will attack other hornworm caterpillars. The wasp is not like the wasp we think of that stings us. It is a little thing, almost fly like, doesn’t sting us and is one of those beneficial bugs you would like to have in your garden.

flowering carrots!

carrot flowers

carrot flower closeup

Carrot Flowers

I didn’t know carrots will flower-and what beautiful flowers they are! Here are some pics of a carrot flower. I forgot to pick the carrot from last year and it is going to seed now. I saw the carrot leaves a few weeks ago but ignored picking it as I thought it would be very woody and not very good to eat. See what can happen if you just let things be!

First I get to enjoy the roots, then the flowers (if I don’t eat the carrot!), and then I will try to get the seeds.  Next year I will let a few more carrots go to seed as I like the flowers so much. Pure joy!

carrot flower just coming out

Giant tomato

Here is a picture of one of my giant tomatoes on it’s way to stardom. (I hope!)

baby giant tomato

Notice this tomato looks deformed and gnarly. It has 4 little tomatoes that have fused together-kinda like Siamese twins only this one is quadruplets! Most giant tomatoes are a result of a megablossom where 2 or more blossoms fuse together. Many megablossoms do not pollinate fully and so they have a higher self abort rate. So far this one is doing well. I have a few other megablossoms right now but not many. Some varieties produce more megablossoms and hence more giant tomatoes. Two varieties that have the potential of producing giant tomatoes are Delicious and Big Zac. There are other varieties that can produce giant tomatoes too. This one in the picture comes from a Nick Harp tomato seed. His plant grew a 7 lb+ tomato last year and he gave me a few seeds. I call his plants the ‘Harpies”! I have 5 growing right now. Hope this one becomes a monster! Since I’m an organic grower I’ve been feeding it fish and seaweed fertilizer from the Neptune brand.

Wall of Waters for tomatoes

tomatoes in wall of waters-2010

Here are the 35 tomatoes in wall of waters. You can buy them at your local nursery or order them through the internet. They are an invaluable tool for Spring as they act like little greenhouses or cloches to help protect your tender plants from cold nights and the wind.Be sure you fill them up in the morning so they have all day to heat up. Then they will give off the heat at night and keep the plant warm.

To set them up, put a 5 gallon bucket over the tomato (the tomato must fit inside the bucket) then slide the wall of water over the bucket and take a hose and fill up each cell in the wall of waters. When done slide the bucket out and the wall of waters support themselves. If your plant is taller than the wall of water, you can still use it but will need a friend to hold the wall of water as you fill up each cell. Sometimes the wall of water (WOW) can partially collapse under heavy wind. In that case put some bamboo posts inside the edges of WOW to help support it. In a few years, you might get some leaky cells. I take one of my leaky WOW and cut off a good cell and insert it into the leaky cell and fill it up and it works. I only use wall of waters in early spring when it is still cold at night. Be sure to take them off when the plant starts to get crowded inside of the wall of waters, usually in late May or early June.

giant tomato megablossoms

Single blossom on left and double megablossom on right

GIANT TOMATOES-I got my first 2 megablossoms off my Big Zac tomato plants and they are not even in the ground yet. All giant tomato growers are looking for megablossoms. Some varieties tend to produce more than others. Since megablossoms usually come earlier on a plant I will leave these on as I don’t know if I will get more off each plant. A megablossom is at least 2 or more blossoms that fuse together to make one big tomato.  That is why giant tomatoes are so knarley and bumpy. It is kind of like twins, triplets or quadruplets that are all conjoined together. Recognizing these megablossoms is the key to growing giant tomatoes. It doesn’t happen all the time so it is exciting when we get some megablossoms and the potential for a BIG TOMATO.  Since they are made up of many blossoms, oftentimes they abort if they don’t pollinate well.  Most tomatoes are self-pollinating so you don’t have to worry about pollinating them unless you get a megablossom. That is when we should hand pollinate them although I didn’t on these. Using a small soft paintbrush, you can take some pollen off of the stamen part of one blossom and paint it onto the megablossom pistils. Kind of sounds like Luther Burbank doesn’t it?

The top picture has two blossoms-the one on the left is a normal single tomato blossom and the one on the right is a megablossom made up of two flowers. Notice how big it is.

megablossom with three blossoms fused

This second picture  has even more blossoms fusing together. Looks like maybe three blossoms. Starting to look knarley! I’ll see if it aborts or starts to grow into a giant tomato on it’s own as I didn’t hand pollinate them. I will pick off all the normal blossom off of each plant. I might grow 2-4 tomatoes from megablossoms off of one plant. You don’t let all of the normal tomatoes grow so all the energy goes into these potential giant tomatoes. Obviously I am growing these for size and I have other varieties where I let every blossom become a tomato to grow for food.