Mix together and spray on leaves:
- 1 gallon water
- 1/4 cup molasses
- 1/4 cup neem oil
- 1 teaspoon dish soap
Today I taught the Organic Pesticide class and added Disease Control too as we are or will be dealing with pests and disease soon in the middle of the gardening season. The class was great and we had good comments from some of the attendees. I talked about what’s going on the our gardens now and what insect and disease controls we can implement. Attached is the pdf from the class for anyone who wants to know what I do.
ORGANIC PEST and DISEASE CONTROLS
Also attached is the pdf with photos of certain insects that may be attacking our plants now as well. This is in color so it would be a great reference for you to keep when you need to identify a bug you may think is a pest.
I recommended the book, Good Bug, Bad Bug for everyone to get which is a great ID book that will show which ones are good beneficial bugs and which ones we consider pests and what crops they attack. I got mine at Amazon.
Then we walked around the community garden and looked for plants that are being attacked or are sick and I showed everyone the plants so hopefully it will help them go back to their gardens and look at their plants and see what is going on.
Other than the heat, I thought the class was great. Thanks to all 20 of you that attended!
Still catching up on what’s up in the garden. I planted a new bean called Climbing pole French Bean – Meraviglia Venezia that I bought from Franchi Seeds. It’s a Romano type of bean only yellow in color. I wonder what it will taste like. I also planted Emerite french filet pole bean from John Scheepers Vegetable seeds and a Chartreuse leaf colored scarlet runner pole bean which I grow for looks as the bright yellow-green leaves look fantastic against other greens.
Detroit Red beets, Craupadine beets and Atomic Red carrot seeds were planted directly in the garden. I put row cover over all of them to keep the birds from eating the bean seeds and to keep moisture in the ground for the beets and carrots. If you’ve had trouble with birds eating germinating seeds, put row cover over them till they get about 3 inches tall. The Detroit beets and carrots are coming up nicely but the Craupadine beets are not. They are so hard for me to germinate compared to other beet seeds-still I try as I love the flavor of them.
Cucumber seeds planted in 2″ pots in the greenhouse at end of May, have germinated and will go into the garden today-June 15. The varieties are: Poona Kheera cucumbers (best tasting slicing cuke ever-never get bitter), Parisian cucumbers (I will make Cornichon pickles out of them), Boothby Blonde cucumber seeds will become Bread and Butter pickles and National Pickling cucumber seeds which will become dill pickles. Can’t wait to make pickles!
Last year and every year before, I planted cucumber seeds directly in the ground but roly polys ate my cucumber seeds as they germinated last year in the soil. Roly polys, sow bugs, pill bugs, potato bugs are sort of interchangeable names for Armadillidiidae. They are actually good composters of horse manure so they are great in a compost pile but can damage small seedlings as they germinate in your garden when you plant seeds. Last year, I thought it was a cut worm eating all my seedlings, but found the roly polys instead to be the culprits. I had to plant 3x before I could get enough up and only after I sprayed them with Neem did I have success. This year I pre-started them in the greenhouse in 2″ pots to get them a little bigger. I find when seedlings are bigger, the roly polys don’s bother them anymore. They only like the young tender seedlings as they emerge. If they do eat some of my other seedlings that are direct seed planted, they will be toast as I will spray Neem Oil on the roly polys on the soil where they live to get rid of them.
The winter squash varieties I’ve planted are Rugosa Violina Butternut and Waltham Butternut. I grow Butternut squash because it doesn’t attract squash bugs! It’s the winter squash to grow if they are a problem.
I’m also growing ‘Tahume’ Calabacitas squash which is really a winter squash picked very immature-we eat it like summer squash out here in Santa Fe especially in the dish called Calabacitas, which is a mixture of sauteed onions, corn, Hatch green chili and calabacitas squash. I got this from Botanical Gardens seed company. Very yummy!
Summer squash varieties I started are Costata Romanesco zucchini (best flavor ever) and ‘Bennings Green Tint’ patty pan. If I hadn’t had such trouble with the rolly polys last year I would just plant the seeds in the ground and you should too if they are not a problem for you. The soil has warmed up nicely—over 70°F which is perfect for squash seed germination.
Should be done with all veggies planted this week. So if you think you are behind in the garden this year, don’t worry, you’re not alone!
What’s wrong with this zucchini? The one on the left is yellowing and shriveling up. It wasn’t either fully pollinated (some bee didn’t do her job) OR once again it was too hot when pollination happened and it didn’t take hence it is self aborting. Just like tomatoes, all squash likes the heat but not when it is trying to pollinate. The zucchini on the right side of the photo is fine.
I just posted about the squash vine borer and a gardening friend, Gene, mentioned that his squash is smaller than in the video in a comment in the earlier post on squash vine borers. I forgot to mention that while the squash is small before they blossom, I keep them covered with row cover which keeps both the SVB and the squash bugs out but once the plants are bigger and blossoms, we have to take the row cover off for the bees to be able to pollinate them-that’s when we should use the foil.
I’ve been totally busy teaching classes lately and the last class I taught was the Santa Fe Master Gardener Intern Class on Vegetables. All I can say to the interns is hang in there. Yes there are some difficult classes to get through but there are some great instructional classes as well that are like a breath of fresh air. It wasn’t till I became a Master Gardener that I really blossomed as a gardener. And now I am a rabid gardener! The knowledge you will continue to gain afterwards, the contacts, camaraderie and friendships you will develop will help you grow as well as the plants you will be growing! Hopefully you enjoyed and learned a lot from the Vegetable class. (Yes it was my favorite class when I was an intern!) So for those of you who couldn’t come to class or aren’t in the program but are interested, here are the information sheets. I want to make them available to all.
VEGETABLE GARDENING IN SANTA FE gives an overview of vegetable gardening in Santa Fe.
INFORMATION SHEET covers what the differences are between an Heirloom, Hybrid and GMO plant and explains what mycorrhizae fungi is and how it helps plants grow.
HERBS is a list of perennial and annual herbs we can grow here in Santa Fe.
PLANTING TOMATOES and PLANTING SQUASH both address how to transplant them into the garden and some of the things I add to help grow these beautiful vegetables and also how to help thwart the dreaded squash vine borer and squash bugs.
SEED STARTING DATE CALCULATOR from Johnny’s Seeds is the same one from the previous post but if you didn’t read it, then here it is. A great tool for when to start seeds or transplant them into the garden.
And now if you will excuse me, I will continue starting my seeds inside! Perfect day-cold, windy and snowy!
Article first published as The Mystery of the Calabacita Squash on Blogcritics. Story by giantveggiegardener.
As a gardener and a cook, I’ve been searching for a particular squash seed-the Mexican Calabacita. It was the original squash used to make the famous ‘Calabacitas’ dish of squash, corn, onions and green chili here in New Mexico. Most of us now use zucchini to make this savory dish because of it’s availability, but here at the Santa Fe Farmers Market, you can buy the Calabacita squashes in early summer and then by mid summer, they are gone. They are little green squashes with soft skin and teeny weenie seeds-too small to harvest. I researched it and found that the squash originally came from Mexico but not a lot of information is out there on it. No seed catalogs have it. None of my gardening friends have any seeds. I couldn’t find it anywhere.
Then two years ago while on vegetable gardening forum here in Santa Fe, I met another gardener and during the course of our conversation after the forum, the mysterious Calabacitas squash came up. I told her of my difficulty finding the seeds. She told me she had gotten some Calabacita seeds from another farmer whose family had been here for generations. She offered me a few of the seeds. Finally I would get some seeds! So we emailed each other and I sent her an envelope to send me some but they never came. I went by the Farmers Market where she sells produce but we kept missing each other. Another season passed and still no seeds.
This year, on the last day of my season as ‘The Tomato Lady’ at the Farmers Market where I sell heirloom tomatoes, I went by her booth and mentioned maybe I could get some of those seeds for this upcoming season. She said,” Why not buy one of the squashes now?” When she pointed them out, I said, “That’s one of them? It doesn’t look anything like the ones earlier in the season” and she remarked, “Yes that’s one of them. They are actually a type of WINTER SQUASH. We just pick them when they are really young and immature and have no seeds”. That explains it! Why I could never get any seeds from them. That is why we don’t see them later on in summer-if you let it keep growing; it will become a mature winter squash. There were several there at her booth with different colors. Some were green with orange stripes and some were salmon color with green-grey stripes. She said there really wasn’t any difference in the taste. I ended up with the salmon-green striped one. It weighed about 15 lbs and has a squat oval shape outside and lovely orange color inside. It smelled like a cross between a cucumber and a melon.
I got the seeds and roasted the squash. To roast it, I quartered it and rubbed some oil on it and put it on a cookie sheet. Then I added a little water in the bottom of the pan so it wouldn’t dry out. I put it in the oven at 350° and placed some aluminum foil loosely over it so it would not burn. It took about an hour to cook. Afterwards, I put the flesh in a freezer Ziploc and will later cook squash lasagna with béchamel sauce.
So Calabacita squash can be used to make Calabacitas in early summer or later in the fall used in winter squash dishes.
Here is a recipe for Calabacitas from New Mexico:
1 lb or more Calabacita squash or any summer squash, cubed
3-4 ears fresh corn cut off the cob or 1 can corn
1 chopped onion
cumin to taste
New Mexico green chili to taste
Sauté the onion, add the squash and corn and sauté till tender.
Add cumin to taste. Add New Mexico green chili to taste.
Squash bugs are around my squash and pumpkins right now. I go out AT LEAST ONE TIME A WEEK and go hunting for adults, nymphs and eggs. I know the ADULTS LIKE TO HIDE DOWN AT THE BASE OF THE PLANT or underneath the leaves. I take the hose and spray the whole plant and at particularly at the base which is covered in straw. The adults come running up the stems of the leaves to escape the water. Then I pick them off with my hand. I hate handling bugs barehanded so I use gardening gloves. I either squish them on the ground or put them in a bucket of soapy water where the adults drown. No mercy.
I then look at EACH LEAF of the plant to see if there are any EGGS ON THE UNDERNEATH SIDE OF THE LEAVES, usually in the “v” where the veins form. If I find them, I either tear off the whole leaf (if I have a lot of leaves) or I tear out just the section that has the eggs and put them is a bucket of soapy water where they will smother. THE EGGS WILL BE DARK LIKE ROOTBEER WHEN THEY ARE READY TO HATCH, so get them EARLY.
I also look for the GRAY NYMPHS WHICH ARE USUALLY UNDERNEATH THE LEAVES OR ON THE STEMS. If I find a few I squish them. If I find a lot, I take the whole leaf off because they are fast and I can get them all. Then I put them in the soapy water.
Squash bugs go from EGGS TO NYMPHS IN 7-10 DAYS, so we should look for eggs about every 7 days to catch them from turning into nymphs. I do this on the weekend when I have more time. The squash bug PRODUCES ONE NEW GENERATION EACH YEAR but of course if each squash bug lays 15 eggs on each leaf they chose to deposit their eggs on, then all those newly hatched nymphs will lay more-but not this year. The nymphs will grow into adults this year but will not lay eggs. They will overwinter and lay their eggs next year.
So my thinking is if you get the adults now and the eggs now, then next year you should have way less squash bugs (I’m assuming we might miss a few) and of course if we get them all, in theory we should have none next year.
I keep my plants covered early in the season with row cover until they flower but now that they are flowering, I must uncover them so the bees can pollinate them. The key is to be REALLY DILIGENT ABOUT FINDING THEM BEFORE THE EGGS HATCH. After they hatch you can easily be overcome by the nymphs. Most people don’t keep up on the inspections and then the problem magnifies tenfold-so keep up on them. The hunt is on!
Some people spray Sevin on the plants. I prefer to go organically, so if I get a major problem, I would use Neem which is somewhat helpful but picking them off is the best way to control them.
All pictures courtesy of University of Minnesota. For more info on squash bugs, go to their site: http://www.extension.umn.edu/distribution/horticulture/M1208.html
Here are some pictures of the giant pumpkin patch taken on July 4th. There are also 1 greenie squash and 2 giant marrows in the patch so I think it’s gonna get crowded in there. I hope I have a sea of green by August!
Here is the overall view of the pumpkin patch from the road.
I have the low tunnels propped up so I can work on the giant squashes. Kind of like opening a car hood! I took off the row covers for pictures.
The giant pumpkin plants are doing well-they are just coming out of their low tunnels. Here is the 895 Grande plant with the low tunnel off.
Some of those big leaves are 18″ across. I just love this pumpkin plant. It’s sister seed took the NM State record last year. The leaves are much bigger than the 1048 Grande.
Here is the 1048 Grande. It’s leaves are smaller but they say leaf size has nothing to do with pumpkin size. Is that like the shoe size argument?!
I saw my first female flowers on the 895 Grande pumpkin plant on the end of the main vine. Isn’t it beautiful! The only issue is it is only 7 feet out from the stump. I should wait to pollinate until it reaches at least 10 feet out but may not. We do that to allow the plant to develop more leaves behind the future pumpkin-more leaves-more food. Lot’s of times we pollinate many pumpkins and then cull the smaller ones so I think I will do that. Notice the oval shape of the possible baby pumpkin.
The only problem is the male flowers that are there are also very small and they usually bloom before the girls even show up. The boys are always the first to arrive at the pumpkin blossom party and usually the girls show up later. It’s ok because my first pollinated pumpkin flower last year was July 27 so perhaps I will be ahead of that date which is important because it will give me more days to put on more pumpkin weight.
Here is the greenie-The greenie looks just like any giant pumpkin plant but the fruit will be green. It is doing well. I saw a really small female flower with the potential baby green fruit. The seed came from 2007 so I was surprised it even germinated The plant looks fantastic. Just goes to show that you can’t always listen to the folks that say get rid of your seeds after 2 years old.
Here is the 78 marrow-kinda bushy. Very different than the other marrow in the patch.
This is the other giant marrow that came from my last year’s plant. I’m very suspicious of this one as it doesn’t look quite like the other marrow above which I know is pure in strain. Mine was pollinated by the bees and so it could of crossed with one of the winter squashes last year. It will be interesting to see what the fruits look like on this one later on!
I also saw one squash bug (which ended up under my shoe) and some eggs on the underside of 3 leaves. I just took off all those leaves that had the eggs on them and put it in a bucket of soapy water-goodbye eggs. I will plant some onion sets in their wells to help deter them and I will probably have to keep the pumpkin plants covered with row cover. I will be on the lookout from here on out.
I get a lot of questions about how to control squash bugs. They are a veggie gardener’s nemesis. I have read and tried several things and think a few help. Here’s a list of things you might try to control squash bugs and squash vine borers.
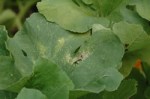
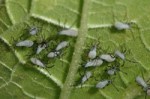
Squash bugs
Squash bugs attack both summer and winter squash. They pierce it and suck out the juices. If left unchecked, they can take over and destroy the plant. The key to control is catching them right away. Here are some thing s to try:
-Plant onions around squash to help repeal them. I planted little sets around the squash last year and I got a few but not a lot. Very controllable.
-Make an onion spray to put on leaves. Fill blender with water and add a couple of onions. Blend onions and let them sit overnight. Strain onions out and put in sprayer to spray squash plants.
-Put row cover over young plants till they flower, then remove so they can get pollinated.
-Hand pick every 7 days and remove eggs, nymphs and adults from leaves. Put in bucket of soapy water. Then cover plants again with row cover. Squash bugs life cycle from egg to nymph is 7-10 days so keep ahead of them.
-Spray Neem Oil on squash when you have to keep them uncovered for pollination. Neem is an effective repellant.
-Plant late like the first couple of weeks of July-you may miss their lifecycle.
-Rotate squash into different beds, They may not find you. First time squash growers generally get the first year free of squash bugs. Afterward the bugs find you and the battle is on.
Squash Vine Borer
This bug is not suppose to be west of the Rocky Mountains and yet it has been seen around here damaging and killing squash plants. It likes to bore into the main stem around the base of the plant to lay its eggs which then turn ito larvae inside the vine and eat it from the inside. Look for sawdust like particles around base if plant suddenly wilts. You can try to slit the vine parallel (not across it) and dig out the grub and then tape the wound shut. It may survive. Here are some things to try:
-Once again cover them until pollination needs to happen.
-Wrap aluminum foil around the base of the vine for about 12 inches to keep them from attacking it.
-Also bury the vine with dirt or mud covering the main vine.
So someone asked me, ‘Hey Jannine, how come we haven’t heard about your giant vegetables yet?” Well, I’ve sort of been preoccupied with getting the tomatoes in the ground lately but all the giant vegetables are still in the house all cozy under my gro lights just waiting to go out. We still have some cold nights ahead in the next few nights so I want to wait a little more. Also all my peppers and eggplants are still inside as well as they HATE being cold more than tomatoes do. One cold night can stunt a pepper plant all season so I suggest you protect them with something the next few nights if yours are already out.
But back to the giants-I have 2 giant pumpkins, one giant ‘greenie’ squash, 2 giant marrows (think supersized zucchini), 1 giant pear gourd, 2 long gourds and 6 giant tomatoes. I’m shooting for next week to get them out. Don’t worry, I’ll be talking alot about giant vegetable how-to’s once they get going. Here is what I still have to do for the GIANTS:
I still have to do a final mixing of my soil and add some amendments in the giant vegetable patch I have.
I still have to get out my low tunnels for the giant pumpkins and greenie to go under to protect them from our intense sun and cold nights.
I still have to build a super tall arbor for the long gourds which can get as tall as 109+ inches. But I can still get them in the ground and build the arbor around them. If you build it, they will come!
I still have to create the drip system for a new giant tomato bed.
I still have to do a drip system for the GIANT VEGETABLE PATCH
I don’t know where the giant pear gourd is going yet! I think Bri’s GIANT VEGETABLE PATCH (named after my beautiful horse Bri who is no longer with us) is going to be really full this season!
Have you ever planted winter squash and it grew in a direction you didn’t want? Here is a good tip for how to tell which direction a vining winter squash (versus a bush variety) will grow. I will use my giant pumpkin as an example but any winter squash that is a vining squash will act the same.
Let’s say you plant some vining winter squash next to a wall or on the edge of a garden bed and you need it grow away from the wall not into it or into your squash bed not out of it (good luck on that one!) When the plant puts out the first two leaves as I have described in previous posts, these are called the cotyledon leaves (baby leaves) and don’t look like any of the other leaves it will grow afterward. All leaves after the cotyledon leaves are called true leaves.
Sooo pay attention to that FIRST TRUE LEAF. The plant will GROW IN THE OPPOSITE DIRECTION FROM THE FIRST TRUE LEAF. If I’m growing them inside for a head start, it is easy to mark the container as you will not remember which one was the first leaf (trust me!) when the second one appears. I just take a marker and mark the opposite side of the pot so I know when I transplant it into the ground which direction I orientate it. If I grow directly into the soil, after the first true leaf appears, I gently dig up a big amount around it and gently lift it and the dirt so as not to disturb the new roots and rotate it in the direction I want it to grow. For those who are growing their winter or summer squash seed in the ground, it is too early. Wait till May 15th (our first frost free date) to plant directly into the ground when the soil and weather are hopefully warmer.
The giant pumpkins and greenie squash germinated and are looking GOOOD! I planted the seeds on April 7. The first one up was the greenie on April 12, then the pumpkins followed by April 14. The cotyledon leaves (very first leaves to appear or baby leaves) are huge. My all star lineup so far is:
Giant Pumpkins: 1046 Grande 10, and another 895 Grande 08 (which became my New Mexico State Record for giant pumpkin last year)
Giant greenie squash: 903 Noel 07
They are in 4 inch peat pots on a plant heating mat in a light box and I just see the beginning of the first true leaf on the pumpkins and greenie. Looking good so far! Grow naguas, grow!
I planted all the seeds for my ‘All Star Lineup’ of giant pumpkins, giant marrows and also new this year is a giant ‘greenie’ squash (think green pumpkin) and 2 long gourd on last Thursday, April 7.
-For the pumpkin and greenie (giant green squash) seeds I filed the edges just a little so the seed can absorb water more readily to help it germinate. Then I planted them in a 4 inch peat pot about 2 inches deep pointed side down. For the Giant Marrow I just planted the seed point side down.
-I put all of them on the plant heating map to keep the soil warm for germination. They are in the light box and get watered every day. Hopefully they will all germinate.
I’ve been collecting some of the seeds that I want to replant for next year-rattlesnake beans, giant marrow, Japonica corn, giant pumpkin, scarlet runner beans, sunflower seeds, tomato seed from my 2.11oz tomato, cosmos, and zinnas. Ones I won’t take are cucumbers, most tomatoes, zucchini, winter squash, and peppers as I grew several of the same varieties and they could of crossed and I might loose the original strain.
When saving big seeds like squashes or pumpkins, be sure to thoroughly DRY the seeds before putting them in a zip-loc baggie or jar. Any hint of moisture will ruin them. I just put the cleaned, wet seeds on a piece of wax paper on a cookie sheet in a dry sunny place until dry. That way they will release from the wax paper after they are dry. I always like collecting seeds every year. It’s fun when you plant them the following year. It’s also fun when you don’t have to buy a packet of seeds for $2.49 with 20 seeds in them when you can collect the same seed and get 100’s more. I have a friend (Fran) who walks and collects the wild flower seeds and broadcasts them on her property and the her natural garden this year looked awesome. (Did I tell you that Fran?!) Awesome!