Borlotto Beans

Borlotto beans in the garden

Last season I planted a new dry pole bean called Borlotto  (also called Borlotti). They are an Italian heirloom variety. The variety was Lamon which is supposed to be the best for flavor. It got around 6 feet high and I grew it in the garden on one of the 3′ high perimeter fences. As it got taller, I added bamboo stakes to let it continue upwards. They are a very beautiful bean on the vine when growing. I planted around 12 plants, 6 inches apart right at each drip emitter. You can shell the bean fresh but I just left them to dry on the vine.  I got my seeds from Seeds of Italy.

I particularly like dry beans. I picked them after they dried on the vine which is towards the end of the season but before the first freeze. I find dry beans are so easy to grow, needing nothing except water and a vertical support of some kind and then harvesting at the end. They are very different then fresh beans which you must pick daily. There is also a bush variety of these beans but they are not Lamon.

I left them in their shells in a basket until last week when I took the beans out.  I find it fun to shell them on a cold winter night. The beans are very beautiful being cream color with maroon stripes. I got 3 cups of the precious bean. Good for 1 meal.  I will save some to replant too. This year I will definitely plant more.

Tuscan Bean Soup recipe from Ialian Food Forever

I like that I can make a hearty soup or stew from them and eat them in the winter. Here is a recipe from Italian Food Forever for a traditional Tuscan bean soup using Borlotto beans. When cooking the beans before hand, you must cook for a long time here in Santa Fe due to our high altitude at 7000 feet as you want them soft and creamy. I just cooked mine in a crock pot all day and it worked well. You can also leave out the pancetta for a vegetarian style soup. There are many recipes for Borlotto bean soup out there that all sound wonderful! Can’t wait to try them.

Hard Boiled Eggs-Not!

eggs steaming

I just read about a new way to ‘hard boil’ eggs which doesn’t really entail boiling them at all but instead you steam the eggs. Why would you want to steam them? Well, have you ever had hard boiled eggs that were hard to peel? The reason eggs can be hard to peel is because they are the fresher eggs. The fresher the eggs, the harder to peel. But when you steam them with the pointy side down and the fat end pointed upward, they peel perfectly every time. Just put them in a pan with your steamer and water underneath and lean them against each other so they stay upright and steam them for 20 minutes, then rinse them in cold water. I also mark my eggs so I know I ‘hard boiled’ them if I put them back with the other eggs which I’ve been known to do but without the markings. Then it’s a guessing game! I have chickens that lay every day and since I’ve been steaming them, they are now always easy to peel. No more frustration when peeling eggs.

Kale

winterbor_russian red kale

Russian Red Kale on left and Winterbor Curly Kale on right doing well with the cold nights

This year I grew 3 different varieties of kale-above is the Russian Red and Winterbor Curly kale growing together

lacinto kale

Lacinto kale (also known as Dino kale) It is the dark green in front of grape vine

Here is the Lacinto being shaded by the grape vine with carrots growing in front

Of the 3 varieties, Winterbor Curly Kale is my favorite and it is the most cold hardy. I started growing them the last week of July just before the Home Grown New Mexico Tour I was on. I had some holes in the garden so I ended putting some kale there. The Lacinto was partly shaded by a grape vine so it did not receive full sun. The Lacinto got heavily attacked by aphids. I sprayed all of them with water to help keep the aphid numbers down. But the Russian Red and Winterbor were planted elsewhere in the garden. I put them next to some tall tomato plants on one side and some tall sunflowers on the other side so they never got full sun either. They do well in our hot summers with some partial shade. They were not attacked by aphids. All three are still doing well. I’m not a great fan of kale so I’ve been looking for recipes that make me want to eat it. Here’s one wonderful way to eat it.

Kale Chips– you can use any variety of Kale to make this. This is now my favorite way to eat kale-dried! Kind of like potato chips but way more nutritional. Here’s a great simple recipe.

Kale Chips recipe courtesy of http://www.somastudio.net/2013/02/crispy-kale-chips/

Crispy Kale Chips
This kale chip recipe is easy to make and is so tasty you’ll want to make a double batch!

Ingredients:
2 big bunches of kale
1/2 cup raw tahini
1/4 cup olive oil
1/4 cup wheat free tamari
1/4 cup raw apple cider vinegar
1/4 cup nutritional yeast
2 cloves garlic
1 teaspoon onion powder
1 tpsp maple syrup
optional 1 tsp of chilli flakes

Instructions:
Rinse, de-rib, and rough tear the kale into a giant bowl.
Put all the other ingredients into a food processor or blender and mix until smooth or use a hand blender
Pour the mixture over the kale, and use your hands to toss it all together. Squish Squish! Get it good and covered.

Oven method:
Spread the kale out evenly on lined or oiled cookie sheets. You want them to be as ‘dehydrated’ as possible, instead of baked.  250º for 4 hours (ish). Every oven is different so you’ll need keep an eye on it and be your own judge. Just remember that too much heat will change the flavor.  Don’t overcook them!

Here is the recipe in PDF format for printing:
Kale Chips recipe

___________________________________________

MORE METHODS

Dehydrator method by http://www.giantveggiegardener.com :
Spread the kale out evenly on the dehydrator trays. Set temperature 115°F° or lower for about 4 hrs or more. Chips should be dry and crunchy when done. Every dehydrator is different so drying time may vary. This is still considered raw food done this way.

Raw food is food that is dehydrated at 115° F or lower to be the most nutritious and not lose vitamins. Above that and you start losing the nutritional value.

Here is some visuals of the process:

kale_squishing

Put cleaned, dry kale in bowl with the recipe ingredients below and squish with your hands so kale is well coated.

kale_putting on trays

Put on dehydrator trays

kale_drying

Dried Kale chips

kale_dried in jars

Store in jars or zip-loc baggies-I like storing in jars as the pieces don’t break up so much.


.


Amy’s Tomato Salad

tomatoes in sherry vinaigrette

I don’t know about you but I still have a lot of cherry tomatoes that I picked the other day. I love to serve them as a tomato salad in a sherry vinaigrette. It’s divine with the sweetness of the cherry tomatoes. A friend of mine, Amy Hetager, who is no longer with us was kind enough to share it with me.  I call it Amy’s Tomato Salad. Here’s the recipe below.

Amy’s Tomato Salad (Cherry Tomatoes in a sherry vinaigrette)
2-1/2 lbs tomatoes cut into same size or cherry tomatoes
1/2 cup red onion, thinly sliced
2 shallots, thinly sliced
1/3 cup fresh coarsely chopped herbs (basil, parsley, marjoram, whatever you got)

Toss everything together with the sherry vinaigrette below. Let it sit for a few hours before serving.

Sherry Vinaigrette Dressing
This is good on fresh kale salads too
1 garlic clove
3/4 tsp Kosher salt
1-1/2 TBL lemon juice
1-1/2 TBL sherry vinegar (this is sherry vinegar, not sherry wine)
1-1/2 tsp Dijon mustard
1 tsp sugar
black bepper
6 TBL extra virgin olive oil

Blend or shake it all together so it emulsifies before pouring over the tomatoes.

Here it is in pdf format for printing:
Amy’s Tomato Salad


Tomato tapenade


tomato tapenade all tomatoes

Being the Tomato Lady I have lots of tomatoes. One of the things I’ve done with my tomatoes, especially my older ones is making tomato tapenade. It’s easy to do and is so yummy you’ll want to make more with any tomatoes you can get your hands on at this time of year. The picture above I have mixed up all kinds of tomatoes.

1. Preheat the oven to 300°F

tapenade beginning

2. Take a cookie sheet and cover it with a big sheet of foil to protect your cookie sheet. Don’t try to piece two pieces together, it won’t work. The tomato juices will leak between the two pieces and what a mess it makes. I first tried it with parchment paper underneath and it was worse so don’t try that either. I learned the hard way and ruined a cookie sheet. Then I spread some olive oil on the sheet so the tomatoes don’t stick and cut my tomatoes in half and put them on the cookie sheet.

3. Put salt and pepper on the tomatoes and crush up some garlic (lots) and put that on top of the tomatoes.

red tomato tapenade

4. Put fresh thyme on top of the tomatoes.

sauteed onions

5. Then (this is optional but so good) Slice an onion or two and saute it in olive oil until soft and carmelized as above. Then spread the onions on top of all of it. Now I have made this both with and without the onions and it is definitely better with the onions but is really good without it too if you want to save more time.

yellow tapenade with garlic and thyme

6. Drizzle some good quality balsamic vinegar and then a little olive oil over it as well.

7. Cook and check often till soft and slightly caramelized. I start with half an hour and then keep checking every 15 minutes till done. Should take between 1-2 hrs if your tomatoes are bigger or juicy. There will be some black on the edges and that’s OK but watch closely as it gets closer to done as it can overcook quickly and the whole thing could burn black. A little black good, a lot of black bad. I scrap off the tomatoes (skin and all) off the foil and viola its done! I don’t puree it as I like it chunky and the skins are soft enough that you don’t even notice them.

8. I make some crostini out of some french bread toasting the slices till slightly crisp on the outside.

9. Then I spread some chevre goat cheese on the crostini and put a spoonful of the tomato tapenade on top. Sometimes I put a Kalamata olive on top, sometimes not. Divine!

Two cookie sheets makes about 2 cups of the tapenade. Refrigerate for immediate use or freeze or preserve it using a canning method for longer storage.


Rhubarb-Raspberry French Galette

I made a French galette the other day. Thinned out the rhubarb in the garden and got some raspberries from the market although it is great with strawberries too. A galette is like a pie only you don’t have to be so careful about putting the dough in a pie tin and you can put almost any fruit for them. Here’s how I did it.

galette

First I cut about 2 cups rhubarb from the garden (cut leaves off-use only stalks) into 1-2 inch pieces and added 1 tablespoon lemon juice and lots of sugar because rhubarb is so sour (about 1 cup). The variety of rhubarb in my garden is called Victoria, a green variety although there are many other varieties. Then I added 2 tablespoons flour and stirred it up in a bowl. Lastly I added 1 cup of raspberries and gently folded them in to keep them intact.

galette_dough ready to roll out

Make the dough. I use Debra Madison’s recipe from ‘Seasonal Fruit Desserts’. The recipe makes the lightest flakiest crust I’ve ever made.

galette_roll dough on cutting board

After refrigerating it for about 30 minutes, I roll it out thin approximately round or oval. This is what I love about galettes – you don’t have to be perfect in its shape. Kinda like a farmhouse pie.

galette_picking it up

Now transfer the dough to a cookie sheet that has parchment paper on it (to keep from sticking)

galette_rolled out

Here it is ready for the filling.

galette_ready to cook

Put the rhubarb-raspberry mixture in the middle and fold up the sides. Sprinkle crust with a little sugar. Bake for about 50-55 minutes at 375°F. Check it often. If you see it starting to burn, cover it loosely with foil to keep crust from burning.

galette_final

I couldn’t even get a picture before it was half eaten!

Homemade Fresh Pesto

add basil leaves

Pesto is a such an easy thing to make and is so delicious that I don’t know why more people don’t make it. This summer I made fresh pesto with my mini food processor which I then froze for later use. I put some on pasta the other night and all the flavors of that fresh basil burst in my mouth just like when I first made it.

To make fresh pesto you can either grow your own plants or buy plants to use. I cut off all the leaves except the biggest to use in pesto. I keep the bigger leaves to add when making a pasta sauce to cook down. I do not use the flowers if there are any, as I think they give the pesto a slightly bitter taste.

fresh basil leaves soaking

Soak leaves for 15 minutes

I use Italian or Genovese basil to make my pesto and after I cut the leaves off, I soak the basil in bowl of water to freshen it up for about 15 minutes.

Blend salt. pine nuts, and olive oil

Blend salt. pine nuts, and olive oil

Put olive oil, sea salt, pine nuts, and garlic cloves into a blender or food processor and blend well.

Add drained basil leaves

Add drained basil leaves

Drain your basil leaves and add them and blend till smooth and creamy. If the mixture is really thick add more oil a little at a time till smooth. It should not look like thick chopped spinach but be a little thinner and smooth consistency!

Add parmesan cheese

Add parmesan cheese

Then add the grated cheese and blend again. Notice how it is finely grated and light and fluffy.

Finished pesto ready to freeze for later use.

Finished pesto ready to freeze for later use.

I like to put the finished pesto in freezer bags, taking as much of the air out of the bag as possible. Then lay the bags flat in the freezer. Be sure to not add too much to each bag as you want it thin enough to break off chunks of it later to use with your pasta. Above is the finished pesto ready to freeze. Here is the recipe:

FRESH BASIL PESTO
INGREDIENTS
1/2 extra-virgin olive oil (give or take a little) use a good grade
1/4-1/2 tsp coarse sea salt ( I use less as the cheese is salty)
1/4 pine nuts
2 garlic cloves
3-4 cups fresh Italian basil
1/2 cup Parmigiano-Reggiano Parmesan cheese, finely grated

Put olive oil, sea salt, pine nuts, and garlic cloves into a blender or food processor and blend. Drain your basil leaves and add them and blend till smooth and creamy. If the mixture is really thick add more oil a little at a time till smooth. It should not look like chopped spinach but be of thinner consistency! Then add the grated cheese and blend again. If you are not going to use it right away, put it in a bowl and add a small amount of oil on top of it to help keep the pesto from oxidizing.  This won’t hurt the flavor but will turn the pesto into a shade of Army green instead of its bright beautiful green color. I like to put it in freezer bags, taking as much of the air out of the bag as possible and lay it flat in the freezer. Be sure to not add too much to each bag as you want it thin enough to break off chunks of it later to use with your pasta. Never microwave the frozen pesto to soften it. I like to put it in a bowl on top of the stove (next to the pot of boiling pasta) where it will start to soften up. Then after I drain the pasta, I pour it over the pesto. The hot pasta will melt the pesto, then toss it to coat all the pasta evenly.  Add a little grated Parmigiano-Reggiano on top and enjoy.

Make tomato sauce the easy way!

2tomato sauce-making sauce

By now you’ve probably finished harvesting and making your tomato sauce but I have to share how I do it.

I grow many tomatoes each year and make LOTS of tomato sauce as a result. But canning it doesn’t happen until late fall after harvest season is done.

I use to make it the old fashion way of putting the tomatoes in boiling water until the skin splits, then putting it in ice water to stop cooking, then peel off the skin and squeeze the tomatoes and juice in bowls to freeze. Tiring—very tiring and it takes lots of time.

Now I make tomato sauce the easy way. I finally got a food strainer (sometimes called a food mill) that separates the skins and stems from the pulp, juice and seeds making an uncooked tomato sauce in record time.  My food strainer is from Victorio. It comes with one screen that is fine mesh. I also got the salsa screen because I want my sauce thicker. I can process about 20 lbs of tomatoes in 10-15 minutes. But let’s start from the beginning.

1tomato sauce-tomatoes ready

First you’ll need some tomatoes. Good and imperfect blemished tomatoes are perfect for making sauce. These had hail damage but tasted good.

4tomato sauce-tools

Here are the tools-a plunger to push to tomatoes through (comes with the food strainer), a ladle, and a serrated knife to cut the tomatoes in chunks to fit in funnel. This process is messy so cover your table!

3tomato sauce-putting tom in mill

Cut up and put the tomatoes in the food strainer funnel. No need to take off skins, the strainer will do it for you.

5tomato sauce-partially done

Here is some sauce partially done. The food strainer has separated the sauce out into this green bowl. You crank the handle and push the tomatoes into the funnel using the red plunger. The strainer reminds me of a meat grinder except it grinds up tomatoes instead. It also can be used to make grape juice from grapes and applesauce or apricot sauce.

6tomato sauce-skins out

The other side of the food mill spits out the skins. I also cut off the stems shown in bowl. The chickens will love getting this bowl!

7tomato sauce-finished in bowl

Here is the bowl full of rich raw tomato sauce ready to bag with more tomatoes in the background ready to make sauce.

8tomato sauce-in bag

I put about 12 cups of raw tomato sauce in a gallon size freezer bag. I don’t like to overfill them. I also squeeze out the air while I ‘zipper’ them up. Be sure you zipper it well or it could leak out when you lay it flat.

9tomato sauce-finished in bags

Here is the raw tomato sauce—bagged and ready to freeze. Notice I have different colors of sauce coming from different colors of tomatoes. Later I either cook the bags of raw sauce up for a recipe or I end up canning them when my freezer is too full and I’ve recovered from harvest season!

Tarbais bean/cassoulet part 2

cassoulet

Cassoulet is a hearty winter dish which was originally created by poor farmers or peasants in southwest France. Only god knows what the rich and royal were eating if this is what the peasants ate cause this is very rich! There are different types of cassoulets in France depending on the region you live. Some cassoulets made in mountainous areas might have lamb as their main meat, others close to the sea would have fish and the most famous cassoulet is made with duck but no matter, they all used the Tarbais bean (pronounced Taar Bay) as a main ingredient to make this famous dish. To find out more about my experience on growing Tarbais beans go here. I made cassoulet with duck and my Tarbais (cassoulet) beans that I grew.

Cassoulet is slow cooked in a ceramic dish called a cassole which is a basically a covered ceramic casserole dish that can go in the oven. It traditionally is made with sausages, pork, duck confit and Tarbais beans-not for the faint of heart and I mean that literally!

So on with making a cassoulet with duck. Don’t be in a hurry cause it takes several days to make this dish-yes I said days—like as in 3 days!

First, Whole Foods ran out of duck confit, so I had to go online and learn how to make it myself which was a blessing as duck confit is very expensive and evidently not as good if you don’t make it yourself. There are many recipes on the internet but here is the recipe for both the Duck Confit and Cassoulet that I use from: Cassoulet by Anthony Bourdain and Michael Ruhlman as presented by ‘The Daring Kitchen’: http://thedaringkitchen.com/recipe/confit-cassoulet . Here is their recipe as a pdf – Confit_Cassoulet_Jan_2011 which is helpful to print out as your computer will run out of juice before you can finish making the recipe in 3 days!

I wouldn’t want to go to all this effort all the time but once a year in the winter is great. Plus I did not line the ceramic pot with pork rinds-just seemed like overkill to me (literally).  Now don’t worry they also have several different versions of cassoulets at the link above for the more heart healthy conscious (like chicken confit in olive oil and vegetarian cassoulet) but I thought I’d try an original version once! Next time I will exchange the pork with smoked turkey necks (which taste like smoked pork) and the different pork sausages with turkey sausage versions as it has sooo much fat.

What was once a poor man’s dinner is now very expensive but oh so good. I like to eat this hearty winter dish on a cold winter’s night with a glass of red wine by the fireplace. I think the red wine cuts the fat, or least that’s what I tell myself!

Tarbais bean/Cassoulet Part 1

Here is what Tarbais (pronounced Taar bay) beans looks like on the vine and closeup, after dried but before shelling and when shelled in jars. I like to cook and wanted to learn how to make a french dish called ‘Cassoulet’ last year (2012) and had a heck of a time finding this particular bean that hails from France where I would have to pay $34.00 an ounce for heirloom Tarbais beans ! That’s because our USDA and the cost of their inspections drives up the price to get them into the US. The ones to grow can be different from the beans to eat. The ones you can purchase to eat might not be a true heirloom, mixing genetically with other beans but they will taste the same unless you try to grow them out.  The heirloom variety were not in any seed catalog last year but I finally found 4 people who offered their heirloom seeds through Seed Savers Exchange (SSE) in their Members Catalog ($4 for shipping only) and each gave a lot of beans (30+). Well worth joining because 1) you are supporting growing heirloom seeds and 2) many people grow unusual vegetables and offer their seeds through SSE. They were the only ones who had them in 2012 in the US. This year (2013) I saw them offered at Baker Heirloom Seeds in their catalog and got more although now I have my own supply of them as well.

tarabais and navy bean

Navy bean (top) and Tarabais bean (bottom)

So what’s so special about the Tarbais bean? I probably could have used a white Navy bean but I read that the Tarbais bean is slightly bigger and becomes creamy without disintegrating and becoming mushy like many other beans do and I wanted to be authentic and grow out that variety of bean.

The Tarbais bean originally came from the village of Tarbais, in southwestern France and is used in cassoulet dishes. Tarbais beans were developed by generations of farmers that lived in that area. The Tarbais Bean in 2000 obtained IGP status (Indication of Protected Geographical Origin). Only members of a small, closed cooperative in Tarbais are allowed to use that name for their beans, and production is tightly regulated. The original seed is a New World runner bean (Phaseolus coccineus) and most think it originated in Mexico.

That’s one of the great things about growing your own vegetables-you can grow something you might not find in the grocery store. That doesn’t mean it will taste exactly the same as where it originated from (like I doubt a New Mexico chili grown in New Jersey would taste the same as our conditions and soil are very different) but at least I could try. The beans are grown like any pole bean that you are going to leave on the vine until dried. They were harder to start as the birds liked the ‘bean sprouts’ when they popped up so I had to replant several times and cover them with row cover to protect them until they were about 3 inches tall. After that it was a breeze. Just water them regularly. They will produce many pods that you just leave on until fall when they dry on the plant.

Part 2 of this will be the about Cassoulets and the recipe I used.

Fresh Pumpkin Recipes

pumpkin interior

Now that the 5th Annual Pumpkin Bash is over, what can we do with our fresh pumpkin pieces? Here are some ideas.

pumpkin steak cooked

One recipe I love is ‘Pumpkin Steaks’. You can find the recipe here: https://giantveggiegardener.com/2012/11/05/pumpkin-steaks/

pumpkin soup2

Here are 3 great pumpkin soup recipes you can find here: https://giantveggiegardener.com/2010/11/21/3-great-pumpkin-soup-recipes/

512px-Pumpkin_Pie_from_a_*real*_pumpkin,_November_2007

Of course no pumpkin recipes would be complete without a pumpkin pie recipe but this one is for FRESH pumpkin:

FRESH PUMPKIN PIE

1 unbaked pie shell
2 c. freshly prepared pumpkin
1  can evaporated milk
3/4 c. sugar
1/2 tsp. salt
1 tsp. cinnamon
1/2 tsp. ginger
1/4 tsp. nutmeg or allspice
1/8 tsp. cloves
2 eggs, beaten slightly

To prepare fresh pumpkins:
Use small to medium size pumpkins OR really giant ones like I do! Cut pumpkin into quarters or big pieces. Whatever will fit on a cookie sheet. Leave rind on. Put a little oil on cut edges to keep from drying out. Place cut edge down on foiled lined cookie sheet. I put foil loosely on top to keep edges from burning.  Bake at 350° for about 30 min-to over an hour depending on thickness. Pierce frequently with fork to check for tenderness after at least 30 minutes. When fork pierces meat easily, remove from oven. Cool first and then scoop out meat and drain in colander for about 30 minutes to release extra liquid. Then use wand, blender or food processor to puree. Use fresh or freeze in Ziploc freezer bags for later use. I like to freeze in 2 cup increments which is exactly what the recipe calls for!

To prepare fresh frozen pumpkin meat:
By now, if you are like me, you have some pumpkin you prepared as above and froze it. All I do is defrost it and if still a little watery, let it drain a few minutes then follow directions below.

Pumpkin Pie Filling: Preheat oven to 425 degrees. Mix the 2 cups of fresh pumpkin with rest of the ingredients. Pour into pie shell. Bake 15 minutes at 425 degrees. Reduce heat to 350 degrees and bake another 45 minutes or until an inserted knife comes out clean. If edges of crust start to turn too brown or burn, make a ring out of foil and put on edges of the pie crust.

The runaway

giant marrow 08-10

A BIG runaway! DISCLAIMER: This one is way too big to eat! I entered this in 2010 in the State Fair instead!

At this time of year if you’re a vegetable gardener, you’ve experienced it—zucchini runaways. One day you go out and see this cute little zuke and think I’ll give it one more day and the next day you go out and it grew into a baseball bat. It’s like overnight it got on some steroids and went ballistic.  Now it’s too big so what do we do with them besides hide them under the bed in case an intruder comes in? Well you could use them as door stops or take them to the fair but here are 4 ideas to eat them!

Savory Zucchini Pancakes
Take 2 cups of grated zucchini, add two beaten eggs, 2 tablespoons of flour, and 2 teaspoons of some fresh herb you have and 1 cup feta or mozzarella or cheddar or whatever cheese you have (please, no Velveeeeeta). If you want more, then just up the ingredients like 3 cups zucchini, 3 eggs, 3 tablespoons flour, etc. Just don’t up the herb, keep it at 2 tsp so not to overwhelm the flavor of the zucchini (what? zucchini has flavor? Yes, at least two varieties do – Costata Romanesco and Benning’s Green Tint (not a zucchini but a delicious summer squash). All the others, in my opinion, are worthy of either the compost pile or the chicken coop or both) Then saute them in olive oil until brown on both sides. This is my favorite way to cook super-sized zucchini.

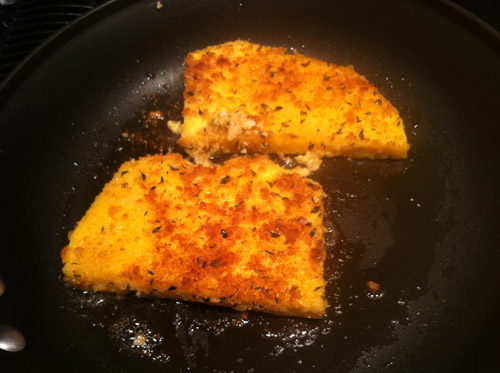
Garlicky Zucchini Medallions
Slice them into medallions and saute them in olive oil with some crushed garlic cloves until tender in a BIG fry pan. Sprinkle lightly some red pepper flakes and add fresh grated Parmesan cheese on top and cook a few minutes more till melted. This is also great with a little left over spaghetti sauce drizzled over them.  (Can you really drizzle spaghetti sauce. No—but you get the idea-don’t drown them.)

Zuchinni Soufflini (This one comes from my mom-thanks mom!)
1 1/2 lbs zucchini
1 large onion, chopped
3 TLB butter
1 cup shredded cheddar cheese
1 tsp salt and 1/4 tsp pepper
2 beaten eggs
1 1/2 cups soft bread crumbs
2 TLB butter

Cook squash whole for about 5 minutes in boiling water. Cool. Dice into cubes. Saute’ onion in 3 TLB butter and add to zucchini. Stir in cheese and seasonings and allow mixture to cool before adding beaten eggs. Spoon into buttered 1 quart casserole. Toss bread crumbs with 2 TLB melted butter and sprinkle over casserole. Bake 30-40 minutes at 350°F about 30 minutes or until knife inserted comes out clean. Serves 4-6 people.

Of course there is always the infamous zucchini bread but how about chocolate zucchini bread? I got this recipe from a friend many moons ago and it is excellent. Your kids, friends, spouse or partner will never know they are eating something healthy!

Chocolate Zucchini Bread
2 ¼  cup all-purpose flour
½ cup unsweetened cocoa powder
1 tsp baking soda
1 tsp salt
1 ¾  cup sugar
½ cup butter
½ c vegetable oil
2 eggs, large
1 tsp vanilla extract
½ cup buttermilk
2 cup unpeeled zucchini, grated
6 oz choc chips
¾ c chopped walnuts

-Preheat oven 325 degrees. Butter and flour a 13” x 9” x 2” baking pan
-Sift flour, cocoa powder, baking soda, salt into large bowl.
-Beat sugar, butter and oil in large bowl until well blended. Add eggs 1 at a time, beating well after each addition. Beat in vanilla extract. Mix in dry ingredients, alternate w/ buttermilk in 3 additions each, fold in zucchini. Mix in choc. chips + nuts. Pour into the baking pan. Bake until toothpick inserted in center comes out clean in about 50 min. Cool completely in pan.

So the next time you get a runaway, don’t despair, now you have some ideas on how to use them besides hiding them under your bed!
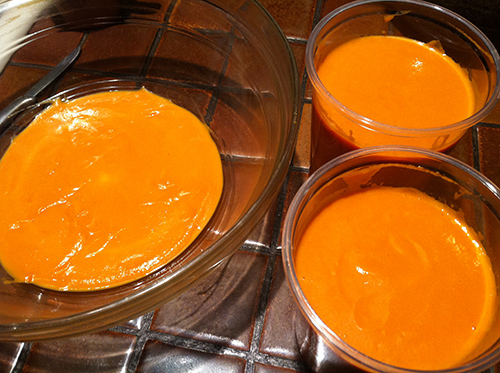
The Holy Grail of Beans

tarabais beans

The holy grail of dried beans are Tarabais beans. They are a runner bean (Phaeseolus coccineus). Haricots Tarabais (as they are called in France), have been grown for centuries in Tarbes, at the foot of the French Pyrénées in the southwestern region of France close to the Spanish border. This white bean, which is larger than a navy bean, is thin-skinned, sweet and has creamy flesh and doesn’t fall apart when cooked. They are commonly used in a classic french dish called cassoulet, a rich and savory casserole baked with these beans, duck confit, sausage, pork, sometimes lamb, and topped with crispy breadcrumbs. This is a great winter dish. Different cities in France have different ingredients in their cassoulets, but all of them start with these beans. They are also perfect for any bean salads or bean soups.

I had a hard time finding them last year in the states. When I went online to get them from France they were very expensive- $34 an ounce! I had a friend who was in Germany try to get some for me but they were still $15 an ounce. Too rich for my blood and to think these were originally used as a peasant casserole! I was about to give up when I saw them in my 2012 Seed Saver’s Exchange members book last year. There were 4 people offering them in the US. It cost $5 (for postage) to get them. So I spent $20 and got some from all four members. Enough for 2 years. Well this year you’ll be in luck if you want to try these beans-they are in Baker Heirloom Seeds for the first time and are easily available this year in the states.

haricot tarabais  bean pods in summer

haricot tarabais bean pods in summer

In growing these beans, I found it tough to get them started having to replant the seeds 3 times before I got them to germinate on my 8 ft long fence. They grew up over the 3 foot tall fence and curled back on the other side which was fine. Once up they are up, they are an easy keeper. You don’t have to do anything special except to be sure to give them adequate water. They did get a little rust on some of the leaves but regrew new leaves  (like all my beans) without it reoccurring again. You’ll need to get them in the ground as early as possible as soon as the ground warms up because it takes all season for the pods to mature. Then I picked them after the pods dried. After I picked them, I brought them inside, shelled them and placed the beans on a cookie sheet until they were really dry. You can tell if they are dry enough to put away by biting one and if it is rock hard and no give, then it is ready. After that I put them in some mason type jars where they are ready for me to start the cassoulet adventure this winter!

Cook green beans and other vegetables-Julia Child’s way!

Watch Julia Child/The French Chef cook vegetables the french way! Bon Appetit! Part 1

I found this video on you tube on Julia Child back in 60’s when she had her TV cooking show.  Besides finding it very entertaining (I kept thinking of the ‘Saturday Night Live’ skits on her), I also learned a lot. In it she cooks green beans, carrots, stuffed mushrooms and braised spinach. I was most interested in how she cooked green beans. I use to steam my homegrown green beans but I think this might be a better way to cook them as they keep their color and flavor (yes even store-bought beans). Besides I like her accent! Yessss. Watch it and see!


Watch Julia Child/The French Chef cook vegetables the french way! Bon Appetit! Part 2

Cosmic Atomic Carrot Soup

Check out the color in this carrot soup!

Check out the color in this carrot soup!

If you haven’t had carrot soup before, this is really good. I’m not a huge carrot eater but went back for seconds with this soup! It is made with Cosmic Purple carrots and Atomic Red carrots (hence the name) but can be made with any other variety of carrot as well.

Cosmic Atomic Carrot Soup

1 large onion

½ lb. Russet potatoes

½ stick butter

1½-2 lbs fresh carrots, cleaned and sliced

6-8 cups veggie or chicken broth

1 cup cream (or half and half)

salt/pepper to taste

honey (to taste) – tablespoon+

Saute onions in butter on medium heat in a SOUP POT till tender. That way you can just add the other ingredients without using more pots. Add carrots, potatoes and broth and cook till they are fork tender. Pour into a blender and blend till smooth. You will have to do it in batches. You could use a ‘wand’ but I find the blender purees it better and it should be silky smooth. Pour it back into the soup pot. Add honey to taste to just bring out the sweetness of the carrots and stir in well. Taste. Add more honey if needed.  Stir in cream. Reheat till warm but do not boil. Delicious!