Cold Frame Survivors

I tried to overwinter some veggies in the coldframe that I planted last October. I wanted to see what would survive and what would die back.

coldframe survivors

Here is what has survived (so far) in the coldframe – 1 sad little bok choy, 2 sadder lettuces, 4 happy endives, a row of Bull’s Blood beets and 2 chard. The mache and arugula were doing great but bolted during the 70°F day we had last week and were loaded with aphids so I pulled them out and the chickens enjoyed them instead of me. What didn’t make it was some of the chard, most of the lettuces and mesclun (more baby lettuce).

Now it is suppose to get down to 16°F tomorrow night and 14°F on Sunday night! Yikes! I’m going to spray everything with insecticidal soap for 7 days in a row to hopefully rid me of the aphids. I don’t dare plant anything else in the coldframe till I’m sure they’re gone.

I also planted spinach in an outside raised box with row cover over them and they hung on in a rather dormant state and now they are growing full blast.

Next year I will only plant endive, mache, spinach and arugula as they did great even when we got down to 10°F although I do put a layer of heavy row cover over all when it gets down in the teens.

Time to start your fall vegetable garden?! But wait it’s still summer!

Photo courtesy of aggie-horticulture.tamu.edu

OMG! I’ve received newsletters already talking about starting our fall vegetable gardens! What?! Already?! I’ve barely harvested my spring garden and haven’t harvested the summer garden yet!! No! No! No!

Yes folks, it is time for us to consider planting our fall vegetable gardens mid-month. The fall garden is very similar to the spring gardens in the varieties of veggies we can grow. If you want lettuce, chard, kale, spinach and many of the cool season crops later in the fall, you should consider putting them in this month. I would either plant seeds inside under lights to transplant later or buy seedlings at the nursery (that way you can plant a little later). Just make sure you buy heat-resistant varieties of lettuce and spinach and give them some shade for now. If you plant by seed, most lettuces take around 60 days till fully mature which would put us in September-October. Hard to believe isn’t it?

To figure out when to plant each variety, just look on your packet of seeds and count backwards from the time of the FIRST AVERAGE HARD FROST (Oct.3 in Santa Fe ) and add 14 days for shorter daylight hours (I add 15 days to make the math easier for my memory). So if I have some lettuce that will take 60 days till harvest and I add the extra 15 days, that would bring me 75 days (2 1/2 months) ahead to plant before a hard frost. So if I plant on July 15th, I would harvest right around Oct. 1. Unbelievable! Now with spinach and kale you can wait a little longer as they can handle some frost. And if you want some in Sept. you better plant now-like this weekend! Just when you thought you could cruise till summer harvest!

Thinning and preparing mesclun/greens-keeping your homegrown greens fresh!

Here are my steps to thinning and preparing mesclun so it doesn’t WILT in your refrigerator. In fact you can use this method after you clean any greens in ANY STAGE from microgreens to full grown lettuce and greens from the garden or store bought.

The MOST IMPORTANT THING if you are growing any greens is to PICK THEM FIRST THING IN THE MORNING when they are fresh-not the heat of the day, OTHERWISE THEY WILL BE WILTED NO MATTER WHAT YOU DO (are you listening Lava?). During this first stage of mesclun, it is a little more labor intensive. (After the leaves grow more, you will just cut off the tops above the crowns so they can grow back and there will not be much dirt since you are not pulling these out by the roots.)

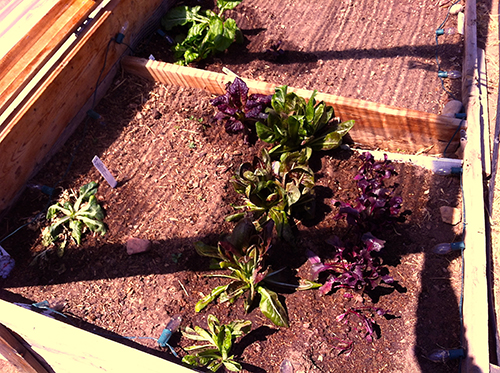
Here is the mesclun in my salad bowl I made. Notice they are very cramped with not much dirt showing. I need to thin these out so the leaves can get bigger without overcrowding.

Thin out the mesclun. The goal here is to have some dirt showing to give the remaining leaves some room to grow.

Now the mesclun (first thinnings) are like microgreens and are ready to clean. Notice the roots are still on them. You can cut them off or eat them if you rinse well. Here I’m leaving them on. Of course you could just feed them to the chickens or throw them out but I don’t like to waste them plus they are yummy! You would pay big bucks for just a tiny bit of microgreens in the stores.

Here is the mesclun at the first rinse. I first clean my sinks out with bleach so I know they are clean. I suppose you could use big bowls to rinse instead. I filled my sink with COLD WATER from the faucet. Notice the leaves float on top while the dirt mostly sinks to the bottom. From here I gently scoop out the leaves trying to leave the dirt on the bottom of the sink or bowl and transfer them to the other side of the sink full of water for the second rinsing. By the way, rinsing this way is way easier than using a colander.  It works really well for spinach too. This way removes the dirt that can stay in a colander.

Second rinse-Notice most of the dirt is gone at the bottom of the sink after I  have removed the leaves.

At this stage I do one hand rinse in case their is more dirt trapped on the roots. Then I put them into…

The last rinse- notice the dirt is gone. Rinse more if you still have dirt.

Since I grow the lettuce bowl inside, I use seed starting mix and you need to look out for the perlite that is in it as it can float in the water instead of sinking like the dirt-so be on the lookout for it. Just scoop them off the surface of the water before you do each rinse. It would be a little too crunchy in my salad!

Now the leaves are ready for the spinner. Just don’t pack it too full as the leaves are very delicate. Spin it in small batches and..

gently place it in a loose plastic bag (not ziploc) lined with a dry paper towel. Then this next trick is very important. I learned it from reading Dorie Greenspan’s book,  Around My French Table where you…

squeeze the bag so there is only a small opening and blow into the bag with your breath. This will fill the bag with carbon dioxide (which we expel) and then blow it up till it is full and..

tie off with a twistie tie so the air doesn’t escape and put into your refrigerator. YOUR GREENS WILL STAY FRESH FOR ABOUT A WEEK. Be sure you blow into it each time you get some greens out before putting it back into the refrigerator again. This takes up a little more room in your refrigerator but is worth it. No more homegrown wilted greens! Pretty cool trick, huh?!

Time to plant spinach and lettuce

Now is the time to plant spinach and lettuce OUTSIDE as well as peas if you haven’t already done it. This year I am putting them between the rows of garlic I planted last November as APHIDS DO NOT LIKE GARLIC so I’m hoping the garlic will help keep them away from the greens this year. I took the temperature of the soil in the exposed raised bed with my compost thermometer where I want to plant them and it was 60°F. Lettuce seeds germinate best at soil temperatures of 40° to 80°F so I’m in the right range. This will be mesclun so I spread the seeds over the area as shown on the left side of the picture, then put a fine layer of sand over the seeds as shown in the right side of the picture, I planted ‘Provencal Mix’ from Cook’s Gardens and ‘Rocket Arugula’ ‘Tyee’ spinach (which is slow to bolt), and another lettuce mix with Arugula that I got from the Home Grown New Mexico’s seed swapping event we had a couple of weeks ago.

Create your own lettuce/mesclun bowl!

What does the cat have to do with the lettuce mesclun bowl?

"Trini" the cat! Photo by Genevieve Russell

‘Mesclun’ is a term that means a ‘mixture of young salad greens’ in French. Last year I created a lettuce/mesclun bowl inside the house while it was still cold outside. I took the bottom from one of my pots (you know so that your pots don’t leak all over when you water), cleaned it with a bleach solution and drilled some holes in the bottom of it so water can drain out.

Then I filled it with some moist potting soil and sprinkled some lettuce mesclun mix all over it and gently tamped it down so the seeds make good contact with the soil. In this first picture I sprinkled sand over the half of the seeds.

Then I finish sprinkling the sand over the seeds-just enough till they were covered.

Next I sprayed the sand so it became moist with a spray bottle so as not to disturb the seeds. Then I put plastic wrap over it to hold in the moisture until the lettuce germinates. I kept it in a cool place in the house until it germinated and then I moved it by a window.

This is when I got in trouble with the cat…

Trini, "I like salad too" Photo by Genevieve Russell

Here is the lettuce bowl. Coming up nicely. Now if I could just keep the cat from eating it! She loves it! I caught her eating it around the edges by the window. I’ll have to thin it this week without her help! Perhaps I’ll have to make her a salad bowl of her own.  In another couple of weeks it should be pretty big.

Here it is ready to eat for it’s first cutting in 32 days and at $6.99/lb in the stores, it’s a deal! Harvest by the ‘cut and come again’ method and it will grow back for several cuttings. To do this, simply take sharp scissors and cut off a bunch of leaves in the amount you need to fill your salad bowl. Cut the leaves off at 1 to 2 inches above the soil. Don’t cut the crowns of the lettuce or it won’t grow back. Bon Appétit!

Lettuce bowl ready for first cutting-32 days

Plant peas, spinach, and arugula on St. Patrick’s Day

Today is ST. PATRICK’S DAY- TIME TO PLANT PEAS, SPINACH AND ARUGULA. I always plant them right around now and use the holiday as a reminder. I stayed home today to recoup after putting Butch down. Getting my hands in the soil is always grounding for me. Lots of things to do right now regarding gardening. Here are some of the things I did today.

COLDFRAME-I inspected the rabbit damage to see if the spinach seedlings are salvageable. All but one of them are starting to grow back from the crown which were undamaged. I planted seeds of the following in the coldframe:

SPINACH-Bloomsdale-45 days in the other half of the coldframe.

CHARD-I didn’t know (or remember) that chard is a biennial (meaning two years) but spends it’s second year mostly growing to produce seed which is why they never seem to produce as big of leaves the second year. I will pull them and plant more chard seeds-white variety.

OUTSIDE RAISED BED-Checked the outside raised beds by the house. Last fall I I dug some old horse manure into one of them and it looks great. I planted the following seeds and covered them with row cover to keep the rabbits from them:

PEAS-Dwarf Grey peas and Oregon Sugar Pod II-60 days

SPINACH-Bloomsdale-45 days and a giant variety of spinach (there I go again!) called Monstrueux de Viroflay-50 days

BUTTERHEAD LETTUCE-Yugoslavian Red-40 days

MESCLUN-Provencal mix-40 days

CILANTRO

CUTTING LETTUCE-a new super red variety of  called Sea of Red-40 days

ROMAINE-Paris Island Cos-68 days

ARUGULA-Apollo-30 days

IN THE SECOND RAISED BED- Took out the last of the carrots from fall that overwintered. They should be extra sweet! The garlic I bought at SF Farmers Market last fall is coming up in it. Lightly dug in some Yum-Yum Mix in the remainder of the bed as I’m going to plant more carrots, beets and shallots which are heavy feeders and need some extra fertilizer especially if you are putting them back in the same area. I will plant:

CARROTS- Purple Haze and Danvers

BEETS-Detroit Dark Red-60 days, Bulls Red Beet-50 days and Early Wonder beet-48 days

DUTCH SHALLOTS-picked up some Dutch Red Shallots while I wait for the French shallots to arrive. Should be a good taste test at harvest time.

MAIN GARDEN-I hooked up the hose and watered the strawberries and the asparagus. Underneath the layer of dried leaves in the strawberry bed I see new leaves starting to grow from the crowns. The asparagus is either dead from our very cold winter or they haven’t started growing yet, we will see..

The Best Lettuce and Greens Seed Catalog-The Cooks Garden Seed Catalog

'Curly Ruffle Mix' from The Cook's Garden Catalog

I love lettuce and salad greens. The Cook’s Garden Catalog is one of my favorite seed catalogs for these. I think it is by far THE BEST CATALOG FOR SALAD GREENS. Period. It has 20 pages or so of unique lettuces, mesclun mixes and greens. Did I say 20 pages? Yes, I did. Very exciting for a greens eater! Every year now I can’t wait to go through it and see what new types they have.

Some of my favorite lettuces are Santoro Lettuce, Yugoslavian Red, Forellenschluss and Navaro Red. My favorite mesclun mixes include Provencal Mix, Summer Mix, Oakleaf Mix, Fall and Winter Mix, and Heatwave Blend and new this year, Curly Ruffle Mix. There are lettuces for every season from winter through the heat of summer. If you don’t have their catalog, go to www.cooksgarden.com to order one. It’s not too late and you won’t be disappointed!

Winter gardening

Main garden Jan. 8, 2011

Bri's Pumpkin Patch Jan. 8, 2011

It really looks like old man winter has arrived. Here are pictures of  the main garden and pumpkin patch down by the barn that I took this morning. We’ve had some precipitation (finally) on Dec 31-Jan.1 and some absolutely frigid temperatures last week which is why it is still on the ground.  Another Arctic blast is due here next week. Oh boy, can’t wait..

I went to get some carrots in my small patch protected only by 12 inches of straw up by the house for dinner last night and the carrots (yellow carrots) were looking good but the ground was frozen. All those nights in the single digits made the ground rock hard. Guess I’ll have to wait till spring when it thaws to harvest some.

Cold Frame Jan 8, 2011

When I checked the cold frame, the soil is still soft and the plants are doing great!

Winter lettuce damage

A little damage on some of the lettuce leaves from the -4° we had one night but not bad considering I don’t pay any attention to it except for an occasional watering. In the picture notice I have large bubble wrap on my cover to add insulation and you can see the row cover to the left that I have to cover the crop with to also add protection. Guess this is working pretty well. The transplanted chard is holding it’s own and the spinach leaves ARE ACTUALLY GROWING-slowly but growing!  So I watered the cold frame winter veggies before the next big weather front.  I use gallon jugs to water-easier than the frozen hose…

Closeup of cold frame veggies

Lettuce patch update

lettuce patch shade cover

Here is my shade cloth over the lettuce patch. I also am going to put bird netting around the raised bed to keep out the rabbits. This morning I  thinned again (third time) my romaine (now 5 inches tall) and butter lettuce about 5 inches tall). I want to see if I get some big heads of romaine and butter heads but it is a lot of work always thinning them to make room for them to grow.  I am hoping the butter lettuce won’t bolt with the warm weather.

looper and lettuce damage

closeup of lettuce looper

I also found some small loopers (caterpillars) on some of the lettuce so I will spray with BT (Bacillus thuringiensis) today-an organic pesticide that won’t hurt bees or birds or humans and is specific to gets rid of caterpillars that do damage on our crops. Notice the holes in the lettuce and the little dark spots are frasse (poop). So if you see frasse- look for the loopers.

A few of the arugula are bolting but it bolts with the first bit of warm weather. I’m giving everything that bolts and the ends with roots to the chickens. I also picked Provencal lettuce mesclun which is wonderful and easy. I didn’t have to thin but one time. That plus you just cut off the tops of the lettuces and waa laa-instant salad. It should comeback 3 or more times. I am putting a shade cloth over the bed as I had some friends tell me they were able to have lettuce in the summer with it over them.

I also tried a new spinach for me called Bordeaux which I am very disappointed with. Very small leaves are sorta wimpy-not much there so I’m going to try some summer type of spinach that supposedly won’t bolt and have bigger more succulent leaves. Gonna try Tyee spinach. Suppose to resist bolting in the heat.

Lastly, pick your lettuce first thing in the morning after watering it the night before. To clean lettuce after I thin it, I pull it out roots and all and cut off the leaves above the the dirt and roots-less rinsing. Then in the kitchen I put it in some bowls of clean water to move debris and use a salad spinner to remove excess water. I put the lettuce  into a zip loc freezer bag with a damp paper towel folded up. This help keep it from getting limp.

lettuce bowl ready to eat!

Here is the inside lettuce bowl I started on April 4th-now 32 days later.

Lettuce bowl 32 days later on May 16

The outside lettuce patch is looking real good too. Peas aren’t flowering yet and cauliflower is still little but arugula and lettuces are ready for a real salad! Chickens won’t get these anymore. Looks like  I won’t have to buy greens for awhile. Gonna make me a salad tonight!

lettuce patch May 16

my lettuce patch

lettuce patch in early spring

Here are my cool season crops coming up by the house in my lettuce patch. I like the idea of walking out the front door and picking salad stuff without going down to the main garden by the barn (which isn’t in yet anyway-way too cold at night) In the picture, from the back to forward-peas are back by the fence, then little cauliflower (they are soo slow to grow) is next closest, then romaine lettuce next, then 3 types of butter lettuce, and in the front row is spinach on the left, arugula in the middle and provencal mesclun on the right. I need to start thinning everything to give them room to grow. They are loving the cold nights. Still haven’t planted tomatoes though! I am waiting for the last of the freezing nights to end. Last night was 28 degrees F (-4 degrees C). Looks like we might go right up to the May 15 average last freeze date here in Santa Fe before getting any warm season crops in..

My lettuce bowl-chickens love it!

I put the lettuce bowl outside under heavy rowcover cloth (.09) as it wasn’t getting enough light inside. Yesterday I thinned it so the baby lettuce have room to grow and gave the seedlings to my chickens.

The girls eating the lettuce seedlings

They are nuts for lettuce anyways but fresh baby seedlings? yum! Here are some pictures of the chickens eating it and some closeups some of them as well. Speaking of chickens,besides providing wonderful eggs they help make compost with their manure.

Chickens eating lettuce seedlings

They are pets which each having a name so I don’t eat them, just their eggs. I feed them lots of scraps from the kitchen which  is what makes their egg yolks so orange. The rest of the kitchen scraps goes into the compost pile. Their manured compost is great for the veggie garden but don’t put it on fruit trees-it has too much nitrogen.

closeup of 'Chimay'-a Belgium Campine chicken-hence the name!

closeup of 'Kielbasa'-a Polish chicken

'Grayhawk' drinking water-an Andalusian chicken

'Ari'- an Auracana chicken-lays green eggs!