Ahh! What a nice day to be in the garden!

summer storm over gaaren

summer storm over the garden

Glory bee!  (yes they were out too). I’ve been waiting for a nice warm day to get back out in the veggie garden without the cold or the wind (ugh). Today was a nice, no, make it a great day in the garden-nice and warm and not even a breeze. So I spent 3 hours gathering all the tomato stems that I had hurriedly pulled out really last late fall when a worker was a no show and I decided to do it alone because if I don’t show up it’s my own dam fault. I pulled them so they wouldn’t freeze solid in winter (very hard to dig thru frozen ground). Up till now I just left them in the paths with the full intention of cleaning everything up before the new season is here. Still have more to do but it felt so good being outside. Today was a bonus day!

And tomorrow is suppose to be another great day (until about 4 pm) when the winds return. So get out there early!

Snow day!

KOKO likes the snow!


The gardens on a snowy day-Dec 26, 2018

More daylight hours/plants start to grow again

Growing Spinach and Lettuce in a Cold Frame

The Persephone period is over. Elliot Coleman in his Winter Harvest Handbook, coined this name. When daylight hours are less than 10 hours per day, the plants that are in the ground slow down or stop growing altogether during this time. This means that the spinach or mache you planted last fall had slowed down and by Thanksgiving stopped growing. The Persephone period can be longer or shorter depending on what latitude you live in. For us in Santa Fe, it is from Thanksgiving to Jan 14th.  In states that are further north, they are still in the Persephone period. As the daylight hours continue to get longer and longer, you should notice the plants starting to grow again. I grew ‘Carmel’ spinach last fall in one of my beds up by my house and it is still alive, covered with winter weight row cover. I did this the year before and it survived and gave me beautiful spinach by March that I was able to harvest 4 times before it became too warm. If you didn’t grow anything to overwinter, you can now start spinach, Asian greens like ‘Tatsoi‘ and ‘Baby Bok Choy’, mache and some very cold hardy lettuces like ‘Winter Wunder’ and ‘Marshall Red Romaine’ once the soil warms to 40•F+. If you keep them covered with winter weight row cover to protect them from our cold nights, you will be able harvest them in early spring barring any devastating deep freezes. If you can’t wait and want to speed up the process, start the seeds under lights inside now and transplant them next month in February. To find other extra cold hardy crops to grow, go here.

Transplanting winter lettuce and chard


chard crowded

I went down to Agua Fria Nursery and got some lettuce and chard starts back in mid-November intending to plant them right away. I waited too long to transplant them and they got stunted and crowded in each cell as shown above.

chard just transplanted

Chard transplanted on Dec 1

When I did transplant them I teased them apart and planted them in small pots. Here they are right after I transplanted them on December 1. ‘BT’, the man of the house, inspects them.

chard_2 weeks old

Chard transplants on Dec 14

Here are the Chard transplants on Dec 14-only 14 days later! Look at the difference between the two pictures. I’ve grown all the lettuce and chard transplants under my lights in the house as it is too frigid to put them in the greenhouse now. I figured I could wait till after the Persephone period was over and by then they would be just big enough to transplant in the GH. The Persephone period will be over on January 15th here in Santa Fe when the daylight hours get longer again. The plants will be ready to transplant way before that time period. The chards are coming along nicely. I’m growing ‘Argentata’ chard and ‘Ruby Red’ chard.

BATCH 64_MOONSHINE

I planted them in a new potting soil called Batch 64-‘Moonshine’ which is available at Agua Fria Nursery in town. It’s fantastic with everything growing very fast. When I went back to Agua Fria Nursery and talked to Bob, he said he had the same experience last year, especially with the tomatoes.

Here are the ingredients in it: coconut coir, perlite, pumice, rice hulls, expanded shale, humus, worm castings, biochar, feather meal, fishbone meal, blood meal, alfalfa meal, oyster shell, metamorphosed evaporite, flaxseed meal, cotton seed meal, dried molasses, kelp meal, azomite, potassium sulfate, limestone, yucca extract, and mycorrhizae. Phew-quite a list!

The lettuces planted on Dec 1 are ready to transplant now! They have absolutely gone crazy growing super fast in this potting soil. The varieties I’m growing are North Pole, Winter Wunder and Marshall Red Romaine.

Starting COLD HARDY VEGETABLES Super Early

lettuce_greenhouse germinating

So now that the Persephone period is almost over and the magic date of January 15th is upon us, what does that mean? It means our day lengths are getting longer and January 15th is when we start getting 10 hours of daylight that will continue to get longer every day. Have you noticed already it now gets dark around 5:30 instead of 5 pm? The darkest time of the year is over. What does that mean to gardeners? To learn how to start cold hardy vegetable seeds super early outside and how also how to start them inside read on.

STARTING COLD HARDY VEGETABLE SEEDS OUTSIDE: cold frme opened
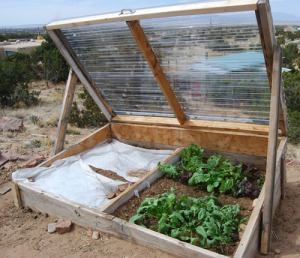
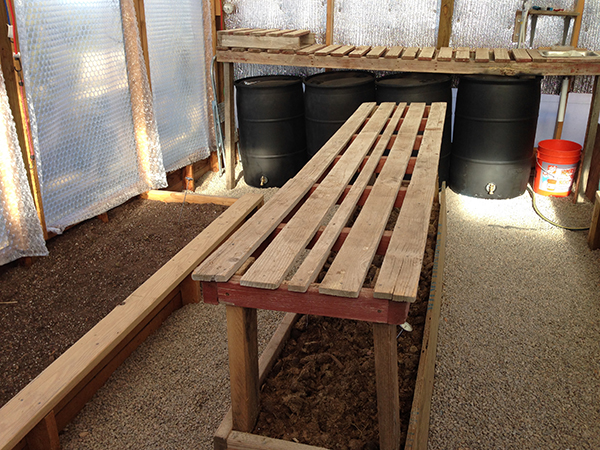
If you want to try growing cold hardy vegetables outdoors at this time of year, you will need a cold frame, low tunnel or hoop house.

If you already planted cold hardy vegetables late last fall in a cold frame, low tunnel or hoop house, you may have noticed that the little seedlings haven’t been growing much at all as winter set in. Now with longer daylight hours, they will start to grow again and barring any devastating freezes, they will continue to grow and you can get cold hardy crops earlier this spring.

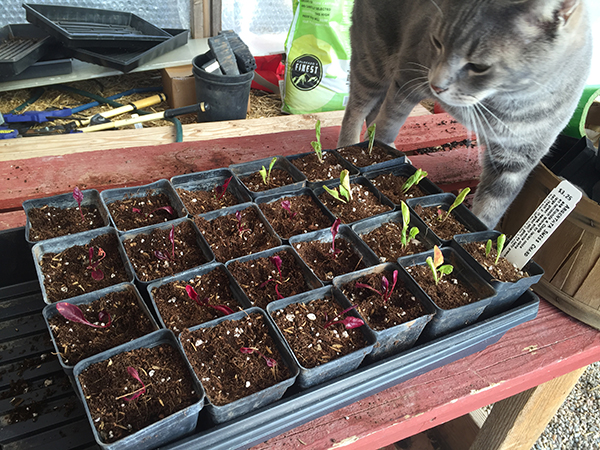
In late winter, before you have harvest your winter crops, decide what you want to plant in your bed once space opens up in your cold frame.  As the end of the Persephone period draws near (January 15) , you can re-seed the openings created from your harvesting or you could start planting seeds in your bed if you don’t have anything growing. My soil in my unheated greenhouse is at 40°F right now (as of January 12). Lots of cold hardy vegetables germinate in cold soil.  They will be slow to start at first but they will start as your soil warms up to 40°F and warmer. Now with the day light getting longer, you can think about starting early. The winter sowing you do will be ready for harvest by early spring, often long before the same crop when grown outside without protection. A bonus is many of the cold hardy winter crops don’t like our springs, bolting on the first few warm days so you’ll be able to harvest that spinach before it bolts!

Some cold-hardy plants planted inside a cold frame, low tunnel or hoop house can tolerate a hard freeze at night, provided they are allowed to thaw during the day. The plants must be completely thawed before you harvest them. In addition, put some winter row cover over seedlings at night to give them an additional 4-6°F protection even though they are already in a cold frame, etc. Remove the row cover on days when it is above freezing. Watering is necessary to get crops started, but they will generally need very little water during the winter season-early spring once established.

STARTING VEGETABLE SEEDS INSIDE:
I’ve already written about starting seeds inside on many earlier posts.
To learn all about starting seeds indoors to get a head start go here:
https://giantveggiegardener.com/2012/03/08/starting-seeds-inside/

WINTER HARDY VEGETABLES
The following list of winter vegetables to grow is from ‘The Winter Harvest Handbook’ by Elliot Coleman. These can be planted either as transplants (first started inside under lights) or outside as seeds in cold frames, low tunnels or hoop houses.

Asian greens-Tatsoi, Pak Choi (Mei Quing Choi), Mizuna, Tokyo Bekana,Komatsuna

arugula-Astro, Sylvetta

beets-Red Ace, Merlin, Touchstone Gold

beet leaves-Bull’s Blood, Red Ace

carrot-Napoli, Mokum, Nelson

chard-Fordhook Giant, Ruby Red, Argentata

claytonia

endive-Bianca Riccia

leek-Tadorna

lettuce-Red Saladbowl, Tango, Rex, Rouge d’hiver

 mache-Vit

minutina

mustard green-Toyoko Beau

radishes-Tinto, D’Avignon, Cherriette

scallion-White Spear

sorrel

spinach-Space

turnip-Hakurei

watercress

Cold Damage on Winter Crops

garden dec 9 2014

Well  here it is in early December and not surprisingly, most of the outside crops in the main garden, ‘bit the dust’ as they say—died. A few are still alive. It is warmer now—here are the results of those cold snaps we had.


The Toscano Kale with freeze burn. It is more sensitive to cold temperatures  than other kales

Toscano Kale

The Toscana (aka Lacinato or dinosaur) kale got severely damaged. It is cold sensitive and although it’s not completely dead, it is unharvestable. Here it is with the leaves burned from the cold.


Russian Red kale is still alive

Russian Red kale


The Russian Red and Curly Leaf kale are still going and have some damage as well but the new growth is doing well. I haven’t watered them at all-nature has with a little snow and a nice rain the other day- almost an inch. I do have them covered with 2 layers of winter weight row cover.

gourds in field

The gourds are still drying in the field. Some are starting to get lighter in weight so I will put those in the garden shed to finish drying. The rest will stay outside until they dry more.

bubble wrap down on windowsThe green house is button up fairly tight now with just a little venting at the top panels. I’ve put the bubble wrap on all the windows (bubbles faced to the window) for extra insulation. I’ve also put the 4 barrels with water in them on the north wall for them to absorb heat in the daytime (I took them out during the summer), releasing the heat at night (the theory is that the sun which is lower and further to the south will hit them on the north wall and warm up in the daytime). I’m not sure I have enough barrels to do much good but even one degree will be helpful once it gets cold again.

winter lettuces

I’ve planted 2 winter lettuce varieties in the green house as transplants back in early November. The cold hard varieties are a green variety-Winter Wunder and a red variety-Marshall Red Romaine. They both have made it so far through those cold snaps although they have slowed down in growth because of the shorter daylight hours. They will stop growing until sometime in January when the daylight hours start to get longer.  Winter Wunder is my favorite lettuce but only grows well during the cold months. When it starts to get even a little warm, it will bolt. The lettuces have 2 layers of row cover over them at night and have some protection from the unheated greenhouse (at least from the winds). I’ve also noticed that the lettuces don’t need a lot of water now (about once every 2 weeks). It will be interesting to see if they make it Dec-February. Don’t they look wonderful in the winter!

There has been about a 4-7°F difference between the greenhouse temperature and the outside temperature at 7 am in the morning when I check everything. When I add the row cover at night I get about 4-6 degrees more protection. I’m not sure what to expect this winter since this is my first December-January  in the greenhouse. Last year when we finished up the greenhouse I start planting on February 17th so now I will see if these established greens can survive Dec-Jan.

Early Spring Planting-Three Important Factors

Three important factors should be considered before planting seeds in early spring:

Amount of daylight hours-In the winter the sun is weaker in the northern hemisphere and we have less daylight hours. If you plant seeds too early either outside or in a greenhouse, the seedlings will be spindling when they germinate. Once we have 10 hours of daylight (we currently have over 10 hrs), we can start planting our cold hardy seeds. So in Santa Fe, we now have enough daylight hours. But wait, there are several more factors we need to consider before we plant seeds.

Soil temperature for germination for different vegetable seeds

Soil temperature for germination for different vegetable seeds

Soil temperature-If you are thinking of planting OUTSIDE, forget about it, your soil is probably frozen so of course you can’t plant anything! Even if it’s not frozen, it’s probably still too cold to plant outside. However it will warm up soon. How can you tell what temperature your soil is? You’ll need a soil thermometer. I prefer a compost thermometer that is about 18″ long so you can check both the soil and a compost pile. A soil thermometer is invaluable, as different veggies like to germinate at different soil temperatures. Insert it about the depth of the root zone of the plants, about 4”-6″ in the soil to see how warm it is. Notice the chart above gives an optimum range for each veggie.  If you have a cold frame, hoophouse or greenhouse your soil is probably much warmer already. So are you ready to plant? Not quite. There is one more factor to consider.

Air Temperature-The air temperature is also important and is the main thing people think of in considering when to plant seeds. It’s too cold at night to plant most veggie seeds outside or even in a greenhouse without extra protection BUT there are some wintergreens that are very cold hardy, some even hardy below 32°F at night. Even in an unheated cold frame or greenhouse, the temperature dips below freezing at nights so if you have a one, I suggest you put some row cover (winter weight-.9-1.0 mm.) over your beds. If you don’t have a greenhouse and will be planting outside in early spring, definitely put row cover over it at night but don’t forget to check your soil temperatures too.

I’ve compiled a list of these very cold hardy crops that can be started in a greenhouse now if the soil temperature and daylight hours are good. Many of these cold hardy crops can be planted outside as soon as the soil warms ups in March. For the list go to my blog at: http://giantveggiegardener.com.

Winter greens for the greenhouse or early planting outside

I can’t wait anymore! I got this newly completed greenhouse and am antsy to try it out. I’ve done a lot of research on which plants might do well in the winter and am ready to rock n’ roll! So I am planting cold hardy seeds this week inside the house. I will transplant them into my new greenhouse when they are bigger. I’m also going to try some direct seeding in the greenhouse in the raised beds like arugula, spinach, kale, baby bok choi and mache in mid-February-all of which can handle some pretty cold weather. How cold? We will see soon although you wouldn’t know it by this week. I will also plant other greens like some winter hardy lettuces, peas, and a winter hardy variety of chard called Argentata at the end of February-beginning of March. Everything planted in the greenhouse will have to have row cover over it even in the greenhouse at this early date because of our cold nights. For those of you who do not have a hoophouse, or cold frame, the seeds in the list below will do well outside only you have to wait a little longer.

Here is my list of cold hardy crops to try in the greenhouse. You can also plant these outside in March once the soil is not frozen and cover them with row cover:

From Johnny’s Seeds:
‘5-star greenhouse’ lettuce mix
‘Space’ Spinach

From Southern Exposure Seed Exchange:
‘Even’ Star’ Winter Arugula
‘Winter Bloomsdale’ spinach

From Kitazawa Seed Co:
‘Mei Qing Choi’ (dwarf pak choi)-recommended in ‘Four Season Harvest’ by Eliot Coleman
‘Tatsoi’ (pak choi)-recommended in ‘Four Season Harvest’ by Eliot Coleman
‘Golden Yellow’ pak choi
‘Astro’ arugula

From The Cooks’ Garden:
‘Red Grenoble’ lettuce
‘Forellenschluss'(speckled trout) lettuce
‘Rouge D’Hiver’ lettuce-recommended in ‘Four Season Harvest’ by Eliot Coleman

From John scheepers Kitchen Garden:
‘Argentata’ Chard-recommended in ‘Four Season Harvest’ by Eliot Coleman

From Agua Fria Nursery: transplants ready to plant
mache (corn salad)-recommended in ‘Four Season Harvest’ by Eliot Coleman
endive-recommended in ‘Four Season Harvest’ by Eliot Coleman
‘Winter Wonder’ lettuce
‘Marshall Red’ romaine lettuce

Heating the Greenhouse using passive solar methods?

wide angle view of GH interior

I like this wide angle view of the inside of the greenhouse

I want to heat the greenhouse in the winter using passive solar methods. There is nothing growing in it so far this winter but I’m doing some experimenting to see how warm I can get it (my goal is around 32°F or warmer) at night. To this end I’m experimenting using compost to help heat it, putting some barrels with water in them to act as a heat sinks and I’m insulating the structure inside a little better so as not to lose so much heat at night. If the sun shines, it gets between 70-80° in the day right now (which is delightful) and I’d like to keep some of that heat in at night and not lose it. Of course I had the opposite problem last summer when it got too hot but that’s another problem I’ll address this summer!

GH inside winter

The center bench has compost underneath it in a raised bed

The compost pile is only 1/2 a yard so is probably not enough to keep it significantly warmer  inside the greenhouse but what if it adds a degree or two? I’ll take it. Everything helps. The compost pile got up to 112°F  while the surrounding soil in the two raised beds is 40°F. Not that I’m planting in the compost but it shows it is significantly warmer. Now it has cooled down to 60°. The night temperatures are still below freezing inside.

Since I didn’t have a chance make shutters for the screen windows before winter set in, my friend, Jody, thought of putting plastic on both sides of the open screen ‘windows’ to trap warm air and slow the heat loss. I’ve done that now.

bubble wrap down on windows

The vents are covered with plastic and bubble wrap is on all the windows

I just put bubble wrap on the windows to hopefully act as insulation to slow the loss of heat at night as well. Plus I added bubble wrap on the ceiling between the rafters. Elodie said probably a lot of heat is loss up there through the uninsulated fiberglass roof. Now the green house looks like a  bubble wrap house on the inside! The night temperatures are still below freezing inside.

I painted the rain barrels black and filled them with  water to act as heat sinks

I painted the rain barrels black and filled them with water to act as heat sinks

I also have 4 rain barrels that I painted black and filled with water and installed hose bibs on the bottom so I can empty the water out at the end of winter. I put them under the growing tables and the night temperatures are still below freezing inside. And lastly I plugged up a lot of leaks where the roof meets the rafters.

Did it work? Are my nighttime temperatures above freezing? NOPE. I’ve only been able to keep it about 5 degrees warmer than the outside temperature which make me go to plan B.

What is plan B? Try planting only super cold hardy winter greens and see what happens. Stayed tuned…

10 Things to Do in December

xmas clip reindeer

HO! HO! HO! Here are 10 things you can do in December for your garden. I wrote in green where I’m at with this list!

1. Don’t forget to feed your worms in your vermicomposting bin! They get hungry too! Also if it has been dry, give them a some water on a warm day. Don’t give them so much food that it just sits there and freezes. For an outside plastic bin, maybe wrap it with a water heater blanket or surround it with straw bales to help keep the worms from freezing. You try living in a plastic box all winter without insulation! For bigger outside vermicomposting areas, put straw bales around the perimeter to add insulation. Also put straw on top.  (I covered mine with about 8-10 inches of straw on top of everything and will check them in about 2 weeks to see if I need to add more food)

2. Reflect on what worked in the garden and what didn’t. What could you do differently next year? (Where do I begin? I’ll write more on this later)

3. Order your new catalogs. That way you’ll have them by January. (Done!)

4. Speaking of catalogs, go through those old catalogs and throw them out! (Done!)

5. Research on the internet new and different veggies you may want to try next year while you are waiting for your catalogs to come in. I’m always wanting to try something new. Start a list of possible veggies and add to it as you find more. You may not try all of them but at least you won’t forget them! (I started mine and keep adding to it)

6. Water your trees and perennials if you don’t get precipitation. We got a great snow in November so that let us off the hook but if Dec is dry, water later this month on a warm day. Forget about it if your tree has snow around it and the ground is frozen-the water won’t soak in frozen ground. (Since it snowed, I didn’t water-yea!)

7. If you feed birds, be sure you give them a source of water too. If my waterer is frozen, I boil water in a teapot and add it to my waterer to melt the ice. If you have bees, keep providing to them water too. (I check daily to make sure they have both food and water)

8. Take a walk around your frozen tundra (garden) and start to plan your next year’s  garden. Walking around when it is barren can reveal problem areas. It’s hard to ‘see’ when the garden is going on in the middle of the season with all the greenery. Perhaps you want to make a new bed or fix an old one…or maybe you could be a nut like me and add a whole new 1000 sq ft section in the garden Now that was a big project in 2011. Was I insane or what?! (This year I vow to finish the greenhouse by early spring.)

9. Organize your garden shed. Find all those tools you left outside-they’re  easy to see on the ground now that the the garden is done! (Still have a few floating around that I need to collect)

10. Ask Santa for some gardening stuff! Give them suggestions of things you want! (Done!)

10 more things to Do in February For the Garden

We may not be able to get out in our gardens now but it is time to get busy with things to do to get ready for the garden. March will be seed starting time and there will be lots to do before for that. I will be elaborating on some of these items over the next few posts as I see there is more info I can offer.

1. Go over your current seed supply. Organize it. Get rid of any seeds over 3 years old unless you froze them. Fresh seeds are essential for good germination. Older seeds have less success of germinating.

2. Decide which vegetables you want for this year and order any seeds you may need to get from seed catalogs.

3. Talk to your local nursery to see what they might be growing this year. I give a list to mine and they tell me what they are growing so I don’t duplicate. I prefer to let them do the growing, it’s just that I want to grow so many varieties that they might not have so I have  to start some by seed.

4. Stock up on any fertilizers, amendments, compost, nutrients, mycorizzial, and biomicrobes you may need for veggies. i.e- tomatoes, giant pumpkins

5. Check your grow light boxes to make sure they work. Get new bulbs if necessary.

6. Check grow heating mats to make sure they work and get more if necessary. Last year I had one and ordered another as my seed growing expanded.

7. Consider purchasing a seed mat thermostat. Last year I had to get one because the seed heating mats were running too hot and burning up the seeds before they have a chance to germinate. The mats stay 10° F hotter than the ambient temperature of the room so if we are having a really warm spring and the temperature is 80° F inside than the temperature would run 90°F in the seed flats-way too hot. The thermostat will keep the temperatures in the pots at whatever is best germinating temperature.

7. Purchase soil seed starting mix. I use Metro Mix 100 to start seeds. This stuff is great. The water doesn’t roll off the ‘dirt’ like many seed starting soils

8. Clean and sterilize any containers you plan to reuse for seed starting or transplanting seedlings. Use a 10% bleach to water ratio to rinse off the containers.

9. Buy any containers you may need for seed starting/transplanting. Most gardening stores sell up to 3″ in the peat pots. If you want a 4″ peat pot, go to Territorial Seeds. They are the only ones that have that size. I need them for my giant varieties cause they grow so fast. I also like the flats that have a raised lid. good for germination.

10. Read at least one good gardening book your interested in each month during the winter. I’m almost finished with ‘Four Season Gardening’ by Eric Coleman and just ordered ‘The Compost Tea Brewing Manual’ by Elaine R. Ingham.

Gardening in the Winter

squirreleating nut

It’s always good to get a GMO rant going and it’s such an appropriate subject for gardeners and just about anyone who eats-but now back to gardening! My gardening in the winter basically consists of looking over my seed catalogs by the fireplace. I’m an armchair gardener in the cold winter months-storing up gardening info like a squirrel and juicing up energy for the next season! Visualizing the coming year’s garden in my mind’s eye is a favorite activity I like to do along with reflecting on last year’s garden and what I might do differently. I got a garden planning application which is fun to start placing next year’s veggies in the garden.

I actually went down this week (while it was in the 50’s) and swept out the garden shed and put away a few garden tools that I found out and about and I found my compost thermometer! Ah ha! I’ve been looking for it since last fall and there it was hiding above the door frame of the garden shed-why would I ever put it there?!

Oh yea, I finished watering the fruit trees so everything is watered for a month, went on a 3 mile hike with some friends and I can’t forget we’ve been getting ready at work for our big art show in Philly in February. I guess I’m not a complete sluggo!

How to Make a Coldframe

My coldframe

A dear friend of mine, Kim, asked me if I would explain how to build a coldframe while there is still time before planting time in early Spring. There are many designs available online to make a coldframe or hot bed. Here is the coldframe plan (as a pdf) that I basically used when building my coldframe with a few small exceptions. Now mine isn’t super refined as you can see in the photo but seems to be working! (Be sure you look at the pdf because there is a lot more information in it). As you look at the plan, it’s pretty self explanatory but here is what I did for the sides and the bottom inside.

one page of the coldframe plan

I used 2 inch x 10 inch lumber for the bottom section all around and another 2″x10″ section for the top side slanted pieces. Cutting the diagonal piece is easy, I drew a line from one corner across diagonally to the other corner and cut on the line then I used one piece for each side on top of the bottom piece. The only thing I did differently is I put one more 1 x 2 inch piece vertically in the middle on each side  (screwed in-see photo not diagram) and in the back to join the top and bottom piece together. I added a 2 x 4  (long) piece on the lid that I screwed in (not tightly) so I can raise and lower the lid and prop it up vertically (see the piece holding up the lid on the right side). In the photo you notice I taped BIG bubble wrap (not small bubbles) with duct tape on on the inside of the plexiglass lid to add extra insulation in the dead of winter. I also divided mine into two sections.This isn’t in the plan but in the left section I started with hardwire cloth on the bottom to keep out gophers. Then I added dirt and compost on top of the hardwire so I could plant in it but the soil isn’t heated. The right side has a garden heating cable. I attached the cable with twist ties to the hardwire cloth that is cut out to fit the bottom. Then I turned over the hardwire cloth so now it is on top and place it on the bottom. I did this so I can’t put a spade through the cables while digging around in the dirt when planting. Then I put dirt on top like the other side. So the right side is a contemporary hot house when I plug in the heating cable (which I haven’t done yet). I will use it to heat the soil to a temperature so the seeds will sprout. A traditional hot house has a dug out area where ‘hot’ green manure is placed into. Then on top of that is the dirt that you would put your plants or seeds in. The manure gives off heat as it composts, heating the soil just like the heating cable. Now I love the idea of the manure and doing it naturally but I don’t want to have to replace it every year so I chose the heating cable. I will use an extension cord to bring power from the house. I’m experimenting with the non-heated and heated side to see if it really makes a difference in early Spring. If it does, I’ll heat the left side too next year.

Last time I reported, the right side which I planted with transplants in November, is still doing well while the left side where I planted transplants in January all died in the -20°F we had one night (except the parsley which survived) which is interesting cause I don’t even like parsley! I think the left side all died while the right side didn’t because they did not have any time to grow roots while the right side planted in November did. Remember I haven’t heated the right side yet so I know that wasn’t a factor. Anyways I’m sure the plans will help you more than my description!

10 things to Do in February For the Garden

We may not be able to get out in our gardens right now but it is time to get busy with things to do to get ready for the garden. March will be seed starting time and there will be lots to do before for that. I will be elaborating on some of these items over the next few posts as I see there is moe info I can offer.

1. Go over your current seed supply. Organize it. Get rid of any seeds over 3 years old unless you froze them. Fresh seeds are essential for good germination. Older seeds have less success of germinating.

2. Decide which vegetables you want for this year and order any seeds you may need to get from seed catalogs.

3. Talk to your local nursery to see what they might be growing this year. I give a list to mine and they tell me what they are growing so I don’t duplicate. I prefer to let them do the growing, it’s just that I want to grow so many different varieties that they might not have so I have  to start some by seed.

4. Stock up on any fertilizers, amendments, compost, nutrients, mycorizzial, and biomicrobes you may need for veggies. i.e- tomatoes, giant pumpkins

5. Check your grow light boxes to make sure they work. Get new bulbs if necessary.

6. Check grow heating mats to make sure they work and get more if necessary. Last year I had one and ordered another as my seed growing expanded.

7. Purchase soil seed starting mix. I use Metro Mix 100 to start seeds. This stuff is great. The water doesn’t roll off the ‘dirt’ like many seed starting soils

8. Clean and sterilize any containers you plan to reuse for seed starting or transplanting seedlings. Use a 10% bleach to water ratio to rinse off the containers.

9. Buy any containers you may need for seed starting/transplanting. Most gardening stores sell up to 3″ in the peat pots. If you want a 4″ peat pot, go to Territorial Seeds. They are the only ones that have that size. I need them for my giant varieties cause they grow so fast. I also like the flats that have a raised lid. good for germination.

10. Read at least one good gardening book your interested in each month during the winter. I’m almost finished with ‘Four Season Gardening’ by Eric Coleman and just ordered ‘The Compost Tea Brewing Manual’ by Elaine R. Ingham.

More winter greens go in the cold frame

Well I got some more winter greens to plant from ‘The Veggie Man’ from the Santa Fe Farmers Market on Saturday. My good friend Lava, told me she saw him there selling veggie starts and found out where he has his greenhouse and we went over there and picked some up. I got Argula, Endive, Blue Kale, and Baby Bok Choy and Parsley. I will plant them on Wednesday in my Cold Frame (where I already have Swiss Chard, Oakleaf Lettuce and Spinach growing), weather permitting. We are suppose to get cold again on Wednesday so we will see if I or the plants can stand it.