Are the monsoons here early?

MONSOONS
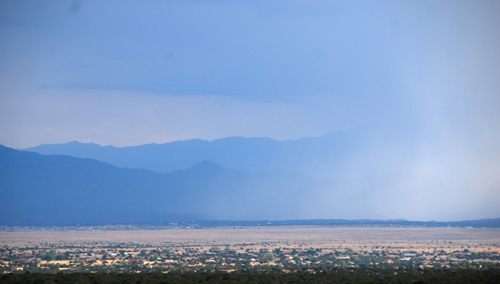
Are the monsoons here early? Historically, in my 28 years here in Santa Fe, the monsoons have traditionally started after July 4th weekend thru the second week of July. But last year and this year the weather people are saying it comes in around June 15th. Did things change? If so, I’m a happy camper cause we really need the moisture.


ROW COVER ON TOMATO CAGES/LEAFHOPPERS
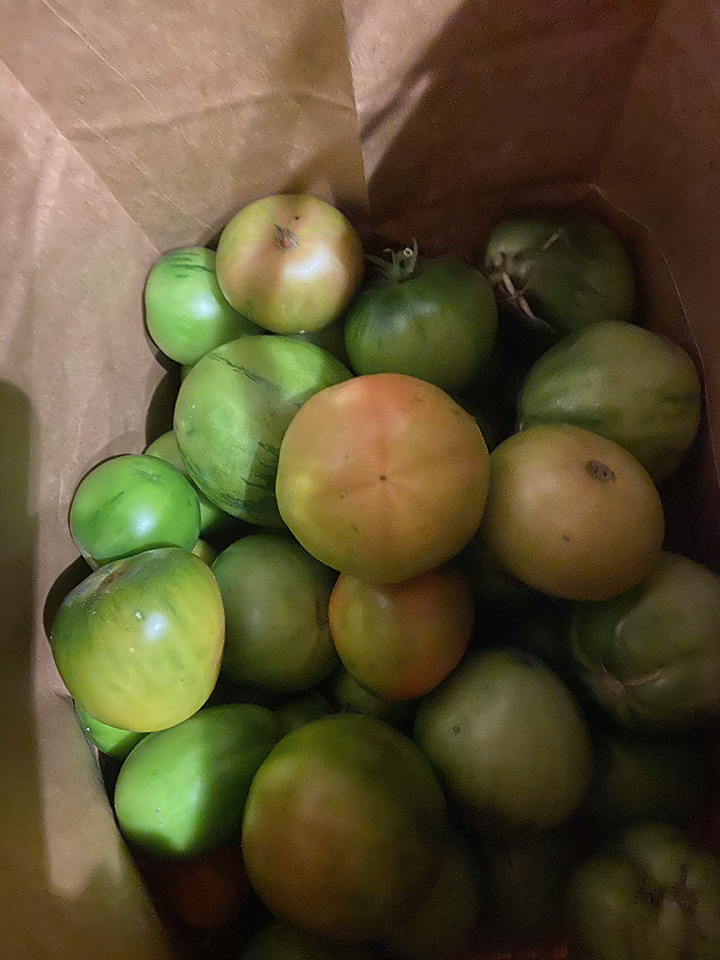
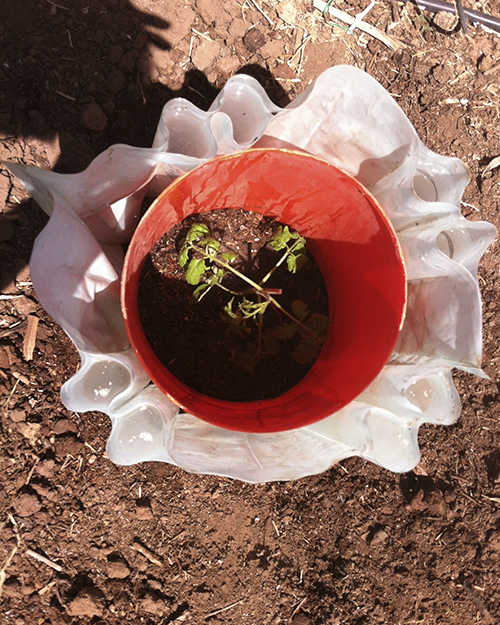
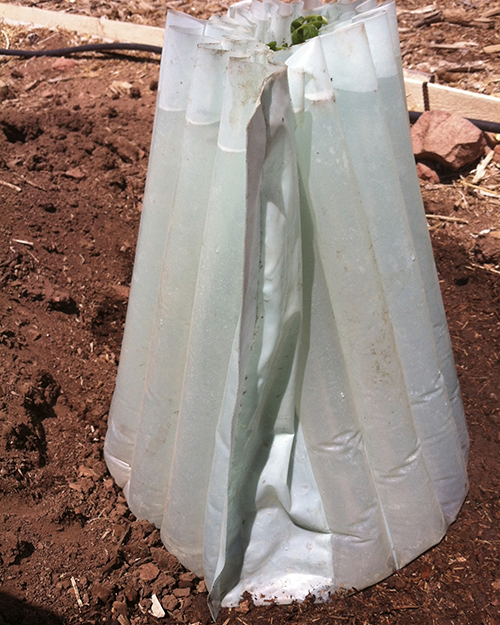
Plus I can take off the row covers off my tomato cages as the dreaded beet leafhopper should be leaving soon. But I don’t do that with the first rain which we got here yesterday. I wait a few days-like maybe after this weekend if the weather pattern holds up. We got .4″ of rain which is great. 

So if the monsoon pattern doesn’t peter out, and we get a little rain for next week and the monsoon pattern holds, I will be taking the row covers off my tomato plants. I haven’t seen my tomatoes since late May. Row cover is put completely around and over the cages to keep the beet leafhopper from physically getting to the tomato plants and biting the plant-no insecticides work. They transmit a fatal virus-Curly Top Virus (CTV) to tomatoes. One extra step we have to go through to get tomatoes out here in the southwest. The bug either gets suppressed or leaves town when the rains come as it prefers dry, hot windy conditions which we’ve had. Who knows? Maybe they will move to Texas.


TOMATO BLOSSOM DROP
Also with the rain, the temperatures should come down and blossom drop will stop too. Tomato blossom drop occurs at 92°F + when it  gets too hot for the plant to set fruit. So if you’ve seen blossoms dropping don’t worry-your tomatoes will continue to make blossoms the whole season. But after it sets fruit, higher temperatures are ok. It’s just during higher heat when they are self-pollinating that they drop their blossoms. They need below 92°F to set the fruit. Another bonus. Ah rain!


Epsom Salts and tomatoes


Costuluto Genevese tomatoes

I’ve always used powered Epsom Salts in the bottom of my hole when I transplant my tomatoes in late spring. I read it helps with producing more blossoms and hence more tomatoes. It’s also good for peppers and roses. Epsom salt is a natural mineral that was originally found in a well in Epsom, England. It is magnesium sulfate. Magnesium is critical for seed germination and Sulpher is used for lowering the pH level in alkaline soils like we have here in New Mexico. Sulfur, is also a key element in plant growth.

What I didn’t know was that it is more immediately available to tomatoes and peppers when sprayed on your plant’s leaves vs sprinkling it on the ground. Dilute 1 tablespoon of Epsom salts with one gallon of water, and applied as a foliar spray. When applied this way,  Epsom salts can be taken up quickly by plants.

Here is an internet article on Epsom Salts that goes into more detail about it, a trial using it, and how to use it. From now on I will be spraying it on my plants instead of adding to the soil.

I do not add Epsom salts to my other vegetable plants, just my tomatoes and peppers.

Here is the complete article from Garden.org on Epsom Salts.


Saving Green Tomatoes

Now is the time to finish picking your ripe and green tomatoes as next week it will be in the 20s at night. If you wait till after a hard freeze, it will be too late.

How to save green tomatoes

If you have an abundance of green tomatoes on the vine, you still can bring them inside your house to finishing ripening them (not in a cold garage). Here’s how I do it although there are many ways to save them, I find using paper bags from the grocery store (yes that’s why you’ve been saving all those bags!) works really well.

How to pick tomatoes that will ripen


First you can tell which green tomatoes will probably ripen fully by looking at them. If you see the green is getting lighter on the sides, it will probably ripen as it has started the ripening process. Some have very dark tops and that is ok as long as the sides are a lighter shade of green. Also I just pick the bigger tomatoes as they are usually further along in the growing process versus the small totally dark immature tomatoes.


Use paper bags to ripen them

Place 2-3 layers of rock hard green tomatoes in bags as shown above-no more  that a couple of layers because as they ripen, you don’t want the ones ripening underneath to get crushed. Also discard any that have blemishes.


Place tomatoes that are just starting to get color in another bag and move the ones that are starting to color up from the ‘green’ bag. Look into your ‘green’ tomato bag every few days and move them to the ‘just starting to color’ bags.

Important tip: Put a slice or two of apple (any color) in each bag. The apple slice will release ethylene gas which is a natural ripening hormone that is in many fruits. It will speed up the ripening process of your tomatoes in your paper bags. Replace apple slices as needed. It really works!

Close up all the bags so the apple does it’s work and none of the gas is released. I fold the paper bags over several times and then I put either something on top of the bags to keep them closed or I shove them under a rack to help keep them closed as shown above.

The trick is you must inspect the bags every few days and move them to another bag as necessary. If you just put them in the bag and forget about them, you might wind up with a bunch of the ripen ones squished with the heavier unripened ones on top.

Once they have changed color but still hard, you should take them out of the bag and put them on the counter to finish ripening. Never put a ripe tomato in the refrigerator. A cold refrigerator dampens the taste.

This method is really good on extending the tomato season once the weather is too cold. They will never be quite as good as the sun-ripened ones but are still about 200% better than store bought ones. I use a lot of them that get a little too soft for pasta sauces and eat the rest.

PS: Not all the green tomatoes will ripen but many will.

Great Weather! Time to Plant?

RAIN5

Wow! Great weather this weekend with no wind, warm temperatures and wonderful rain today. I hear tomorrow brings more rain. Today we had some great rain and boy is it welcomed. The native plants and trees and all of our plants are sucking it up. I can’t remember getting this much rain at this time of year in May. A great big plus is the night temperatures are starting to warm up too with the next 10 nights suppose to be from 35°F- mid 40’s. Pretty cold but above freezing.

So can we plant tomatoes? Is it time? Well that depends on whether the nighttime temperatures remain above freezing. Of course the first frost-free date is officially May 15th historically speaking, but back in 2011, we had a very warm May and many of us planted early as it never got below freezing that May. Is this one of those Mays? Who knows, unless you have a magic ball. By the way, I waited to plant my giant pumpkins till later in 2011 (as they are so frost tender) and my 2010 State Record got broken that year by someone who went for it early. I guess I should have put them in but I just didn’t want to chance it. You have to be a bit of a gambler to put your plants in now.

tomatoes in wall of waters 1

But if you are a gambler and want to plant your tomatoes early, be sure you plant using wall of waters (WOW) as shown above.  If you use them, and the temperatures dip below freezing, they will protect your new tender plants. I always use them even when the nighttime temps are in the 40’s as I feel they provide more heat at night and keep them from setbacks. The cells of water warm up all day and give back the warmth at night to the plants like little greenhouses or cloches. Once they outgrow the WOW’s  (like in the photo above), take them off  the tomatoes, which will probably be late May. Do not leave them on all summer.

2014 Tomato Season in Santa Fe

closeup of virginia sweet

My all time favorite-an heirloom-a ‘Virginia Sweet’ tomato-a super sweet tomato worth the wait and weight.

Every year I try to get to the Farmers Market EARLY to sell tomatoes. Early to me would be end of July. Actually I would be delighted to even get to the market the first week of August. But no. Never. It’s not me I swear-I do my job. I get the tomato plants in the ground early enough. It’s THE WEATHER! Every year someone will ask me at the market how come they:

1. Don’t have any tomatoes or

2. Only have lots of green ones.

This year it’s the later because of THE WEATHER. So let me explain-No. 1 and No. 2 above and how both relate to THE WEATHER. This year we didn’t have a super hot June which was great because our tomato blossoms were able to set fruit in June. (If it’s really hot in June, then we experience blossom drop. Tomato blossoms won’t set fruit in temperatures 92°F and hotter.  They would have all dropped off all their little blossoms in our stinking hot Junes – hence no fruit and they grow more blossoms and set fruit up in July when it’s cooler but that puts us behind-see no. 1.)  But that’s not the case this year.

So on to no.2-we got LOTS of fruit now but they are mostly still green so we are still behind. Why? THE WEATHER! Now I don’t mean to pass the buck here as they say, but it’s true. July and now August this year has been delightfully cool and rainy. Daytime temperatures are cooler and nighttime temperatures are definitely cooler. Just like the old days with a real monsoon season. Now those of you new to the area (meaning you have moved here sometime in the last 12 years) have not really experienced the monsoon season, so enjoy it. Who knows when we will get another since we’ve been in drought like conditions the last 12 years.

Ok, back to why it’s THE WEATHER’S FAULT! So what’s happen is we have lots of green fruit but now we need some WARM SUNNY days to ripen the fruit. Even though the fruit can’t tolerate too hot of weather when trying to set fruit, after it’s set, they need warm sunny days to ripen up. All we’ve been mostly experiencing is very cool weather. Ah, what are we gonna do? It’s either too hot when they set blossoms or too cool to ripen.  Both scenarios make for a very late tomato season. Ah crumba!  I hope we get the warm days soon before fall comes as I have a ton of tomatoes on the vines! I sometimes wonder why I even bother and then I remember! I love tomatoes! I love trying new varieties! I’m a tomato addict!

Wall of Waters 101

I think Wall of Waters are one of the best early season aids for tomatoes and peppers in cooler areas of the country acting like little greenhouses keeping the plants warm at night, protecting them from our ferocious winds in spring and for getting a great head start for growth but they can be hard to put up around the plants especially if you are trying to do it yourself. I have another post addressing what amendments I use when planting  and how to plant tomatoes  but this primer is about wall of waters. You can still use wall of waters right now as the nights are still very cool for tomatoes and peppers.

1wow begin by watering

Here is the planted tomato with a big well around it. If the well isn’t big enough than the wall of water will sit lopsided. (I still had to put the drip line around the plant BEFORE I put the wall of water on it). Notice the green wall of water on the ground and the 5 gallon bucket. Some tomatoes are too tall for the bucket so I cut off the bottom of this 5 gallon bucket, first using a drill bit to drill a hole big enough so my sawzall tool could get inside and cut off the circular bottom. The bucket can go over the plant without smashing it over tall tomatoes.

2wow placing over bucketPut the bucket over the plant and then slide the wall of water (henceforth known as WOW) over the bucket.

3wow waterer

Another great tool for filling the WOWs is this watering wand. I like this one because it has an on-off switch and a lever for control of how fast the water comes out. Here I took off the end so it will fit easily inside each cell. (this is my favorite gardening shoe-can you tell-well worn?!!)

4wow-begin filling

Now put the wand into each ‘cell’ and fill with water. The 5 gallon bucket will keep the WOW from falling on the plant.

5fill cells each side

Fill a couple of cells, then go to the OPPOSITE side and fill a couple of cells and do this on all 4 sides instead of starting on one cell and going around where it will have a tendency to collapse. This will help the WOW to stand up better as you fill up the cells.

6wow finished

After filling all the cells, reach in a pull the 5 gallon bucket out and the WOW will now support itself. A perfect little greenhouse. But sometimes…

7wow REPAIRED

a cell will get a hole and leak after the WOW is a few years old. This is a problem as the WOW needs every cell  full to support itself, so…

8wow replacement cell

So you can buy replacement cells or make your own. Just take that leaky WOW and cut some good cells out of it for use as replacement cells for other leaky WOWs.

9wow installing rep cell

Take your replacement cell and fold it lengthwise in half as shown and slide it into the cell where the water leaked out.

10wow w replacement cell

Then fill up the replacement cell with water and it will hold up that cell. Now one last thing…

11wow finished with stakes

I put 3 bamboo stakes inside the WOW’s right next to the walls and make a tee-pee out of them and tie them together at the top in case the WOW wants to collapse from the wind, the tee-pee will hold the WOW up so it doesn’t crush the plant. These plants have been inside the WOWs for a while and I will take off the WOWs now. Just grab the WOW on opposite sides and pull them off the plant and dump the water back in the wells.

Soil temperature is Important When Planting Tomatoes

TOMATO COSTOLUTO

Now is the time to start planting our tomatoes and other warm season veggies outside in our gardens. So often we concentrate on only the air temperature to decide when to plant these crops but the soil temperature is actually just as important. Tomatoes should be planted when the soil temperature reaches a minimum of 60°F in the daytime. If you plant too early in cold soil, tomato (and pepper) seedlings sulk and will not be happy. Root development is very slow and the roots have difficulty absorbing nutrients. The plants could show phosphorus deficiency which shows up as stunted plants with purple leaves on the underside. If your plants get this, top dress them with some powdered rock phosphate and water in.  Nothing is gained from planting too early in the ground. This may account for why we always seem to get the bulk of our tomatoes in August and not earlier when planted outside no matter when we plant. The tomatoes will just sit there until the soil temperature is optimum.

To measure the soil temperature, use a soil thermometer. I prefer using a compost thermometer because they are much longer, usually around 24″ and can be used to check both the temperature of my compost pile and the soil in my vegetable bed before I plant tomatoes. Remember to push it in deeper into your bed as the tomato plant won’t be in the top 3″ but more likely planted deeper where the soil is cooler. I find the short soil thermometers just aren’t long enough to measure the soil temperatures more than about 5 inches and quite often I plant tomatoes much deeper. I got my compost thermometer online but I recently saw some at Payne’s Nursery here in Santa Fe.

To warm up soil sooner, you can put black plastic over the bed to pre-warm the soil. I use black plastic garbage bags that I tack down with rocks. That way I can reuse the bags later instead of buying a roll of black plastic. Leave it on for 1-2 weeks and take the temperature to see when the soil warms up to the optimum temperature. Many warm season vegetables could benefit from planting in warmer soil.

Here is a chart I found from Farmerfredrant giving the optimum soil temperatures for planting vegetables. I’m showing it here but also listed it as a pdf (soil temperatures for veggie seeds ) so you can print it out as well.

soil temperatures for veggie seeds

Giant Pumpkin Cotyledon Leaves Compared to Tomato Cotyldon Leaves

Here’s a comparison of the giant pumpkin cotyledon leaves (the first 2 leaves to pop out) along with it’s first true leaf compared to a tomato cotyledon leaves along with it’s first true leaf. Notice the size difference! Giant pumpkin cotyledon leaves are the biggest baby leaves I’ve ever seen.

cotyledon leaves on giant pumpkin and tomato

Transplanted Tomatoes Again to Bigger Pots

Ok, yesterday I made another mess in the kitchen. I transplanted more tomatoes up to bigger pots from 2 inch pots to 4 inch pots. I washed the empty pots in bleach water and after planting them, I fertilized them with a weak solution of fish emulsion and Thrive. I knew I needed to transplant them as their roots were growing out of the bottom and they were starting to look stressed. Stressed? How can they be stresssed when they are in a nice warm cozy house under gro lights in a controlled environment-just wait till they get out in the ground, then they’ll be stressed! I tell them they got it cushy now. I think they know their going out early!

I’m chomping to get the tomatoes out. Patience, I tell myself. I looked up when I planted the tomatoes last year and the year before. Last year I planted tomatoes on May 4th and the year before I planted on April 29th when we had a warmer spring. So I guess I’ll wait till around the first of May. It’s always a guessing game when to plant if you want to plant earlier than the first frost free date which is May 15th here in Santa Fe. I like to try to sneak in the tomatoes early because I grow so many mid-late varieties which can take all the way up to 100 days+ to harvest. We have such a short growing season here in Santa Fe that I use all kinds of season extenders to get them in early so they have more time to ripen before that first frost next fall. OMG! I can’t be talking already about fall, we just got into spring and the plants aren’t even in the ground!

Giant tomato

Here is a picture of one of my giant tomatoes on it’s way to stardom. (I hope!)

baby giant tomato

Notice this tomato looks deformed and gnarly. It has 4 little tomatoes that have fused together-kinda like Siamese twins only this one is quadruplets! Most giant tomatoes are a result of a megablossom where 2 or more blossoms fuse together. Many megablossoms do not pollinate fully and so they have a higher self abort rate. So far this one is doing well. I have a few other megablossoms right now but not many. Some varieties produce more megablossoms and hence more giant tomatoes. Two varieties that have the potential of producing giant tomatoes are Delicious and Big Zac. There are other varieties that can produce giant tomatoes too. This one in the picture comes from a Nick Harp tomato seed. His plant grew a 7 lb+ tomato last year and he gave me a few seeds. I call his plants the ‘Harpies”! I have 5 growing right now. Hope this one becomes a monster! Since I’m an organic grower I’ve been feeding it fish and seaweed fertilizer from the Neptune brand.

Learn from my mistakes when starting tomatoes!

UGH!  I made 2 mistakes with my newly transplanted tomatoes last week. So I want to share the mistakes and how I luckily remedied them.
MISTAKE #1- After I watered the tomatoes from the bottom tray where they sit in, (which is a good thing), I forgot to drain the water from the pan all day and all night (too much standing water can suffocate the plants)

MISTAKE #2- Secondly I forgot to cover them with the reflective insulation at night to keep them warm while the house cools down. So not only did they sit in the water all day and all night but they got cold as well. In the morning they were slightly wilted and turned a little purple (turning purple means they can’t access the phosphorus from the cold soil.) Last year I had this problem with the tomatoes turning purple, being stunted and being too cold and have really paid attention this year except this one time. I didn’t get a picture of them purple..

rock phosphate powder

So I drained the water away and read if tomatoes turn purple that we should water some rock phosphate in (which is a good organic source of phosphorus) and put them under the lights to get warm.  This happened a week ago and they have snapped out of it and look good, I lucked out! So now I have given all the baby tomatoes some rock phosphate and they are doing really well. I think I’m going to need to transplant them again before I put them in the ground.

tomato plants after the rock phosphate

Here they are now after the rock phosphate- they have really grown since planting them on March 1. I’m hoping weather permitting, I will sneak them in the ground by April 15th, which is a month before the last frost date like last year. This really gives them a head start on the season, especially for those 80+ days tomato plants.

Another tip to not have those skinny, thin stems on your baby plants is to lightly brush them with your hand everyday and it will stimulate them to make stockier stems.