Make tomato sauce the easy way!

2tomato sauce-making sauce

By now you’ve probably finished harvesting and making your tomato sauce but I have to share how I do it.

I grow many tomatoes each year and make LOTS of tomato sauce as a result. But canning it doesn’t happen until late fall after harvest season is done.

I use to make it the old fashion way of putting the tomatoes in boiling water until the skin splits, then putting it in ice water to stop cooking, then peel off the skin and squeeze the tomatoes and juice in bowls to freeze. Tiring—very tiring and it takes lots of time.

Now I make tomato sauce the easy way. I finally got a food strainer (sometimes called a food mill) that separates the skins and stems from the pulp, juice and seeds making an uncooked tomato sauce in record time.  My food strainer is from Victorio. It comes with one screen that is fine mesh. I also got the salsa screen because I want my sauce thicker. I can process about 20 lbs of tomatoes in 10-15 minutes. But let’s start from the beginning.

1tomato sauce-tomatoes ready

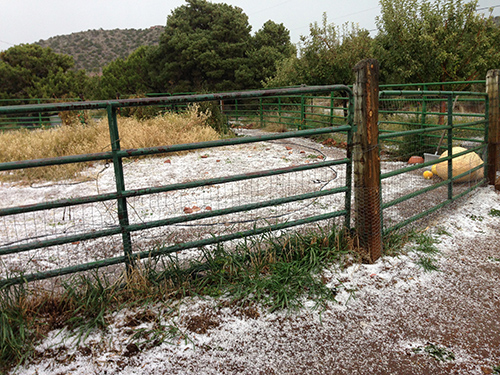
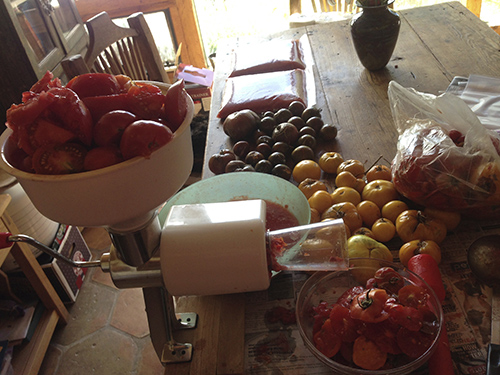
First you’ll need some tomatoes. Good and imperfect blemished tomatoes are perfect for making sauce. These had hail damage but tasted good.

4tomato sauce-tools

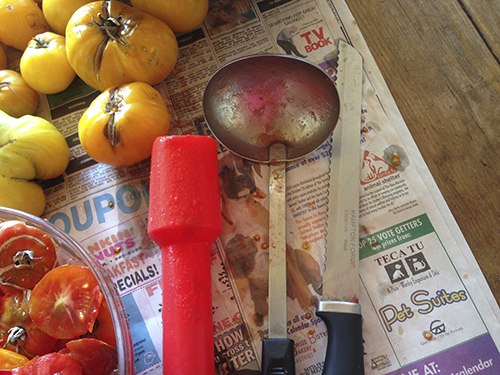
Here are the tools-a plunger to push to tomatoes through (comes with the food strainer), a ladle, and a serrated knife to cut the tomatoes in chunks to fit in funnel. This process is messy so cover your table!

3tomato sauce-putting tom in mill

Cut up and put the tomatoes in the food strainer funnel. No need to take off skins, the strainer will do it for you.

5tomato sauce-partially done

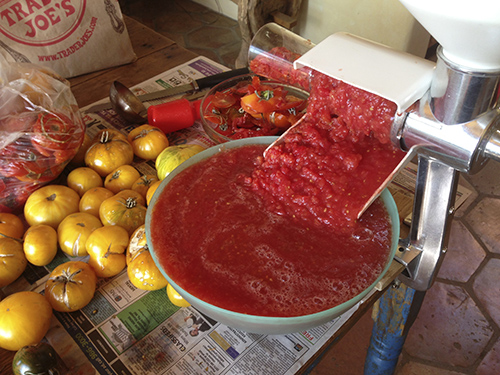
Here is some sauce partially done. The food strainer has separated the sauce out into this green bowl. You crank the handle and push the tomatoes into the funnel using the red plunger. The strainer reminds me of a meat grinder except it grinds up tomatoes instead. It also can be used to make grape juice from grapes and applesauce or apricot sauce.

6tomato sauce-skins out

The other side of the food mill spits out the skins. I also cut off the stems shown in bowl. The chickens will love getting this bowl!

7tomato sauce-finished in bowl

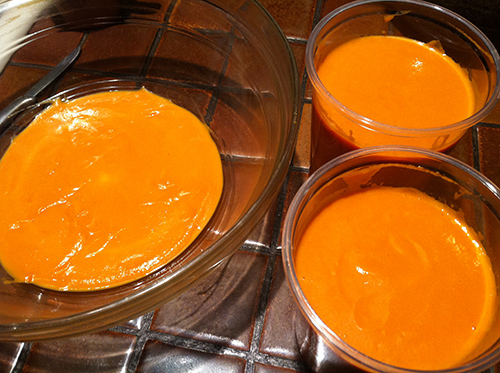
Here is the bowl full of rich raw tomato sauce ready to bag with more tomatoes in the background ready to make sauce.

8tomato sauce-in bag

I put about 12 cups of raw tomato sauce in a gallon size freezer bag. I don’t like to overfill them. I also squeeze out the air while I ‘zipper’ them up. Be sure you zipper it well or it could leak out when you lay it flat.

9tomato sauce-finished in bags

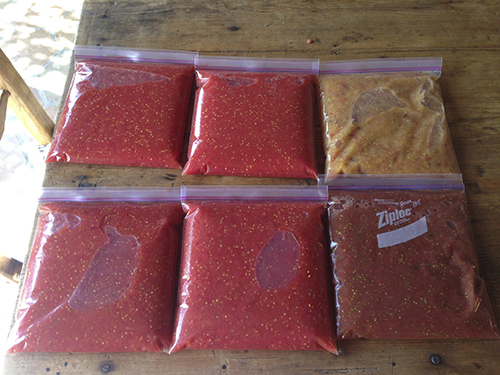
Here is the raw tomato sauce—bagged and ready to freeze. Notice I have different colors of sauce coming from different colors of tomatoes. Later I either cook the bags of raw sauce up for a recipe or I end up canning them when my freezer is too full and I’ve recovered from harvest season!

Tarbais bean/cassoulet part 2

cassoulet

Cassoulet is a hearty winter dish which was originally created by poor farmers or peasants in southwest France. Only god knows what the rich and royal were eating if this is what the peasants ate cause this is very rich! There are different types of cassoulets in France depending on the region you live. Some cassoulets made in mountainous areas might have lamb as their main meat, others close to the sea would have fish and the most famous cassoulet is made with duck but no matter, they all used the Tarbais bean (pronounced Taar Bay) as a main ingredient to make this famous dish. To find out more about my experience on growing Tarbais beans go here. I made cassoulet with duck and my Tarbais (cassoulet) beans that I grew.

Cassoulet is slow cooked in a ceramic dish called a cassole which is a basically a covered ceramic casserole dish that can go in the oven. It traditionally is made with sausages, pork, duck confit and Tarbais beans-not for the faint of heart and I mean that literally!

So on with making a cassoulet with duck. Don’t be in a hurry cause it takes several days to make this dish-yes I said days—like as in 3 days!

First, Whole Foods ran out of duck confit, so I had to go online and learn how to make it myself which was a blessing as duck confit is very expensive and evidently not as good if you don’t make it yourself. There are many recipes on the internet but here is the recipe for both the Duck Confit and Cassoulet that I use from: Cassoulet by Anthony Bourdain and Michael Ruhlman as presented by ‘The Daring Kitchen’: http://thedaringkitchen.com/recipe/confit-cassoulet . Here is their recipe as a pdf – Confit_Cassoulet_Jan_2011 which is helpful to print out as your computer will run out of juice before you can finish making the recipe in 3 days!

I wouldn’t want to go to all this effort all the time but once a year in the winter is great. Plus I did not line the ceramic pot with pork rinds-just seemed like overkill to me (literally).  Now don’t worry they also have several different versions of cassoulets at the link above for the more heart healthy conscious (like chicken confit in olive oil and vegetarian cassoulet) but I thought I’d try an original version once! Next time I will exchange the pork with smoked turkey necks (which taste like smoked pork) and the different pork sausages with turkey sausage versions as it has sooo much fat.

What was once a poor man’s dinner is now very expensive but oh so good. I like to eat this hearty winter dish on a cold winter’s night with a glass of red wine by the fireplace. I think the red wine cuts the fat, or least that’s what I tell myself!

Tarbais bean/Cassoulet Part 1

Here is what Tarbais (pronounced Taar bay) beans looks like on the vine and closeup, after dried but before shelling and when shelled in jars. I like to cook and wanted to learn how to make a french dish called ‘Cassoulet’ last year (2012) and had a heck of a time finding this particular bean that hails from France where I would have to pay $34.00 an ounce for heirloom Tarbais beans ! That’s because our USDA and the cost of their inspections drives up the price to get them into the US. The ones to grow can be different from the beans to eat. The ones you can purchase to eat might not be a true heirloom, mixing genetically with other beans but they will taste the same unless you try to grow them out.  The heirloom variety were not in any seed catalog last year but I finally found 4 people who offered their heirloom seeds through Seed Savers Exchange (SSE) in their Members Catalog ($4 for shipping only) and each gave a lot of beans (30+). Well worth joining because 1) you are supporting growing heirloom seeds and 2) many people grow unusual vegetables and offer their seeds through SSE. They were the only ones who had them in 2012 in the US. This year (2013) I saw them offered at Baker Heirloom Seeds in their catalog and got more although now I have my own supply of them as well.

tarabais and navy bean

Navy bean (top) and Tarabais bean (bottom)

So what’s so special about the Tarbais bean? I probably could have used a white Navy bean but I read that the Tarbais bean is slightly bigger and becomes creamy without disintegrating and becoming mushy like many other beans do and I wanted to be authentic and grow out that variety of bean.

The Tarbais bean originally came from the village of Tarbais, in southwestern France and is used in cassoulet dishes. Tarbais beans were developed by generations of farmers that lived in that area. The Tarbais Bean in 2000 obtained IGP status (Indication of Protected Geographical Origin). Only members of a small, closed cooperative in Tarbais are allowed to use that name for their beans, and production is tightly regulated. The original seed is a New World runner bean (Phaseolus coccineus) and most think it originated in Mexico.

That’s one of the great things about growing your own vegetables-you can grow something you might not find in the grocery store. That doesn’t mean it will taste exactly the same as where it originated from (like I doubt a New Mexico chili grown in New Jersey would taste the same as our conditions and soil are very different) but at least I could try. The beans are grown like any pole bean that you are going to leave on the vine until dried. They were harder to start as the birds liked the ‘bean sprouts’ when they popped up so I had to replant several times and cover them with row cover to protect them until they were about 3 inches tall. After that it was a breeze. Just water them regularly. They will produce many pods that you just leave on until fall when they dry on the plant.

Part 2 of this will be the about Cassoulets and the recipe I used.

Final Harvest 2013

final harvest 2013

Now that the harvest season is over, I have so much to catch up on with you all from this season. Seems when I am in the middle of the gardening season, I’m just too tired to write about all the things I want to share as I’m either in the glass shop or out in the garden during the day and come in at the end of the day ‘dirt tired’ as I say. So now I can catch up on maybe a particular vegetable I wanted to try, or how much honey I was able to harvest this year or a particular dish I cooked and enjoyed or something else I observed. I did take pictures all along waiting till I had the time to share.

Here is a photo of the last harvest of the season on Oct 21, 2013. I picked the Tarabais beans after they dried in the shell. They are in the baskets (on the left) waiting to be shelled, 3 heirloom Banana squash (on the right) which I left out in the first few frosty nights as they get sweeter if left out in the cold (but do bring them in when we get really cold), French Fingerling potatoes were dug out and put in the black box to cure and the very last of the tomatoes that I finished ripening inside that later became sauce and in the white bucket behind all of that was the honey we harvested just before putting the bees ‘to bed for the winter’. You always leave enough honey for the bees before harvesting any for yourself and some years you don’t get to harvest any. Here it is waiting to be put into jars after being strained in the white bucket. More on these individually later.

Fresh Pumpkin Recipes

pumpkin interior

Now that the 5th Annual Pumpkin Bash is over, what can we do with our fresh pumpkin pieces? Here are some ideas.

pumpkin steak cooked

One recipe I love is ‘Pumpkin Steaks’. You can find the recipe here: https://giantveggiegardener.com/2012/11/05/pumpkin-steaks/

pumpkin soup2

Here are 3 great pumpkin soup recipes you can find here: https://giantveggiegardener.com/2010/11/21/3-great-pumpkin-soup-recipes/

512px-Pumpkin_Pie_from_a_*real*_pumpkin,_November_2007

Of course no pumpkin recipes would be complete without a pumpkin pie recipe but this one is for FRESH pumpkin:

FRESH PUMPKIN PIE

1 unbaked pie shell
2 c. freshly prepared pumpkin
1  can evaporated milk
3/4 c. sugar
1/2 tsp. salt
1 tsp. cinnamon
1/2 tsp. ginger
1/4 tsp. nutmeg or allspice
1/8 tsp. cloves
2 eggs, beaten slightly

To prepare fresh pumpkins:
Use small to medium size pumpkins OR really giant ones like I do! Cut pumpkin into quarters or big pieces. Whatever will fit on a cookie sheet. Leave rind on. Put a little oil on cut edges to keep from drying out. Place cut edge down on foiled lined cookie sheet. I put foil loosely on top to keep edges from burning.  Bake at 350° for about 30 min-to over an hour depending on thickness. Pierce frequently with fork to check for tenderness after at least 30 minutes. When fork pierces meat easily, remove from oven. Cool first and then scoop out meat and drain in colander for about 30 minutes to release extra liquid. Then use wand, blender or food processor to puree. Use fresh or freeze in Ziploc freezer bags for later use. I like to freeze in 2 cup increments which is exactly what the recipe calls for!

To prepare fresh frozen pumpkin meat:
By now, if you are like me, you have some pumpkin you prepared as above and froze it. All I do is defrost it and if still a little watery, let it drain a few minutes then follow directions below.

Pumpkin Pie Filling: Preheat oven to 425 degrees. Mix the 2 cups of fresh pumpkin with rest of the ingredients. Pour into pie shell. Bake 15 minutes at 425 degrees. Reduce heat to 350 degrees and bake another 45 minutes or until an inserted knife comes out clean. If edges of crust start to turn too brown or burn, make a ring out of foil and put on edges of the pie crust.

2013 Pumpkin Bash Pics

This slideshow requires JavaScript.

Here are some of the pics from this year’s Pumpkin Bash. Everyone enjoyed the camaraderie, sipping apple cider and bashing the pumpkin ‘Honey Boo Booo’—named because it was so small-only 176 lbs (which is teeny for a giant pumpkin). Who needs therapy when you can do this?!

5th ANNUAL PUMPKIN BASH!! This Saturday Nov. 2, 2013

honey boo booo

Hey friends – I do have a giant pumpkin just waiting to get bashed by you! Now keep in mind it’s not a ‘giant’ giant pumpkin but rather a smaller giant that weighed in at 176 lbs. Still that’s more than most people weigh. Since it is small, I’ve named it Honey Boo Boooo because of its pint size. So come and have some fun-watch it get axed or take part in the axing and sip some hot apple cider. Don’t be late as it won’t take long to bash it. Afterwards, take some of the organic pumpkin home to make your favorite pumpkin dish. The rest of the pumpkin will go to Kitchen Angels to feed the hungry. Be there or be square!

Event: 5th Annual Pumpkin Bash

When: This Saturday, November 2 at 9 am

Where: Liquid Light Glass, 926 Baca Street, Santa Fe, NM

‘Garden talk’ show today on KSFR 100.1

For those of you up early enough to read this, you might want to check out a radio show I’m going to be on at 10:30 am for half an hour on radio KSFR 101.1 FM.  Fellow Master Gardeners, Bob Zimmerman and Laurie McGrath are hosting a new show, ‘Garden Talk with Bob and Laurie’ with me being the guest this week. Hope you’ll be listening in and please call the station to tell them you like it (KSFR 101.1 FM) as it is a pilot show and we will see if it will be picked up. If it is picked up, it will be a weekly show and they plan on having me on once a month to talk about what to do in the vegetable garden.

Latest addition to the barn-KOKO the horse!

Koko_side shot_2 yrs

Koko-just before loading into the trailer

Wow! First, last month in September we get the baby goats, Pumpkin and Iris, to add to our other goaties, and now we get a horse!

After my other horse, Bri died 4 years ago, I wasn’t sure I wanted another horse as the hole in my heart was as big as the horse and wasn’t sure I could go through that again so I had converted the corral into a giant pumpkin patch.

Fast forward to last month when a friend emailed me about Koko needing a home. Her owners who had lived in Nambe moved to town and Koko was being pastured at a neighbor’s place and they needed to find her a home before winter. So we went out and looked at her. She is a beautiful little 2-year-old black and white philly. She is considered a ‘pinto’  with her black and white coloring and is not registered. Pinto can refer to the coloring of a horse and not necessarily the bred and Koko is a mixed bred. I have always wanted a pinto horse, loving the colors and patterns they come in. In my mind’s eye I could see her in our corral even before I got her.

All week long I’ve been converting the giant pumpkin patch back into the corral and yesterday, our new friend, Nick, came over to help put the finishing touches on the corral before we all went to pick her up.

After finishing prepping the corral, Elodie, Chelsie, Nick and myself went out in their truck/horse trailer to pick up little Koko…

Koko_nick loading 2013

Nick tries loading Koko to no avail

It was challenging to say the least to load her in the horse trailer as she wasn’t use to getting in a horse trailer and was totally trailer shy. It took us over 3 hours to get her in it. I tried a few times-no luck. Nick tried the second time-no luck. Nick tried a few more times but still no luck. After that her owner, Steve tried multiple times-no way!

Koko in trailer_2013

Chelsie finally got Koko into the trailer.

After many, many, many times of no go, it was Chelsie, our neighbor friend’s daughter who was finally able to coax her into it using Pat Parelli’s (a horse whisper) training techniques.  We got her in  the corral at home right as it was getting dark. She is very loving and sweet, only needs some training and attention. I can’t wait to start using Pat Parelli techniques that I’ve learned and had trained Bri with once I get my roundpen up again on Wednesday.

Koko in the morning in her new home happily eating her breakfast.

Koko in the morning in her new home happily eating her breakfast.

This morning she seemed very happy in her new digs. It feels good to have a full barn once again. Please welcome Koko!

Tough year in the vegetable garden

IMG_3215

Yesterday’s hail storm-October 11, 2013

This has been one of the most challenging years in the veggie garden that I can remember.

First the leafhoppers arrived in spring to infect the tomato plants with the curly top virus they carry, a fatal disease for tomato plants. They particularly get bad during drought years because they like it dry and hot. I pretty much thwarted them by covering all but 4 of my tomatoes with row cover (I ran out) which acts as a physical barrier until they left in July when the rains came. So my loss was minimal-maybe 10% compared to the 50% loss of tomato plants last year for me. Luckily I always grow more than I need. I will definitely will cover them again next year.

IMG_3210

Biggest pumpkin ‘Honey Boo Boo’ only 176 lbs at end

A squirrel ate my best and fastest growing giant pumpkin plant which put me out of commission to be a contender for our state record, putting me 2 months behind when growing the back-up pumpkin. Here is a pic with my total pumpkins-biggest this year-named ‘Honey Boo Boo’ – 176 lbs-bummer…

We had one of the worst hail storms I can remember in early July but again since the tomato plants were still covered, they were protected. Everything else really got set back but did come back eventually. Many of my gardener friends got hit really hard and lost many crops in that one storm.

IMG_3218

Hail damage-tomato on left, cracks (now healed) from too much water tomato on right

Then in August we finally started getting a lot rain which we desperately needed. Unfortunately we got 3 inches of rain in one week which the plants couldn’t handle all at once and many, including rock hard green ones split or cracked from too much water. (Ahh, whata ya going to do? First too little water, then too much water all at once!) The tomatoes were a little watery for about a week until they absorbed the extra water and healed their cracks. Now they are good again. Most of the uglies became sauce.

Then another devastating hailstorm this time with the row cover off so the tomato plants took it hard and many started to succumbed to fungal diseases because the hail damage weakens the plants and makes them susceptible. Kinda like us getting a severe beating opening up many wounds.

IMG_3212

Hard freeze in late September finished off tomatoes

While I was on vacation, we got our first hard freeze in the last week of September which basically finished off the garden except for the chard and the grass growing under the tomato plants. Pretty unbelievable that we got such an early freeze in Sept when usually it doesn’t come till the second or third week of October. So the season has ended up very short. Usually I can go to the Farmers Market through the first week of November now I’m not sure I can get thru the 3rd week of October. I will go tomorrow to the market as I still have 8 boxes of good tomatoes but we will see after that. I just picked the green ones that were starting to ripen and see if they will still ripen.

IMG_3214

Pumpkin patch almost cleaned up before hail hit.

And finally yesterday we had another hail storm-in October no less! Unheard of to have hail so late. Luckily I had finished picking any tomatoes, eggplants, peppers and a few squash that made it just yesterday morning before the hail hit. So that’s it-THE END. (although I think I may still have some chard left-gotta see how beat up it got…)

Which brings up a point as I am rather calm about all this. I use to get super upset but I learned 11 years ago when we had our 3 year bark beetle infestation due to a severe 4-year drought that basically wiped out 98% of our pinon trees (I lost 300) that we really can’t fight Mother Nature. We can only beat our heads against the wall for so long. We try to do our best and then at some point I learned that I just have to surrender to what is—’you can’t stop an avalanche’ as I was told once. Once I surrender, all stress leaves because I realize I can only do what I can do and that’s it. And surrendering is not so bad as now I can let go and start to plan the next season. Ahh, the life of a little farmer. Luckily my main income comes from glassblowing not farming so I am very lucky in that sense compared to the farmers whose main income is from their crops.

Besides I haven’t been able to write that much in the blog this season as I’ve been so busy in the garden but I did take pics and can catch up on some of the things that took place but didn’t have time to write about. Stay tuned…

New additions to the family!

PUMPKIN N IRIS

I don’t know where I got this farming thing cause I grew up in a city but I really love having a mini farm or as I say a ‘artisan farm’ on the edge of town. Four years of attrition, losing 8 animals (all but 2 were geriatric—1 horse (colic), 3 dogs (old age), 2 goats (old age) and 1 cat (old age) and 1 more goat (bloat) is sad enough. Two new baby goaties have been added to the barn. They are about 1-year-old bringing our total to 4 goats. It feels good to build up the farm again. Nothing worse than an half-empty barn.

BELLA N WEE_FALL2013

The other two are Bella Rosa and Hunwee, the 3-year-old African goaties.

PUMPKIN N IRIS FIRST DAY

The new goaties pictured above look like baby deer or antelope to me with their tall skinny legs and fine bones. They are a cross between a Lamacha goat and another goat-father unknown.  Pumpkin is a orangy-brown and Iris is tri-color with predominately black white markings. Iris has a face like, well an iris. They are built very different from the short squatty African goaties.

PUMPKIN IN EATING BOWL

Pumpkin likes to stand in the food bowl while she eats. I’ve even caught her sleeping in the food bowl but didn’t have my iphone at the time to take a pic.

PUMPKIN EATING

In fact Pumpkin likes to eat all the time. Soon she will outweigh Bella Rosa!

IRIS CLOSEUP

Iris has a markings on her face that remind me of an iris. I think she is very beautiful. Notice her very small elf-like ears which are a Lamacha goat trait. Very different from the large African goat ears.

IRIS CLOSEUP2

She is the most shy of the two new goaties and cries if separated from Pumpkin even if only for a moment. They are sisters and are inseparable.

ALL 4 GOATS

Here are all the girls together. The white goat in the background is Hunwee, next is Bella Rosa with the big bat ears (she is all black except for the most gorgeous white teeth!) In the foreground are the two new baby sister goaties, Iris and then in front of her is Pumpkin.

Please welcome Iris and Pumpkin!

Tomato Tasting Contest

tomato contest1

Today I held a tomato tasting contest with some of my friends. I have to say I was very disappointed. Not with my friends but with my tomatoes. I went last to taste them and could not believe how many of the tomatoes were either bland or watery. Some seemed weak in flavor. I’ve eaten them all summer and couldn’t remember them like this. They were not at all like the sweet flavorful tomatoes I ate last month.

Then it hit me-the 3 inches of rain we had this past week really weakened the flavors. I have had many split their skins this week from taking on so much water and that explains why so many of my favorites were rather bland vs a month ago they were very flavorful. They say if you want the flavors more intense, cut back on watering during harvest time which I did. Usually we don’t have an over-abundance of rain, but we have this year. I haven’t had the drip system on in 2 weeks but mother nature choose to give us more rain than I can ever remember getting at this time of year.

This slideshow requires JavaScript.

Never the less there were some outstanding tomatoes. Below is the ranking of the ones we tasted. There were many ties. I found it amazing that 7 of the tomatoes in the top ten were black or purple tomatoes. 6 were yellow and only 1 red tomato in the top ten. (Remember there were some ties which is why we have more then 10)

Many of the rest of the tomatoes were red which is interesting as most of us like to use red tomatoes for sauce where cooking brings out the flavors but don’t like to use other colors for sauce.

I think if I had had the contest 2 weeks ago before the rain, the results may have been very different but still feel the black tomatoes would have outshine the rest. Can you tell I’m partial?!

Thanks to all for helping out with the tasting and grading!


2013 TOMATO TASTING CONTEST

TOP TEN

1st place-Paul Robeson-black tomato

2nd place-Indigo Apple-black tomato

3rd place-Brandy Boy-black tomato

4th place-Black and Brown Boar-black tomato

4th place-Big Sungold Select-yellow cherry tomato

5th place-Cherokee Purple-black tomato

5th place-Southern Nites-black tomato

6th place-Sungold-yellow cherry tomato

7th place-Juane Flamme-orange tomato

8th place-Ananas Noire-green/black tomato

8th place-Virginia Sweet-yellow tomato

8th place- Porkchop-yellow tomato

9th place-Galon De Melon-yellow cherry tomato

10th place-Bloody Butcher-red tomato

———————————————————————————

11th place-Marmande-red tomato

12th place-Big Zac-red tomato

13th place-Costoluto Genevese-red tomato

14th place-Pantano Romanesco-red tomato

14th place-Green Grape-green cherry tomato

15th place-Cour Di Bue-red tomato

15th place-Gold Medal-yellow tomato

16th place-Orange Wellington-orange tomato

Biggest tomatoes 2013

tomatoes_biggest_2013

Here are the two biggest tomatoes so far this season. The yellow one on the left is 1 lb 11 oz Gold Medal and the red one on the far right is a 1 lb 10 oz Big Zac. I got second place at the State Fair with a little smaller Big Zac tomato but if I had found this Gold Medal I would have had first. It’s ok though as I took 5 first places, 1 second place and 1 third place at the State Fair. Can’t be too greedy.

My bee hive looks good going into fall!

Bee on Borage-photo courtesy of Elodie Holmes

Bee on a borage flower—Photo courtesy of Elodie Holmes

I went into my one and only topbar hive today to see how the ‘girls’ were doing and am thrilled to report that they have 18 bars-10 full of honey, 1 bar being built and 7 full of brood. They look to be in really good shape for winter. I didn’t see the queen today as I was in a hurry but that was ok as there was lots of capped brood and larva in those 7 bars and lots of activity with the bees coming in and out of the hive carrying in pollen and nectar.

Around my property right now native plants such as Apache plume, chamisa and asters are all blooming and the bees are loving them. Plus my Russian sage, catmint, spireas, lavender, honeysuckles, Datura, borage and my out of control, drought tolerant silver lace vine (all over my fences) is full of little flowers and the bees are loving all of them as well. I’d say they are truly ‘busy as a bee’.

I can’t tell you how happy and grateful I am for this to have happened as this past June I almost lost all of my bees. Nothing is worse or more depressing for a beekeeper than to not have any bees! My queen had disappeared after winter sometime in late spring, and I suddenly discovered I had only 2 bars with a few hundred bees roaming around aimlessly, not knowing what to do without a queen. I had two friends, Bob Z and Les Crowder each give me 1 bar of brood so the hive could survive until I got a new queen acclimated to the remaining bees. The surviving bees had the new queen lay an egg in a couple of queen cells they made to supersede the queen I bought. This process is called ‘supersedure’ which is the bees way of replacing an existing queen in the hive with a new queen without a beekeeper’s interference. They obviously wanted to raise their own queen instead of accepting the one I bought. The queen I bought ‘disappeared’ and a new queen of their choosing emerged and took over. The rest is history. She has been one kick-ass queen to build up her hive so big in such a short time. I just hope no bear will come by this far south but they are always worrisome in the fall and one has been seen not too far away. I’ll keep my fingers crossed it doesn’t come my way.

The runaway

giant marrow 08-10

A BIG runaway! DISCLAIMER: This one is way too big to eat! I entered this in 2010 in the State Fair instead!

At this time of year if you’re a vegetable gardener, you’ve experienced it—zucchini runaways. One day you go out and see this cute little zuke and think I’ll give it one more day and the next day you go out and it grew into a baseball bat. It’s like overnight it got on some steroids and went ballistic.  Now it’s too big so what do we do with them besides hide them under the bed in case an intruder comes in? Well you could use them as door stops or take them to the fair but here are 4 ideas to eat them!

Savory Zucchini Pancakes
Take 2 cups of grated zucchini, add two beaten eggs, 2 tablespoons of flour, and 2 teaspoons of some fresh herb you have and 1 cup feta or mozzarella or cheddar or whatever cheese you have (please, no Velveeeeeta). If you want more, then just up the ingredients like 3 cups zucchini, 3 eggs, 3 tablespoons flour, etc. Just don’t up the herb, keep it at 2 tsp so not to overwhelm the flavor of the zucchini (what? zucchini has flavor? Yes, at least two varieties do – Costata Romanesco and Benning’s Green Tint (not a zucchini but a delicious summer squash). All the others, in my opinion, are worthy of either the compost pile or the chicken coop or both) Then saute them in olive oil until brown on both sides. This is my favorite way to cook super-sized zucchini.

Garlicky Zucchini Medallions
Slice them into medallions and saute them in olive oil with some crushed garlic cloves until tender in a BIG fry pan. Sprinkle lightly some red pepper flakes and add fresh grated Parmesan cheese on top and cook a few minutes more till melted. This is also great with a little left over spaghetti sauce drizzled over them.  (Can you really drizzle spaghetti sauce. No—but you get the idea-don’t drown them.)

Zuchinni Soufflini (This one comes from my mom-thanks mom!)
1 1/2 lbs zucchini
1 large onion, chopped
3 TLB butter
1 cup shredded cheddar cheese
1 tsp salt and 1/4 tsp pepper
2 beaten eggs
1 1/2 cups soft bread crumbs
2 TLB butter

Cook squash whole for about 5 minutes in boiling water. Cool. Dice into cubes. Saute’ onion in 3 TLB butter and add to zucchini. Stir in cheese and seasonings and allow mixture to cool before adding beaten eggs. Spoon into buttered 1 quart casserole. Toss bread crumbs with 2 TLB melted butter and sprinkle over casserole. Bake 30-40 minutes at 350°F about 30 minutes or until knife inserted comes out clean. Serves 4-6 people.

Of course there is always the infamous zucchini bread but how about chocolate zucchini bread? I got this recipe from a friend many moons ago and it is excellent. Your kids, friends, spouse or partner will never know they are eating something healthy!

Chocolate Zucchini Bread
2 ¼  cup all-purpose flour
½ cup unsweetened cocoa powder
1 tsp baking soda
1 tsp salt
1 ¾  cup sugar
½ cup butter
½ c vegetable oil
2 eggs, large
1 tsp vanilla extract
½ cup buttermilk
2 cup unpeeled zucchini, grated
6 oz choc chips
¾ c chopped walnuts

-Preheat oven 325 degrees. Butter and flour a 13” x 9” x 2” baking pan
-Sift flour, cocoa powder, baking soda, salt into large bowl.
-Beat sugar, butter and oil in large bowl until well blended. Add eggs 1 at a time, beating well after each addition. Beat in vanilla extract. Mix in dry ingredients, alternate w/ buttermilk in 3 additions each, fold in zucchini. Mix in choc. chips + nuts. Pour into the baking pan. Bake until toothpick inserted in center comes out clean in about 50 min. Cool completely in pan.

So the next time you get a runaway, don’t despair, now you have some ideas on how to use them besides hiding them under your bed!