With all the snow outside right now isn’t it too early to start seeds inside? NO!
My radio show will air on Saturday, Feb 25 on KSFR 101.1 radio station and airs the last Saturday of every month where I give tips and advise about gardening for the following month. March will be about my seed starting schedule which I’ve already started but many veggies can be started later too from the schedule.
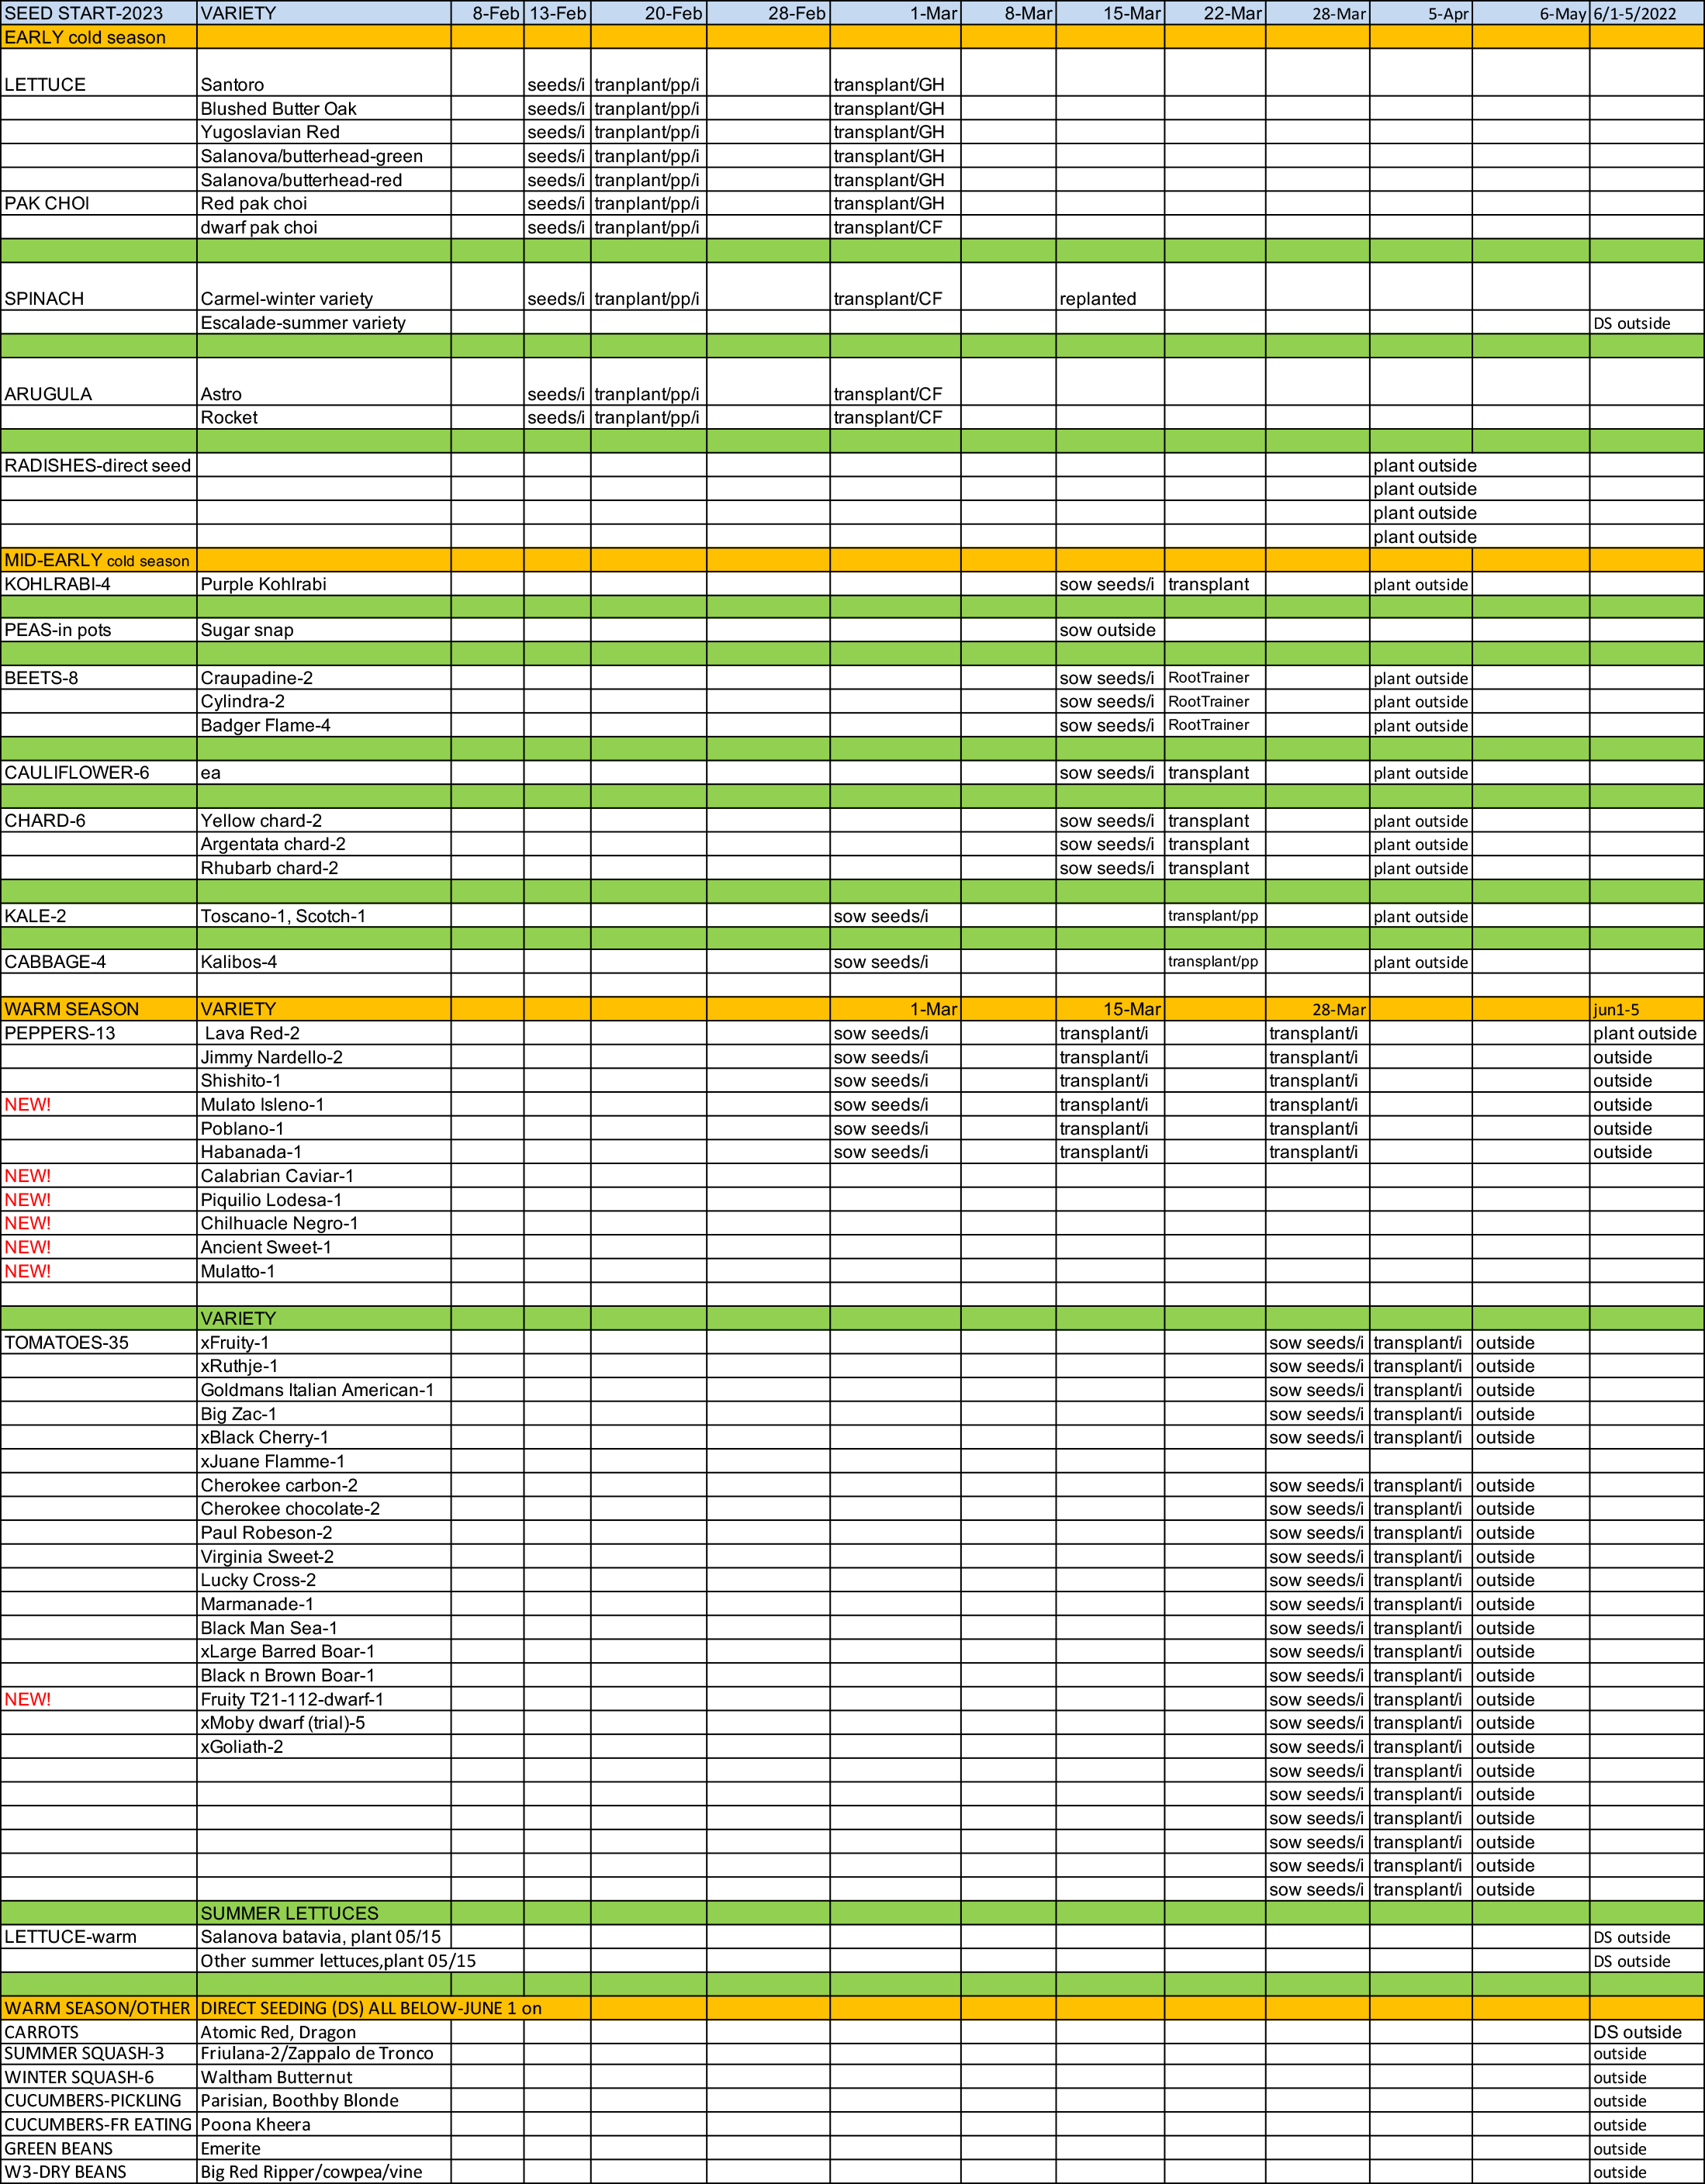
I want to talk about my planting schedule for 2023. Thought you readers might be interested. Of course, the dates are not carved in stone and changes a little each year but it tells me when I should get growing and how I think when starting crops. Some are started inside and later many warm season crops are started inside and more warm season crops will be direct seeded into the ground when the ground warms up in June. If you plan to grow veggies this year, it is good to be organized. I need to see it in writing.
This may seem a bit much to make up such a detailed schedule but I grow so many varieties of veggies and they each have their own growing season so it keeps me on track. You can use mine or make your own up-you can do it simply in a notebook but I hope this will help you start to think of your planning.
You can listen to the show and pick up the notes and schedule after the show or get them here. This is shown BELOW as a jpeg, but you can print it out the pdf ( 2023 SEED STARTING SCHEDULE) I also have it as an Excel file (2023 SEED STARTING SCHEDULE for those of you who have it-that way you can adjust your own schedule)
Please note that once I plant the early cool season crops outside, I use row cover (polypropylene fabric) over them on a cold nite to keep them from freezing. I have people ask if they can use a sheet-NO and one person told me they used a sleeping bag-NO! It didn’t work! ( I told them the only way they could use that was if they were in it!)
For germination tips, go here: Also here is (Zone 6a): SEED GERMINATION CHART which gives the optimal soil germination temperature of crops and how long to germinate.
Later when ready to transplant tomatoes and peppers/eggplants outside, I will use wall of waters (WOWs) to help start the season earlier so if you don’t use either of those aids, then you will have to wait till danger of frost is over. These two aids are invaluable and will give you a head start on getting some of the crops outside in earlier.

I have already started INSIDE with lettuces, spinach, arugula, bok choi, and pak choi. All these will go from the germination trays to pony packs and then after they are big enough, go in either the Green house or cold frame. Seems early? YES but I want to get to harvest the cool season crops before the heat comes and they take 30-60 days to grow to harvest. Must get them out of the house before we start tomatoes inside on March 28 as we need the space inside by then!
PEPPERS
The next thing I will start are peppers inside on Mar 1 (on the schedule), because they take a long time to get sized up. I always said wait until June 1 but if you have wall of waters (WOWs) they might help get your pepper plants outside a little sooner. Even then, it is still very cool at nite. What happens to peppers if you plant outside when it is still cold at nite? They will stall out and stop growing! And they won’t start growing again-then you would have to buy some because it will be too late to start them again.
TOMATOES
Next- will plant tomato seeds on March 28.
NOTE: Before it get’s hot in JUNE, take off the WOWs as you can fry the plants-all plants. BUT if you don’t have WOWs, wait till June 1 to plant peppers/eggplants and May 15 for tomatoes outside.
_______________________________________________
For March-to recap
Cool season crops inside, under lights -NO heat mats early March
Warm season crops inside-Tomatoes/peppers/eggplants under lights with HEAT MATS and a THERMOSTAT will help keep the temperature at the correct germination temp. Notice peppers/eggplant seeds are planted earlier because they take so long to size up before planting outside and tomato seeds are being planted Mar 28 this year.
If this is too much info, go buy your plants ready to transplant-you can still use the schedule. Why do I grow my own varieties? Because there are so many more great varieties of veggies you can grow IF YOU START THEM YOURSELF.
_________________________________
LEGEND FOR SEED STARTING SCHEDULE below (in case you don’t know what my initials mean)
seeds/i=starting seeds inside under lights/no heat for cool season crops/warm season crops also get a heat mat.
tranplant/pp/i=transplanting up to pony packs-still inside under lights (4 or 6 cells-like what you buy flowers in)
transplant GH/CF-transplant into unheated Greenhouse/cold frame. Use row cover over crops at nites to protect from cold-I sometimes use 2 layers of row cover if very cold.
DS outside-Direct seed outside
I write notes all over the schedule so I see what I did for next year. For instance, I changed my cold season crops (lettuces/spinach/arugula) to a later date. No reason except I didn’t check last year’s dates and am late, but not too late. I try to be done with them when it gets too warm in the green house or cold frame which is usually around late April-early May before they bolt. Bolting is when they produce a flower stalk which makes them bitter. I either compost them then or feed them to my chickens. I don’t like bitter greens.
2023 SEED STARTING SCHEDULE (EXPAND TO SEE BETTER OR JUST DOWNLOAD ONE OF THE THE FORMATS)