Rhubarb

Rhubarb plant in the middle

This spring I bought 2 rhubarb plants from one of our nurseries that were the most pitiful plants I’ve seen but I really wanted to try to grow some and they were the only two plants they had so I bought them. They now are very beautiful and I can imagine them in other parts of my non-veggie gardens. I read they like sun or sun/part shade, rich soil and need water but not an exorbitant amount. They would give it a very lush look with their HUGE leaves. They have both grown so big that I decided to cut some and cook it up. Here is one of the plants in the middle of some asparagus ferns and ornamental japonica corn.

Here is the other one with the stalks ‘trimmed’. After I cut off the bigger stalks and discarded the leaves which are mildly poison.

Here is the rhubarb/strawberry compote I made. I cut the stalks into 2 inch pieces and cooked them up with the strawberries and lots of sugar and cornstarch. My variety of rhubarb is called ‘Victoria’ which isn’t one of the red varieties but is green instead so I cooked some of the strawberries with it for the classic red coloring.  My mom use to make rhubarb compote that she served in bowls with whipped cream that we gobbled up for desert or breakfast if we could get away with that!

I then poured the compote glaze over the fresh strawberries in a precooked pie shell.

Here is mom at 23 years old-a fabulous cook!

Thanks mom for the recipe.

Curing Garlic-second week

Chaka Khan helping. "It doesn't look like cat food!"

I am now in the second week of curing my garlic. I cut off the stems to 4 inches above the bulb, rubbed off the dirt and trimmed the roots off at the bottom. They are now inside out of direct sunlight. Notice the purple hue. It is a hardneck variety.

Where are the tomato hormworms?

tomato hornworm revealed

I haven’t seen any tomato hornworms yet which I think is unusual for this time of year. I looked up in my blog posts from last year to see when the tomato hormworm showed up- they appeared on July 8th. And come to think of it, I haven’t seen any Hummingbird moths or Sphnix moths either yet. Maybe the -20°F weather we had last winter killed the larvae! We’ll see.

More on squash bugs..

Squash bugs are around my squash and pumpkins right now. I go out AT LEAST ONE TIME A WEEK and go hunting for adults, nymphs and eggs. I know the ADULTS LIKE TO HIDE DOWN AT THE BASE OF THE PLANT or underneath the leaves. I take the hose and spray the whole plant and at particularly at the base which is covered in straw. The adults come running up the stems of the leaves to escape the water. Then I pick them off with my hand. I hate handling bugs barehanded so I use gardening gloves. I either squish them on the ground or put them in a bucket of soapy water where the adults drown.  No mercy.

I then look at EACH LEAF of the plant to see if there are any EGGS ON THE UNDERNEATH SIDE OF THE LEAVES, usually in the “v” where the veins form. If I find them, I either tear off the whole leaf (if I have a lot of leaves) or I tear out just the section that has the eggs and put them is a bucket of soapy water where they will smother. THE EGGS WILL BE DARK LIKE ROOTBEER WHEN THEY ARE READY TO HATCH, so get them EARLY.

I also look for the GRAY NYMPHS WHICH ARE USUALLY UNDERNEATH THE LEAVES OR ON THE STEMS. If I find a few I squish them. If I find a lot, I take the whole leaf off because they are fast and I can get them all. Then I put them in the soapy water.

Squash bugs go from EGGS TO NYMPHS IN 7-10 DAYS, so we should look for eggs about every 7 days to catch them from turning into nymphs. I do this on the weekend when I have more time. The squash bug PRODUCES ONE NEW GENERATION EACH YEAR but of course if each squash bug lays 15 eggs on each leaf they chose to deposit their eggs on, then all those newly hatched nymphs will lay more-but not this year. The nymphs will grow into adults this year but will not lay eggs. They will overwinter and lay their eggs next year.

So my thinking is if you get the adults now and the eggs now, then next year you should have way less squash bugs (I’m assuming we might miss a few) and of course if we get them all, in theory we should have none next year.

I keep my plants covered early in the season with row cover until they flower but now that they are flowering, I must uncover them so the bees can pollinate them. The key is to be REALLY DILIGENT ABOUT FINDING THEM BEFORE THE EGGS HATCH. After they hatch you can easily be overcome by the nymphs. Most people don’t keep up on the inspections and then the problem magnifies tenfold-so keep up on them. The hunt is on!

Some people spray Sevin on the plants. I prefer to go organically, so if I get a major problem, I would use Neem which is somewhat helpful but picking them off is the best way to control them.

All pictures courtesy of University of Minnesota. For more info on squash bugs, go to their site:  http://www.extension.umn.edu/distribution/horticulture/M1208.html

Tomato plants getting BIG

The tomato plants are now getting BIG. I’ve gotten a few ripe tomatoes-fighting off the birds for them! Most are starting to really produce green tomatoes now. I hope to get to the SF FARMERS MARKET by MID-AUGUST or sooner, tomatoes willing..

Here are my earliest tomatoes on the right that may allow me to go to the market sooner than later. On the left is my strawberry patch.

I have a variety of black tomatoes coming on-Paul Robeson, Giant Black Pear shaped tomatoes, Cherokee Chocolate, Black Krim and Black Cherry. None of which are shown yet.

I should have a plethora of cherry tomatoes this year-Sungold, Black Cherry and Green Grape and a mystery red that was suppose to be a San Marzano! Here is a closeup of  Sungold. Hope the birds don’t get it! All the cherry tomatoes should start producing soon!

I also love the bi-color tomatoes-my favorites. I’m growing Gold Medal and Striped Germans shown above. Both varieties can get between 1-2 lbs and are SWEET, SWEET, SWEET. They only have flowers right now.

My Big Zacs take longest to ripen 90+ days so you won’t be seeing these until late in the season but what a treat.1-2 lb giants with that old fashion tomato flavor perfect for a BLT..

Here is a brandywine. Notice the potato leaves. I haven’t had good luck in NM with Brandywine  tomatoes due to the disease factor but these are looking good so far, I have red, pink and yellow brandywines going.

Harvesting Garlic-pulled on July 14!

Freshly picked garlic starting to dry on table outside in shade

I dug out the garlic I got from our local Farmers Market and planted last fall yesterday. They say the best garlic comes from local growers, so I’m sure it will be good. It is the hardneck type but I’m not sure which variety-I just remember  it was purple. I planted in mid November of last year, so it’s been 9 months of waiting to harvest.

Hardneck garlic scape

It produced a scape in June on each plant as shown in the picture to the left, which is a curly flower pod that you cut off so all the energy goes into the bulbs developing below the soil. I read after you cut off the scape, you should give them a good watering, then cut off the water to them and wait around 20 days to harden them off.

Almost all hardneck garlic have between  7-8  leaves and when the bottom 3 die back but the top leaves are still green then it is ready to dig out. My leaves died back totally because it’s been so hot here. Be sure you use a tool that can dig deep enough to loosen the soil around each bulb and get under the bulb and lift it out being careful not to pierce it.

After you dig it out, you need to CURE the garlic which takes about 3 weeks. For the first week, lay out all the garlic bulbs (leaving all its leaves on) outside in a warm DRY spot on top of a table or shelf but OUT OF THE SUN with good aeration for a week. On week 2, cut off the leaves to about 4-5 inches above the bulb, trim off roots closer to the bulb, rub off the dirt gently on the bulb and put back on your shelf or table to cure another week. On week 3, trim off the remainder of the leaves down to the bulb and cut off the roots close to the bulb and take them inside to finish curing.  After that third week ends, store them in a cool, dry place in your house. I like to put them into one of my old onion bags that I bought from the grocery store (the ones made of netting) and put in a cool place in the house-for me my pantry. I can’t wait to try some!

Tomatoes and Mozzarella-Caprese salad-yum!

Caprese salad-Tomatoes, Mozzarella and Basil

It’s starting! I’ve been getting a few ripe tomatoes every couple of days and  have and been enjoying them. Here is a picture of  a Caprese salad I made last night with tomatoes out of the garden with Mozzarella cheese I made and basil I grew, drizzled with a balsamic vinaigrette. I got into learning how to make some cheeses mainly to go with my tomatoes. I haven’t got it down as good as I’d like but the mozzarella was still good.

‘Big Zac’ Giant Tomato Megablossoms

Single flower on left and 2 blossoms joined to create the megablossom on the right

I’ve planted 6 Big Zac tomato plants and several of my own from last year that came from the the N. Harp 7+ lber tomato seed. I haven’t seen as many megablossoms this year as I would like to see. A megablossom is a blossom that has 2 or more blossoms that fuse together to create a tomato that has several sections creating two or more fruit joined together which give a rather gnarley appearance but produce some really big fruit usually over 2 lbs.

2 lbs. 11.4 oz

Big Zac is NOT the only tomato that produces megablossoms but it does produce more than the average tomato. Other tomatoes can produce megablossoms as well just not as many as the Big Zac variety. Here is one of the Big Zac tomatoes I grew last year that was close to 3 lbs. Notice the 4 sections.

I’ve been a little preoccupied with the tomato scare but now am on the hunt to see if any of my Zacs have some of these blossoms.

Pumpkin Sex

Yesterday I pollinated the 895 Grande female pumpkin flower (scroll back to see what it looked like on July 4th and how much it has grown) with an older male flower from the same plant and I took a fresh male flower from the ‘greenie’ which won’t affect the looks of this pumpkin but may produce green pumpkins from it’s seeds. I just don’t have any opened male flowers from the pumpkins so I had to use the ‘greenie’flower. Notice how much bigger the female flower is now.

So this is how it works. To see more lude photos go to last year post here but basically here’s the dirt on GIANT PUMPKIN MATING HABITS!

All pumpkins produce both male and female flowers and normally the bees do the pollinating landing on the male flowers, picking up the pollen from the male flower and visits the female flower and drops off the pollen on the female flower being attracted by the wonderfully sweet smell of the female flower. BUT with pumpkin growers, we need to know which two pumpkins ‘hook up’ so we don’t get an accidental pollination with a winter squash or another pumpkin we don’t want it to mix it up with. We want to get the biggest pumpkin we can so we keep track of those sort of things. So we hand pollinate. Yesterday I took a male flower and took off the petals and ‘paint’ the pollen all over the female flower stigma with the male stamen. Some of the pollen must go down the female stigma flower for pollination to be complete. If I didn’t get enough pollen on it, it will either not take or abort later. After I pollinated the flower, I used a twistie tie to close it for 24 hours so no bees can accidentally pollinate it. I hope it ‘takes’ but it may not as it was very hot yesterday and quite often it won’t take if the temperature gets too high (over 90°F). There are many baby flowers now so it is going to get interesting very soon!

Giant Pumpkin patch growing

Here are some pictures of the giant pumpkin patch taken on July 4th. There are also 1 greenie squash and 2 giant marrows in the patch so I think it’s gonna get crowded in there. I hope I have a sea of green by August!

Here is the overall view of the pumpkin patch from the road.

I have the low tunnels propped up so I can work on the giant squashes. Kind of like opening a car hood! I took off the row covers for pictures.

The giant pumpkin plants are doing well-they are just coming out of their low tunnels. Here is the 895 Grande plant with the low tunnel off.

Some of those big leaves are 18″ across. I just love this pumpkin plant. It’s sister seed took the NM State record last year. The leaves are much bigger than the 1048 Grande.

Here is the 1048 Grande. It’s leaves are smaller but they say leaf size has nothing to do with pumpkin size. Is that like the shoe size argument?!

I saw my first female flowers on the 895 Grande pumpkin plant on the end of the main vine. Isn’t it beautiful! The only issue is it is only 7 feet out from the stump. I should wait to pollinate until it reaches at least 10 feet out but may not. We do that to allow the plant to develop more leaves behind the future pumpkin-more leaves-more food. Lot’s of times we pollinate many pumpkins and then cull the smaller ones so I think I will do that.  Notice the oval shape of the possible baby pumpkin.

The only problem is the male flowers that are there are also very small and they usually bloom before the girls even show up. The boys are always the first to arrive at the pumpkin blossom party and usually the girls show up later. It’s ok because my first pollinated pumpkin flower last year was July 27 so perhaps I will be ahead of that date which is important because it will give me more days to put on more pumpkin weight.

Here is the greenie-The greenie looks just like any giant pumpkin plant but the fruit will be green. It is doing well. I saw a really small female flower with the potential baby green fruit. The seed came from 2007 so I was surprised it even germinated The plant looks fantastic. Just goes to show that you can’t always listen to the folks that say get rid of your seeds after 2 years old.

Here is the 78 marrow-kinda bushy. Very different than the other marrow in the patch.

This is the other giant marrow that came from my last year’s plant. I’m very suspicious of this one as it doesn’t look quite like the other marrow above which I know is pure in strain. Mine was pollinated by the bees and so it could of crossed with one of the winter squashes last year. It will be interesting to see what the fruits look like on this one later on!

I also saw one squash bug (which ended up under my shoe) and some eggs on the underside of 3 leaves. I just took off all those leaves that had the eggs on them and put it in a bucket of soapy water-goodbye eggs. I will plant some onion sets in their wells to help deter them and I will probably have to keep the pumpkin plants covered with row cover. I will be on the lookout from here on out.

Tomato scare

Trying to protect the tomatoes-wrapping them in row cover

My tomatoes have been looking great, in fact the best ever in 25 years, but about 2-3 weeks ago I noticed a couple of the plants started getting new leaves that looked wierd-sort of fernlike which I thought was odd but they were still green so I ignored it.

Tomato 'fernlike' leaves

Well, this week I noticed about 48 plants had this weird look and the new tips were very distorted. I researched on the internet and it looked like Tobacco mosaic virus or Cucumber Mosaic virus which can spread rapidly among the plants. If your tomatoes get it, it can ruin your whole crop not to mention your whole garden for 3 years as that is how long it can remain in the soil. You must pull the plants and dispose of them as it is very contagious at least for the Tobacco Mosaic virus. I was panicky so I wrapped up the remainder of the ‘ok’ plants in row cover to try to protect them. I called Pat Torres, our County Extension Agent here in Santa Fe about sending samples down to the state lab as I feared the worst. I brought two complete plants to him on Friday, filled out some paperwork and he sent it overnight to the the lab person who went in (on his day off) on Saturday to do a diagnosis for me. What wonderful people! (Both he and Pat) The lab guy tested for all 4 major tomato viruses that are most common here in New Mexico and luckily all the tests turned out negative-no pathogens found. Yes! I’m saved! The lab guy said it looked like Herbicide Drift called Abiotic disorder (or 2,4 D damage) and felt they will outgrow the weirdness and be OK.

And the funny thing is I did spray (carefully) with Roundup 3 weeks ago my driveway and sides of the studio for weeds in the gravel that are about 100 feet uphill of my main garden. He said if you spray on a hot day (and when hasn’t it been hot here lately) it can vaporize and travel up to 400 feet anywhere the breeze blows it. That’s 100 feet more than the length of a football field. The rest of the veggies were intact because they were still under row cover. He also said some herbicides (I’m going to email him for which ones) can travel in the air for 40 miles! So be careful with Roundup or any herbicide. I always go organic in the vegetable garden but sometimes not in the regular garden. What a scary lesson!

Herbicide damage-also called 2,4 D damage

Tobacco Mosiac virus

Vegetable Garden July 4, 2011

Happy July 4th! Here’s a look at the main garden so far this summer. This year is definitely slower than this time last year due to lack of precipitation but with the monsoons here, it should take off this month and kick butt. To see last year’s garden at this time, go here.

The cukes I’ve had to replant due to something eating the seedlings several times even though I’ve covered it with row cover..

I have 2 Costata Romanesco zucchini plants. The leaves are very delicate compared to other zucchini types. Hope we don’t get hail. I grow it because I  think this is the best tasting zuke ever. I read about this Costata Romanesco in one of Debra Madison’s vegetarian cook books-‘Local Flavors’. She lives in Santa Fe and  has several vegetarian cookbooks out. Great books on what tasty things you can create with your veggies. I’m not a vegetarian but am  always looking for new ways to use my vegggies so I don’t get bored.

We didn’t get ANY strawberries this year because I almost lost them all when we had that -25°F this winter. I have June bearing strawberries so I know the time has past. I had just a few plants this spring that survived but the strawberry patch is coming back nicely. Next year I will cover them with straw before winter to help insulate them.

This variety of pole bean is called ‘Emerite’ from John Scheepers. It is a new variety for me. I also have my favorite, ‘Rattlesnake’ beans and another new bush variety called, Verandon, which is a french fillet style of bean. I made a teepee out of bamboo. Notice the row cover in the background covering some of the cucumbers.

Here is the eggplant patches. They are doing well. The patch in the foreground has ‘Fairy’ eggplants in them, a variety that get 3″ long and are my favorite. Their skin is always tender and they are never bitter. You don’t have to soak them in salt water like some varieties-and they are beautiful-purple fading to white. I like to saute them in olive oil and throw them in a stir fry with noodles.

The patch in the back with me are a new variety of eggplant called ‘Rosa Bianca’ and next to it are 4 ‘Peperonchino’ peppers that are growing well.

This year I planted rhubarb among the asparagus plants. I found them this spring at one of the nurseries and they were the sorriest plants I’ve ever seen at that time. They say they grow well with asparagus. Now they are beautiful! Seem to like their location. On the left is row cover I use to help protect new flower seedlings. I take it off in the day and back on at night. Once they get a little bigger, I take it off completely.

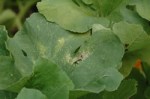
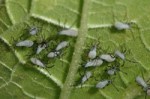
The biggest disappointment of the garden so far. The ‘Shishito’ peppers are still slow but finally don’t look sick any more. Still small and something ate some of them so they are really small but they will come back. Some of them are producing buds. No wonder they are so expensive at the SF Farmers market-they are not so easy to grow..

Overall I am very pleased with the tomatoes this year. They are doing well. Everything is done except for my scheduled organic fungicide spraying every 10 days-especially now that the monsoons appear to be here. I’ve only lost 2 tomato plants and another 3 are suspicious. I will cover those with some row cover in case they have something contagious but if I think they are dying I will pull them pronto. Notice this picture taken from the some angle as on May 15th below-when I first planted them-they have come a long way!

It has proved to be a more challenging year what with the lack of rain for so many months but I feel confident  for all of us with some more rain we will have a good garden this year.

costoluto genevese tomato

Squash bugs/squash vine borer preventatives

I get a lot of questions about how to control squash bugs. They are a veggie gardener’s nemesis. I have read and tried several things and think a few help. Here’s a list of things you might try to control squash bugs and squash vine borers.

squash bug

Squash bugs
Squash bugs attack both summer and winter squash. They pierce it and suck out the juices. If left unchecked, they can take over and destroy the plant. The key to control is catching them right away. Here are some thing s to try:
-Plant onions around squash to help repeal them. I planted little sets around the squash last year and I got a few but not a lot. Very controllable.
-Make an onion spray to put on leaves. Fill blender with water and add a couple of onions.      Blend onions and let them sit overnight. Strain onions out and put in sprayer to spray squash plants.
-Put row cover over young plants till they flower, then remove so they can get pollinated.
-Hand pick every 7 days and remove eggs, nymphs and adults from leaves. Put in bucket of soapy water. Then cover plants again with row cover. Squash bugs life cycle from egg to nymph is 7-10 days so keep ahead of them.
-Spray Neem Oil on squash when you have to keep them uncovered for pollination. Neem is an effective repellant.
-Plant late like the first couple of weeks of July-you may miss their lifecycle.
-Rotate squash into different beds, They may not find you. First time squash growers generally get the first year free of squash bugs. Afterward the bugs find you and the battle is on.

squash vine borer

Squash Vine Borer
This bug is not suppose to be west of the Rocky Mountains and yet it has been seen around here damaging and killing squash plants. It likes to bore into the main stem around the base of the plant to lay its eggs which then turn ito larvae inside the vine and eat it from the inside. Look for sawdust like  particles around base if plant suddenly wilts. You can try to slit the vine parallel  (not across it) and dig out the grub and then tape the wound shut. It may survive. Here are some things to try:
-Once again cover them until pollination needs to happen.
-Wrap aluminum foil around the base of the vine for about 12 inches to keep them from attacking it.
-Also bury the vine with dirt or mud covering the main vine.

Using Organic Fungicides-the Key to Success? Stay Ahead of Disease

 I think the key to preventing many diseases in the vegetable garden is using organic fungicides early-before the onset of visible problems. I am using ‘Companion’ (order online) as a drench around the roots and ‘Serenade’  (get at Agua Fria Nursery only) as a foliar spray on the leaves. I had today off so I used them again. I’ve been using them about every 2 weeks.  I’m looking for less tomato loss this year and hope by keeping up on my fungicide schedule, it will help. I use this combo also on the giant pumpkins and squash and they are looking good so far also. I will cut off any suspicious leaves or branches as well as use fungicides  (see mottled leaf on bottom of picture) Of course we haven’t had any rain yet to speak of to really test them (fungal diseases love moist enviroments) so we will see…

Rabbits in the Giant Pumpkin Patch

Once again I found a rabbit in the giant pumpkin patch running through the 2″ x 4″ field fencing around the patch. Then I left the 1048 Grande pumpkin uncovered and the next morning there were some leaves eaten. Maybe it will be good luck because the same thing happened last year in the same spot that the NM state record pumpkin came from. Luckily the leaves eaten were by the base of the plant and not the growing end of the vine. So I’ve been covering everything in the giant pumpkin patch until I can put some small 1″ chicken wire all around the fence. I got the fencing, just need the time to do it, so for now they will stay covered at night.