My favorite sauce tomato to grow-Goldman’s Italian American tomato

Goldmans Italian American tomato

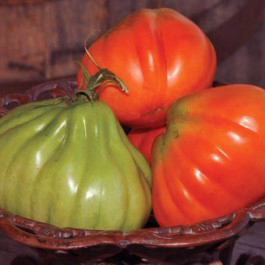
Psst, I’ve got to let you in on a big secret of mine-Goldman’s Italian American Tomato. I think it’s the best heirloom tomato to grow for sauce bar none. It’s a big, meaty, ribbed, pear-shaped red tomato with exceptional flavor. Not too acidic, not too sweet.

Every year I grow a couple of plants of this tomato but never sell it at the Santa Fe Farmers Market as ‘The Tomato Lady’ because I’m too selfish! I want all of them for making the various pasta sauces I make. I sell all my other varieties of tomatoes, but not this one. A friend of mine said, ‘Well why don’t you grow more to sell?” A novel idea I should consider! It’s only downside is it does take 80 days to mature so you’ll get some of them sun-ripened and have to bring the rest in before it freezes. No matter-they ripen in the house just as well as outside. The plant gets big about 6-7 foot tall so you’ll need some space but it will be well worth it.

The Heirloom Tomato book

Amy Goldman found it at a roadside stand in Italy, and named it after her father’s grocery store in Brooklyn. Amy Goldman wrote the book, “The Heirloom Tomato” and I use it as the gospel for helping me pick my tomatoes to grow each year.

I start the seeds inside sometime around the beginning of April each year under lights and on a heating mat. You’ll have to get the seeds online as no one sells either the seeds or the starts around here. I get my seeds from Baker Creek Heirloom Seeds here.

Fall-Time to trim tomato blossoms off

As the tomato season starts to wind down in the fall, I believe it’s time to redirect the plants’ energy so I trimmed off most of my blossoms on the tomato plants. This helps ripen the remaining tomatoes on the plant.  I also cut off those crazy branches that are overgrown (and have blossoms) back to the last tomatoes that have been set on that branch. The idea here is to redirect the plant’s energy to stop making blossoms and put its energy into ripening as many tomatoes as possible before it freezes.

I also trim off any diseased branches where the leaves are dying or turning yellow and spray with Serenade again (probably for the last time). Late in the season, tomato plants are getting older and are more susceptible to diseases so my hope isn’t to cure any diseases but just keep it under control so we can still get many tomatoes. Besides we want all those green ones still on the vine that we have been patiently waiting for!

Why we don’t have ripe tomatoes right now

So if you still have tomato plants after the curly top virus hit many of our plants, congratulations! I had 84 tomato plants and am down to 48. Thankfully I planted more this year or I wouldn’t be at the Farmer’s Market. I’ve gotten many questions on why we don’t have many ripe tomatoes now. Lots of green ones, but few ripe ones and normally we would have LOTS of ripe tomatoes now. The reason is we had an unusually hot July with day temperatures over 90°F almost every day and the blossoms dropped back then, failing to set fruit.  The number one reason for blossom drop is high temperatures over 90°F  during the time blossoms would normally set in July (the number two reason is cold temperatures under 55°F). Once the temperatures dropped below 90°F in August they resumed setting tomatoes again hence the green tomatoes we are seeing now. So basically we are a month behind but should start seeing most of the tomatoes ripening.  Ahh, the challenges of growing vegetables in the high deserts!

‘The Tomato Lady’-sold out

Today was a good day! First day back as The Tomato Lady’ at the Santa Fe Farmers market sold out. A great big thank you to all my patrons who waited for my tomatoes to ripen!  Many thanks! Only a handful of tomatoes and 1 zucchini left. Behind my table are some other vendors at their tables. See you next week!

Tomato Lady of Santa Fe returns to the Farmers Market this Saturday August 25, 2012

Tomorrow, Saturday, August 25, I am returning to the Santa Fe Farmers Market as ‘The Tomato Lady’. At this time I have over 15 varieties of organically grown heirloom tomatoes from luscious black tomatoes like Purple Cherokee, supersweet yellow Virginia Sweets to Italian Red Costoluto Genevese and many, many more . I have over 50 plants and 25 varieties that will ripen as we go through the season. They are beautiful. They are gorgeous! And they taste wonderful! Magnifico!

I also have Shishito peppers, Costata Romanesco zucchini and Fairy eggplants that I will sell as well. Next week I will add some sunflowers out of my sunflower forest and Emerite French filet beans. I’ll be inside the building-look for ‘The Tomato Lady’ sign above my booth. Hours are 7am-noon. Hope to see you there!

First Caprese salad!!

Here is the first caprese salad of 2012! Fantastic! Yellow, orange and black tomatoes with mozzarella, basil and olives drizzled with an 18 yr old balsamic vinaigrette! Been waiting for this since last November! Need I say more?

Video: Early Pruning of Tomato Plants

Last Saturday I taught a vegetable class on Organic Pest and Disease Control for Home Grown New Mexico. It was held at Milagro Community Garden. Part of the class was how to trim your tomato plants to help thwart soil-born fungal diseases like Early Blight. Most people don’t trim their tomato plants enough in the beginning. Here is a video I found from Vegetable Gardener site that shows exactly how to do it. Don’t be wimpy about it-trim them all the way up to the first blossoms.  As a preventative, I will spray Serenade organic fungicide on all the leaves both on top and underneath  about every 10 days. Doing all this should get your tomatoes off to a healthy start. Here’s a link to the video.

Video: Early Pruning of Tomato Plants – Vegetable Gardener.

Make a great tomato cage

Tomato in cage, drip underneath, trimmed up off the ground, straw mulch in well and staked to t-post

You need to ‘cage’ your tomatoes before they get unruly. I hate those tomato cages they sell in the store. They are too little and flimsy and the tomato plant will quickly outgrow them. I found a great way to make cages in ‘The New Victory Garden‘ by Bob Thompson.

First use concrete reinforcement wire to make your cages. It is heavy-duty wire that has 6 inch openings so you can get your hand through the openings with a fat tomato. Think optimistically – you’re gonna get a 2 lb giant juicy tomato on you plant and need to get out of the cage! You can buy it by the sheet, which is 4 ft high, or by the roll which is 5 ft high. One sheet will make one cage. The only trouble with the 4 ft height is it is too short for many heirloom tomatoes but some people stack two of them together to make an 8 ft high cage!

I buy the roll, which isn’t cheap, but is a one-time cost and the cages you will make can also be used for beans and cucumbers, in fact almost anything you want to grow vertically and will last a lifetime. A roll is 120 ft in length and will make about 18 cages so if that is too many than I suggest you go in with another gardener friend (or 2) and share the cost. Cut the wire with bolt cutters or an angle grinder not hand wire cutters-your hand will be wrecked-I speak from experience. Here’s how I do it:

1. If using a roll unwind it and hold it down with some BIG rocks or bricks so it doesn’t wind back up. Count 13 squares and cut off one side of the wire leaving it long.

2.  Then bend the long wire into a ‘u’ and hook it back on itself as shown in this photo.

The cage will be approximately 24 inches in diameter when finished. Then I cut off the bottom leaving all the ends pokey (not shown) so I can push the ends into the ground so it won’t blow over.

3. If using a sheet, I wouldn’t cut the bottom edge as I do with the roll to keep as much height as possible.

4. Stake either cage with a 3 ft high green t-post pounded next to the cage and tie the cage to the green post to keep the cage from falling down from wind as shown in the top photo.  This is important when the plant gets top heavy. If you are next to a fence, you could tie it to that. The point being that you don’t want your tomato plant to fall over. Some people growing in pots just put the cage over the whole pot and the pot keeps the cage from falling over as the plant gets bigger.

Americorp students help plant tomatoes

Today I had some AmeriCorps students help plant some of my tomatoes. I think we planted about 25 of them. What a great bunch of young adults giving service. In case you didn’t know AmeriCorps is like the Peace Corps  (only here in America) where people join and give their time and energy for one year to help communities and farms and learn many skills on their journeys. I explained how I plant tomatoes and  gave them some handouts to take home explaining the process. I hope they take back this information to their communities and share their new tomato growing skills! My only regret is I didn’t get a picture of them before they left! A big thanks to all of you who helped today!

More tasty tomatoes and peppers with Epsom Salts

Get more tomatoes with Epsom Salts

Epsom Salts May help increase blossoms in tomatoes and pepper plants. Increase in blossoms means more tomatoes and peppers!

Epsom salts contain magnesium sulfate, two important elements for plant growth.

Magnesium– can become depleted in soil usually later in the season. Magnesium helps strengthen plant cell walls, helping the plant to absorb nutrients. It also helps to increase blossoms.

Sulfur– improves the growth and overall health of plants, it may also help our high alkaline soil here in the southwest.

There are two ways to use Epsom salts for tomatoes.

1. Mix 1 tbsp of Epsom salts into the soil at the bottom of the planting hole when transplanting tomatoes or peppers or mix 1 tbsp in a gallon of water and water the transplant. It may help plants absorb Calcium and other nutrients from the soil.

2. Use as a foliar spray of 1 tbsp per gallon of water when the plants flower. Epsom salt helps set more blossoms.

I’ve used Epsom Salts on my tomatoes, peppers and even roses for years. It will help roses produce more flowers. Scratch in 1/2 cup of  Epsom salts in soil around rose bush and water in.

Started planting tomatoes May 11

15 TOMATOES PLANTED

I started transplanting tomatoes into the new garden section. My friend Tom, and I got 15 of them in the soil-all ready to go. We added to each hole: more compost, yum-yum mix, mycorrhizal fungi (for root growth), worm castings, epsom salts (for many blossoms), and dry milk (adds calcium to avoid blossom rend rot later). And this year to (hopefully) conserve on water usage, I’m trying silicon gel granules and some volcanic ash, both of which will keep water longer around the plant root zone.  All this stuff is mixed up with some of the existing soil in the hole.  Then we put the tomato plants in (and if they are rootbound, open the roots up a little), made a well around each one and water each hole several times to get the soil wet. Then I go back a third time and water in some Superthrive and seaweed fertilizer (helps with plant transplant shock). Afterwards I put a drip line around each plant and then put a wall-of-water around each of them to keep them warm at night because just when we think we are out of the woods weatherwise, it gets cold again.

To keep the wall-of-waters from collapsing when the wind gets blowing hard, I put some bamboo stakes inside the walls as shown in the second picture. Overkill? Maybe. But I will get some fantastic tomatoes during the season. I still need to put the main drip hose (1/2 inch size) around the perimeter of the patch and connect each individual drip line to it but I can hand water every other day for now till I get to it. Planting is the hands on intensive part-later it will be a breeze watching them grow..

Tomorrow-May 16, Amy Hetager, from Home Grown New Mexico, is coming with her students from Americorp to plant some more tomatoes. No shortage here-still got 55+ tomatoes to put in the ground!

When Will I Plant Tomatoes?

I think I’m going to start planting tomatoes by the weekend.  I won’t get all of them in but this will be the EARLIEST I have ever planted here in Santa Fe. I checked the weather for the next 10 days and no freezing weather is projected. Of course it’s always a crap shoot here in NM but I think the odds might be in our favor this year. I will still put them in wall of waters (WOWs) because they grow so much faster in them than without them and if we get a freeze, they offer lots of protection.  But I will hold off on the eggplants and peppers for a little while longer cause they want HEAT. I checked the weather for the next 10 days and no freezing weather is projected. I’m not recommending anyone plant before our last freeze date of May 15th, just letting you know what I’m thinking. Unbelievably beautiful weather-so different then last year’s-no wind, no freezing weather-just fabulous! Time to spend lots of time in the vegetable garden!

Seed Germination Trouble-seed heating mat too hot!

Some new tomato seedlings coming up among the others

This year I have been struggling with my seed starting this year. Many seeds have not germinated. The seed germination mats seemed way too hot. I’ve never had this problem before (usually it is too cold) but when I did some research, I found out the mats are suppose to be 20 °F over the ambient temperature. This spring so far has been very warm (especially inside the house even without the heat on) and when I took the temperature of the soil in the little pots it was between 95 and 1oo°F! Way too hot for germination. No wonder very little was coming up—I’ve been frying the seeds!

So I got a soil germination thermostat that will control the temperature which I keep at 80°F and within 3 days I had 11 tomatoes come up. Wow what a difference. I will have to replant some tomatoes seeds but hopefully I will be fine. Guess I won’t have to worry about the plants growing too big this year before I transplant them in the garden.

Seed starting INSIDE

I’ve been planting seeds INSIDE for a couple of weeks now. Here is my update on my seed starting endeavors this spring so far.

PEAS-Not everything is successful-My pea seeds I planted inside have NOT done well as I had hoped. They are barely coming up now inside so I planted more outside and if these make it, I will add to the other seeds that I planted outside on Saturday. I think the heating mat was too hot for them so I put them on a table under the lights but with no heat. We will see..

FAVA BEANS-I’m so excited-I’ve never grown fava beans before but are trying them this year. I sprouted fava beans that I got from that Homegrown seed swap and bought some more that I got from Spanish Table Market here in Santa Fe. The companies would like to say that the ones they sell you to eat are different then the ones they sell you to grow.  If they are treated then that would be true but so far I have not found that to be the case. They are both sprouting just fine. Today I saw three of them breaking ground in their little pots on the heat mat under the lights. Once up I will transplant them outside as they like the cold. I’ll talk about them later.

CHARD, BOK CHOY seeds planted-MAR 13-The chard and bok choy germinated in 2 days!

BORAGE seeds planted-MAR 13-Germinated in 3 days!

MORE LETTUCE-seeds planted-MAR 13-just starting to come up

SPINACH seeds planted inside as well as outside -MAR 13-Not up yet

TOMATOES-seeds planted today-Sunday, MAR 18-planted 27 different varieties! Hope to put them out 8 weeks from now-mid May or sooner. Last year I planted tomato seeds inside on Mar 21.

POTATOES-I’ve been chitting them for a week now. Chitting is getting the potato eyes to sprout.

The next major inside seed starting will be in 2 weeks-Basil, oregano, marjoram, zinnias and probably a lot more.

How to collect heirloom tomato seeds

Tomato seeds fermenting in a jar. On the plate are some dried seeds.

I don’t collect hybrid tomato seeds as they may not grow back true.What that means is they may revert back to one parent or the other that they were crossed with. Heirloom tomatoes will grow back true.

The only heirloom tomato seeds I collect are from my giant tomatoes as I’m trying to get some seeds that do well in our high desert and give me some big, really big tomatoes. Last year I got 3 tomato seeds from a giant grower who grew a tomato over 7 lbs in Ohio. This year I got a pretty large tomato from one of those seeds. I kept the tomato which measured 19 inches in diameter and almost weighed 3 lbs and recently got the seeds. I will try some of these seeds next year as well as other big tomato seeds that I got from another grower this week.  Here’s how you can collect your favorite heirloom tomato seeds.

To collect tomato seeds, cut the tomato open, squeeze and scrape out all the seeds and put them in a little jar with some water. Then put the lid on. Try to not get too much pulp in with them. The seed/water mixture will start to ferment in a couple of days and it might bubble a little which is good. The fermentation will remove the slime on the seeds and the seeds will fall to the bottom of the mixture. When almost all the seeds are on the bottom, pour out the liquid, seeds and pulp through a fine sieve, removing the pulp. Keep rinsing until only the seeds are left. Spread them out on a paper towel to drain the excess water and then put them on another paper towel to finish drying. Before the seeds dry completely I move them around so the paper doesn’t stick to them. After they are thoroughly dry, put them in a ziplock baggie, label and store. You can keep any heirloom tomato seeds this way.

My only concern with collecting tomato seeds is if you plant cherry tomatoes too close to the heirloom tomato you want to keep, they may cross-pollinate so think about where they will be in your garden next spring and don’t plant them right next to each other. Tomatoes aren’t pollinated by bees but by the breeze or are self pollinating. Tomatoes originally came from South America and honeybees came from Europe or Africa so tomatoes aren’t native plants to the honeybee hence they aren’t interested which actually makes pollination easier to control.