Saturday I will return to the Santa Fe Farmer’s Market as the ‘Tomato Lady’. I don’t have lots of tomatoes yet but everyday more are ripe so come early to get the best choices like the beauty pictured above from Italy called “Costuluto Genevese”. I have 12 new varieties as well as the ones I grew last year.
Category Archives: general
Weeds!
I came back from a flyfishing trip at the San Juan River last week to out of control weeds EVERYWHERE! Ever since the monsoons kicked in (thank god they did) so have the weeds. Amazing how the seeds lay dormant for years until the right time and water show up. Boom! An explosion of weeds. Now I know how they feel back east having to weed all the time with all the water they get.
I finished weeding the main vegetable garden yesterday-did the last 1000 sq feet in section 3 in one day! Oh, my aching back. My main vegetable garden is divided into 3 sections, each section being about 1000 sq feet. Section 1 is the most fertile, being the original section built on 13 years of composted horse manure 6 years ago in 2008. Section 2- I built originally for my giant pumpkins 5 years ago but I moved them (being the gorillas that they are) after they took over the rest of the garden and Section 3-I built last year so I could get my tomatoes (50 plants this year survived) on a 3 year rotation cycle since I grow a fair amount for the Santa Fe Farmer’s Market. I rotate them to one of the three sections every year. Meanwhile my giant pumpkins moved over to the unused part of the horse corral about 3 years ago and they have 2000 sq feet all to themselves. Well almost-I have 14 more tomato plants over there. The only part left to weed is the paths around the gardens, the apple trees and about half of the pumpkin patch. Progress!
This whole weeding thing has been pretty overwhelming this year so the only way I can get my head wrapped around it is to break down the big tasks into smaller tasks. I just keep chipping away at it-a little bit every day. Plus I have to tend to the veggie plants, keeping ahead of problems that come up from time to time and now harvest time is upon us and that is intense too. All part of the joy of gardening! If I didn’t love those fresh vegetables and those fantastic tomatoes that we all wait for every year, I might not garden at all. But those tomatoes keep me coming back!
Tomato Talk
Later today I’m going out to the Eldorado gardens to ‘talk tomatoes’ with a group of gardeners out there and tour their garden. We will discuss growing tomatoes and disease and insect control on their plants.
For the color pics/descriptions of tomato diseases and control:
Here are the other handouts for anyone interested:
Hail damage
Well all this rain has been great but many of us have also experienced hail damage over the last few weeks. I escaped the hail storms in my vegetable gardens until last Friday. I was out-of-town at the time (which was a blessing as I would have been super upset). My house sitter called and told me (before I came home) that it was hit pretty hard. I came home 5 days later and this is what I found. The chard, zucchini, beans, cucumbers and a few tomatoes got hammered so hard they were skeletonized. But most of my tomato plants were covered with row cover (to protect them from the dreaded leafhopper) and they were fine. Four tomato plants that I didn’t cover also got severely beat up. The eggplants that were covered with row cover were fine but the grapes got severe bruises on the fruit and the fruit will be a total loss but the plant will recover.
So what do we do when nature strikes hard with a devastating hail storm. Not much I’m afraid. Sometimes the plants are beyond self repair and sometimes they bounce back just fine. I left everything as is for few more days before going out and upon inspection, most were already putting out new baby leaves – if the center of the plant wasn’t demolished. Yesterday and today we trimmed back all the demolished leaves leaving new growth and tomorrow I’m going to spray all the plants with some fish emulsion, an organic fertilizer, to help with more new growth and mix in some ‘Serenade’, an organic fungicide with the fish emulsion to help prevent any possible fungal diseases that might have resulted from the beating they all got leaving the plants weak. Sometimes taking a wait and see versus yanking them out right away is a better approach. It is amazing these plants are recovering nicely.
I am always amazed how strong the will to live is. I may have lost a few weeks but at least I didn’t lose the whole season. And I was very glad that everything that had row cover on it was protected. Here are some pics of the damage and recovery.
Is it a weed? White Horehound
There is a plant that grows everywhere around here and I’ve always wondered what it was. Grows like a weed so to speak. I knew it was in the mint family as the stems were square but was definitely not a mint. I just ID it from a book, Weeds of the West.
The plant growing in my gardens is white horehound which is a herb. There are two types of horehound—black horehound and white horehound. Black horehound can be toxic while white horehound can be beneficial. They are easy to tell apart because black horehound has little purple flowers while white horehound has little white flowers.
Since ancient Egypt, white horehound has been used as an expectorant. Native American and Australian Aboriginal medicines have traditionally used white horehound to treat respiratory conditions. Some people make homemade cough drops out of them and some use the dried leaves to make a tea. They actually sell the seeds in Baker Creek Heirloom Seeds but around my place it definitely grows like a weed on its own without my help. I use to pull it out because it is not a particularly attractive plant and frankly grew where I didn’t want it to grow.
But since I became a beekeeper, I noticed the bees are wild about it with its small white flowers, so now I leave it for them. The US Food and Drug Administration banned its use in US made cough drop saying it has no proven benefit. However it is widely used in Europe and you can buy it in European cough drops, just not US made ones.
I recently had pneumonia and a dry hacking cough that would give me fits. The only cough drop that would help stop the coughing that I tried is called ‘Ricola’ Cough Drops’, which is a Swiss made cough drop. Guess what is in those cough drops? Horehound! Only I didn’t know about white horehound, or Ricola cough drops or what that weed was growing in my gardens. I found all this out while I was recovering and on the computer a lot-how serendipitous!
Happy bee-day!
Today was a great day! I had my teacher/mentor Les Crowder come over to the house because my bees have been struggling since April. In late April the existing queen disappeared and a hive without a queen is a doomed hive. So I ordered a new queen and after the proper introductory period released her and they ‘seemed’ ok with her but after 2 more weeks there was a new capped queen cell and the new queen had ‘disappeared’. I thought they must have killed her and figured I did all I could do. Then I noticed the capped queen cell was opened but still could not see the queen. Still with no brood or eggs I figured the hive was failing. Then 2 days ago I noticed some larva but still couldn’t see if there was a queen or if one of the worker bees (called an intercaste queen) had tried to take over the job which doesn’t work-they still would be doomed. Today when Les came by he found a real queen, lots of brood and eggs and thought the hive will be fine! What a relief! They wanted to do supersedure queen (natural requeening) instead of an outside queen and the reason I couldn’t see her is she has stripes like the worker bees instead of the normal dark bottom. She is big and beautiful and laying well. Best gift from the universe for my birthday today!
Herb garden
I use to have a great herb garden but then built the studio here at the house on top of where it was located and had to tear it out. What a mistake. I thought it would be easy to recreate that herb garden-but it hasn’t been. I’ve struggled with my ‘new’ herb garden space for the last three years. First, the drip system clogged up (I wasn’t paying attention) and the plants weren’t getting any water and died. Now for the last 2 years the bunnies, who aren’t suppose to like herbs, have leveled them to the ground because there is so little to eat out there. Last year I tried 3 different types of basil in a large pot on the deck because of the bunnies eating them and they did great. The bunnies won’t come up on the deck. This gave me the idea of growing them in containers.
So this year I decided to take the little 2 inch starts that we get at the nurseries and give them a head start inside in April. They are now transplanted up in gallon size pots and are outside on the deck. Once I get a fence around the herb garden, I will plant them there. I think starting them inside and letting them get bigger (and keeping the bunnies away) will be the trick to getting a good herb garden again. Shown here are chives, oregano, English thyme, tarragon, lemon thyme and sage which are all perennial herbs I use in the kitchen. I already have kitchen sage, lemon balm, rosemary (arp variety), and lemon verbena tucked into the perennial garden among the other plants and they have all are done well for several years. I also have a winter savory and a garlic chive that did survive the bunnies and drought in the herb garden-must not taste too good to the bunnies.
Curly Top Tomato Virus and Beet Leaf Hoppers

Photo credits:
curly top disease – photo courtesy of http://ucanr.org/blogs/blogcore/postdetail.cfm?postnum=3352
Curly Top Tomato Virus
Last year, the Beet Leafhopper which transmits ‘Curly Top Tomato Virus’ was rampant in our gardens and devastated many tomato plants. I lost 50% of my tomato plants. The Beet Leafhopper flies in on the winds in early June through July, jump on the tomato plants and taste them. They don’t even like to eat tomato plants but sample them, transmitting the disease in the process.

beet leafhopper – courtesy of http://www.coopext.colostate.edu/TRA/PLANTS/curlytopvirus.shtml
Identifying Beet Leafhoppers
You will know if they are here as they come in waves and when you walk around your garden, you’ll see a lot of jumping little green bugs that fly off when you walk by. Then they leave—flying to the next garden. Because of this, you can’t really spray anything to get them—here today, gone tomorrow. By the time you notice something is wrong with your plant, they are long gone. It takes about 2 weeks for symptoms to show up.
Symptoms
Your tomato plant leaves will start to curl and the underside of the leaves will turn a purplish color The leaves then start to wilt and the plant will look stunted. You might think it needs water but it doesn’t, it is sick and won’t recover. ‘Curly-Top’ is only transmitted from bug to plant is NOT transmitted from plant to plant hence you will see a healthy plant next to a sick plant.
Remedies
There is NO CURE for this virus and if your tomato (or pepper for that matter) shows signs of the disease, you should pull the plant. You could leave the plant in BUT if another wave of leafhoppers come by and a healthy leafhopper bites your sick plant, it only takes 10 minutes in 90°F weather for it to be able to transmit the disease to one of your healthy plants. The best thing to do is pull any sick plant and dispose of it.
Leafhoppers do not like shade and if your plants are partially shaded, that may help keep them off but since most of us grow tomatoes in full sun that might be difficult.
Another thing you can do is create a physical barrier between the bugs and your plants. This year, I’m covering my tomato plants with row cover until the bugs pass. Wrap the row cover around your tomato cage and put a piece on top of the cage BEFORE they come.
Lastly you could put out some tomatoes later in the season after the bugs leave. Last year when I was out at the Santa Fe Community Garden I noticed many rows of sick tomato plants but one row of perfectly healthy plants and when I asked about them, it turned out they were put out about a month later than the rest of them and by then the leafhoppers were gone.
Dry, sunny, windy weather are perfect conditions for the leafhoppers so look out this summer-conditions are ripe again!
The importance of mycorrhizal fungi in the garden
I first heard about mycorrhizal (pronounced my-cor-hi-zal) fungi through my giant pumpkin grower friends. They started using it before most people in the community knew what it is. When I was becoming a Master Gardener, I asked one of my instructors about it and was told it he didn’t know much about it and that it wasn’t proven. So what is this ‘fungi’ that is proving so helpful for plants?
Mycorrhizal fungi are important components of soil life and can be found naturally in undisturbed soil. But when we till, or dig up the soil to garden, we disturb this soil life. Mycorrhizal fungi live on the roots of plants and have a mutualistic relationship with the plant’s roots. To explain it simply, the plant says, “I need water, I need phosphorus, I need resistance to diseases” to the fungi and the Mycorrhizal fungi says, “Ok, I can bring that stuff to you through my hyphae but I need sugars to survive” and the plant feeds it sugars. So they benefit each other. Mycorrhizal fungi cannot live without the plant’s roots so we should be sure to use it close to the roots where it will colonize.
When I had some problems a couple of years ago with some tomato plants, I send off two plants to our state lab see if there was anything wrong with them. The guy at the state lab called me to tell me there wasn’t anything wrong with the plant except they had been exposed to some herbicide (Roundup) an were showing some damage but he did tell me my root systems were huge and asked what did I do and I told him I added mycorrhizal to the soil at the root zone.
We can inoculate the soil with Mycorrhizal fungi by two ways:
1. I put Mycorrhizal fungi granules (RTI brand) from ExtremePumpkinstore.com in the bottom of the hole lightly mixed up with some soil when transplanting. Make sure the granules come in contact with the plant’s roots. I use this on all my giant pumpkins and squash but have also used it with my tomatoes. It is expensive though.
2. I drench the soil after transplanting with a solution of Fox’s Bushdoctor Microbe Brew which contains different kinds of Mycorrhizal and beneficial soil bacteria as well. This stuff works great as you only have to water it in once when you plant to get it down to the root zone. It is much cheaper too. Both of these ingredients can be purchased through the internet and Microbe Brew can be purchased locally at a hydroponics gardening store called All Seasons Gardening ((505) 438-4769) located off Rufina at 1228 Parkway Dr. here in Santa Fe. Call for availability.
You can find more detailed info and other mycorrhizal products online at Mycorrhizal Applications, Inc.©
Saving water in your vegetable garden
Saving water is so important now in our high desert especially with the drought. Last year I read an article on a company who created oasis in the Saudi Arabia deserts where they get less water than us. I noticed the main ingredients used were polymer crystals and a volcangenic sedimentary mineral (volcanic ash) called Zeolite, both of which absorb water and hold it and nutrients close to the root systems where the plant can use both as needed. I didn’t buy any of the company’s product because they had chemical fertilizers in it but instead experimented on my own with those 2 ingredients and adding my own organic fertilizers/amendments. It doesn’t take a lot of these 2 ingredients. The brand of Zeolite I got is called Zeomax Garden Aid
and both that and the polymer crystals came from Amazon.com. The results were amazing.
Some of you may know that I expanded my garden last year by 1000 square feet going from 2000 sq ft to 3000 sq ft in my main garden. I put about a tablespoon of both ingredients along with my usual yum-yum mix, compost and other stuff I put in the bottom of each hole for my tomatoes. Then I mixed it up well and planted the transplant on top of the amended soil in the bottom of the hole. All of my garden is on a drip system.
I expected my water bill to go up substantially. Amazingly there was no increase in my water bills from the previous year-a savings of about 33% (since I had increased the garden by 1/3 its size or 1000 sq ft) and I only used them on 50 transplanted tomatoes in a brand new raw garden that hasn’t been that heavily amended yet (better amended soil =better water retention). This year I’m going to use them on everything I grow. For seeds I plant, I’m going to dig a trough and amend the soil with both of these items, sprinkling it in and plant the seeds on top of it in hopes of saving more water. You can get polymer crystals at Payne’s Nurseries here in town if in a pinch but they are expensive locally and I could not find Zeomax at all locally. Amazon cost less and if you plan ahead before planting this year, I believe you could save some substantial money in your water bill and cut down on your water usage. You can also dig holes around your new plant or an established plant and mix these two ingredients with some dirt and put it back in around the plant being careful around the roots if you already planted.
Wall of Waters 101
I think Wall of Waters are one of the best early season aids for tomatoes and peppers in cooler areas of the country acting like little greenhouses keeping the plants warm at night, protecting them from our ferocious winds in spring and for getting a great head start for growth but they can be hard to put up around the plants especially if you are trying to do it yourself. I have another post addressing what amendments I use when planting and how to plant tomatoes but this primer is about wall of waters. You can still use wall of waters right now as the nights are still very cool for tomatoes and peppers.
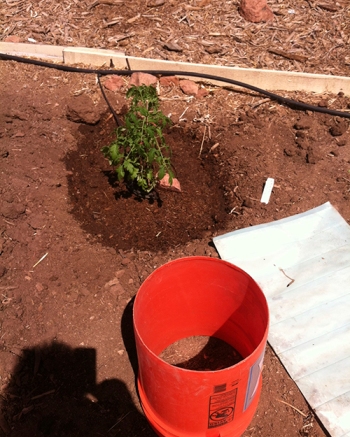
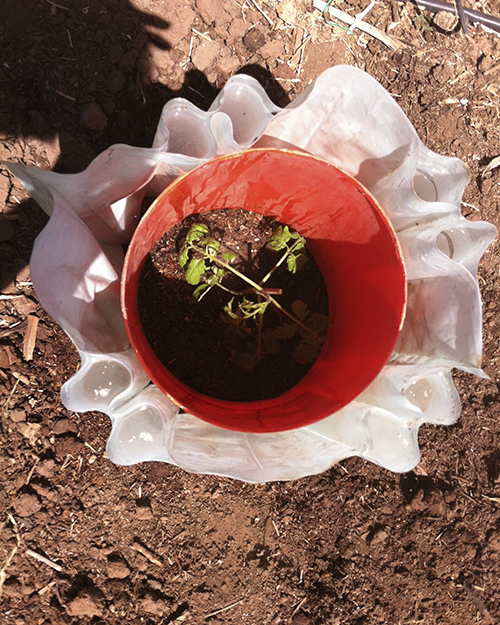
Here is the planted tomato with a big well around it. If the well isn’t big enough than the wall of water will sit lopsided. (I still had to put the drip line around the plant BEFORE I put the wall of water on it). Notice the green wall of water on the ground and the 5 gallon bucket. Some tomatoes are too tall for the bucket so I cut off the bottom of this 5 gallon bucket, first using a drill bit to drill a hole big enough so my sawzall tool could get inside and cut off the circular bottom. The bucket can go over the plant without smashing it over tall tomatoes.
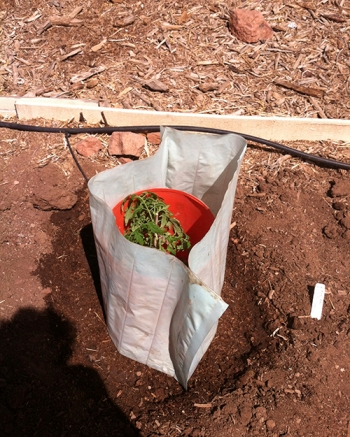
Put the bucket over the plant and then slide the wall of water (henceforth known as WOW) over the bucket.
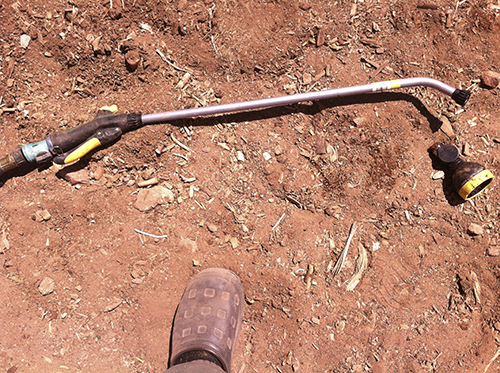
Another great tool for filling the WOWs is this watering wand. I like this one because it has an on-off switch and a lever for control of how fast the water comes out. Here I took off the end so it will fit easily inside each cell. (this is my favorite gardening shoe-can you tell-well worn?!!)
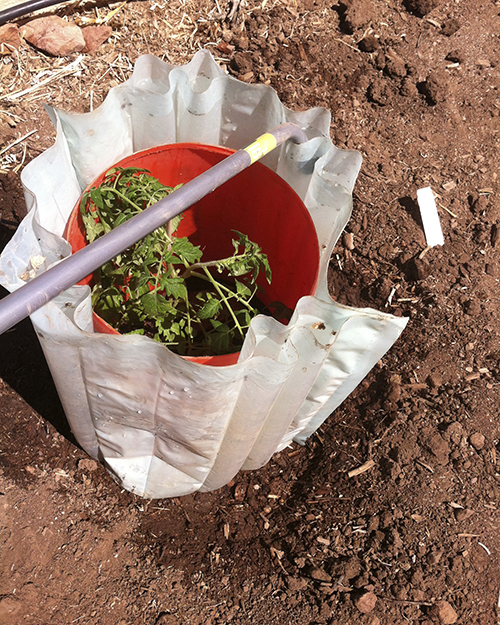
Now put the wand into each ‘cell’ and fill with water. The 5 gallon bucket will keep the WOW from falling on the plant.
Fill a couple of cells, then go to the OPPOSITE side and fill a couple of cells and do this on all 4 sides instead of starting on one cell and going around where it will have a tendency to collapse. This will help the WOW to stand up better as you fill up the cells.
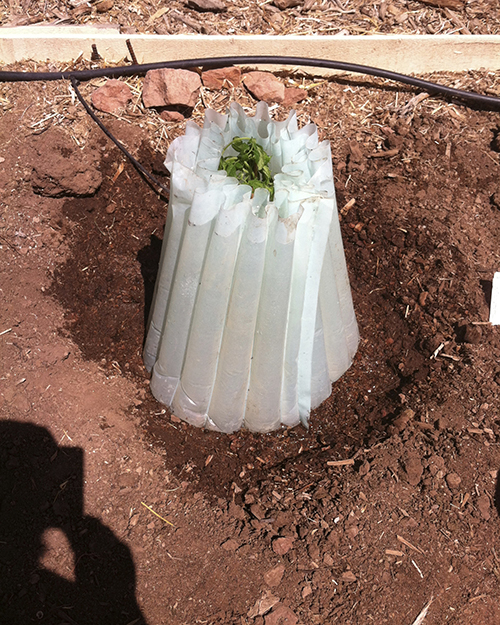
After filling all the cells, reach in a pull the 5 gallon bucket out and the WOW will now support itself. A perfect little greenhouse. But sometimes…
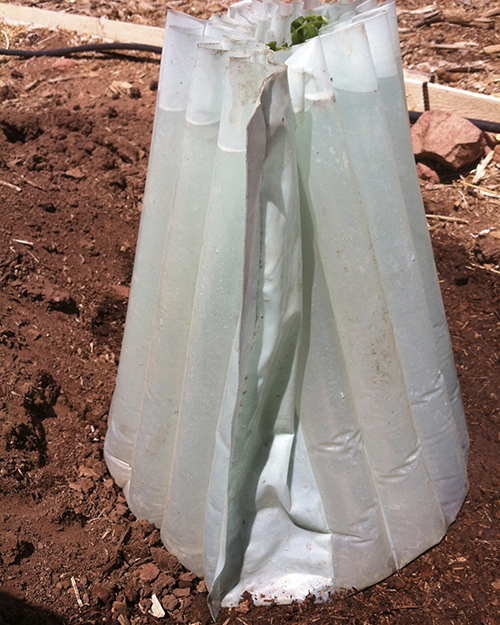
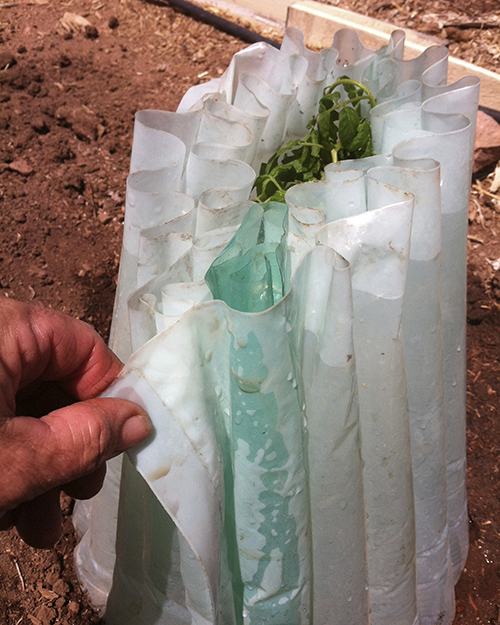
a cell will get a hole and leak after the WOW is a few years old. This is a problem as the WOW needs every cell full to support itself, so…
So you can buy replacement cells or make your own. Just take that leaky WOW and cut some good cells out of it for use as replacement cells for other leaky WOWs.
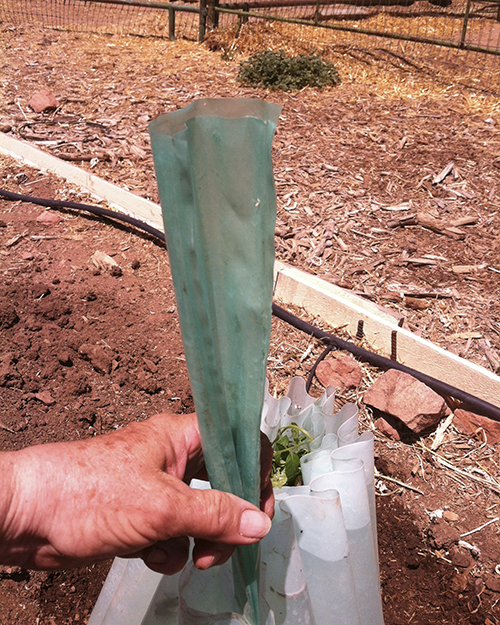
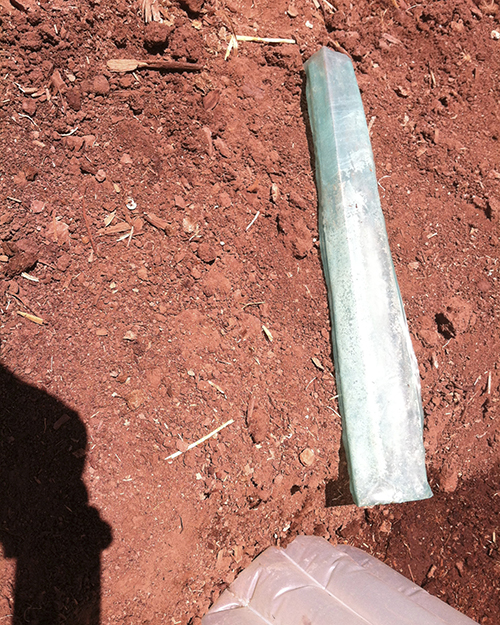
Take your replacement cell and fold it lengthwise in half as shown and slide it into the cell where the water leaked out.
Then fill up the replacement cell with water and it will hold up that cell. Now one last thing…
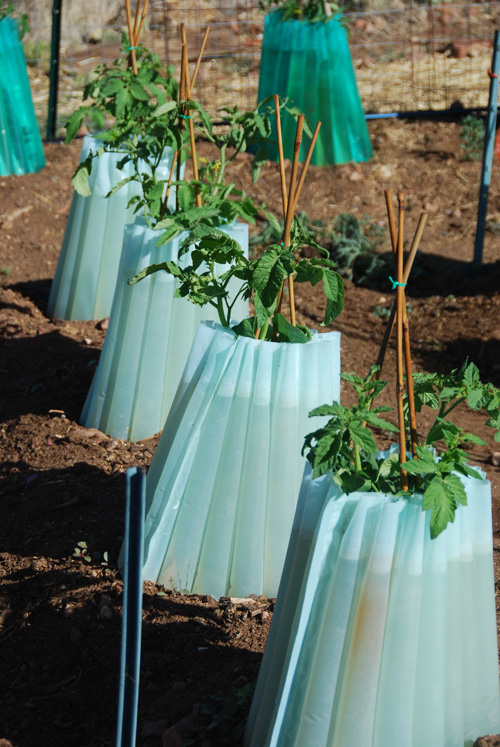
I put 3 bamboo stakes inside the WOW’s right next to the walls and make a tee-pee out of them and tie them together at the top in case the WOW wants to collapse from the wind, the tee-pee will hold the WOW up so it doesn’t crush the plant. These plants have been inside the WOWs for a while and I will take off the WOWs now. Just grab the WOW on opposite sides and pull them off the plant and dump the water back in the wells.
Anti-Monsanto Rally in Santa Fe
Yesterday there was an anti-Monsanto rally in Santa Fe. The rally started at the Santa Fe Farmer’ Market with speakers and then continued with a protest walk to the State Capitol. The rally was for requiring GMO labeling for our foods (so we can make the choice whether we choose to eat foods with GMO’s in them) and was against the Monsanto Protection Act where no one can sue Monsanto for any damages done by their products. Here are more photos from the rally.
How to Grow a Giant Pumpkin
Yesterday I taught a class on How to Grow a Giant Pumpkin and told them I would put the full color version in a pdf format on-line for them to use. I discussed all the basic information on growing a giant pumpkin from picking a seed to hand pollination to determining the direction the vine will grow to positioning the baby pumpkin as it grows to harvesting it and much more. Here is the handout for those interested: GROWING GIANT PUMPKINS with PICS
Here is a photo showing how to determine what direction the pumpkin plant will grow so you can be sure it grows in the direction you want (like not into a fence or wall)!
Below is a drawing showing how a giant pumpkin vine will naturally grow into a ‘Christmas Tree’ pattern with the longest secondary vines closest to the beginning of where the plant comes out of the ground (called the stump) and how they grow shorter and shorter as they grow towards the end of the main vine.
44 tomatoes planted today!
Phew! What a day. Three of my friends came over this morning and all together we planted 44 tomato plants from 8:30-12:30! What a bunch of busy beavers! Janet started out the morning before the others came and screened all my vermicompost and filled three-5 gallon containers. Then Lava showed up and Janet and her put in all my amendments in each hole (I had previously dug out most of the holes and Bob Z came by yesterday and finished digging them for me-another great friend)! Then today, I could barely keep ahead of the girls, me setting out plants, making sure each plant had a drip to it, name tags, map of all the tomatoes, providing stakes and wall of waters while Lava planted them and Mernie and Janet followed up behind putting the wall of waters on all of them. Then we all had other things to do and off we all went. A wonderful day to plant- not too windy and not too hot-it was overcast! A huge thanks to Lava, Mernie and Janet for helping me today and to Bob for helping me yesterday-would of taken me days to get that far. It takes a village to do this much! Mucho gracias!
Giant pumpkin seeds planted inside-It has begun!
This year I’m planting 4 seeds for me and 2 for my giant pumpkin/squash class later this month. I planted them in 4″ peat pots and they are on a heat mat set at 80°F under grow lights until they germinate. Here is the 2013 lineup:
895 Grande 08 – 1016 Daletas x 1385 Jutras-this seed became the 2011 NM State Record
1011 Hoffman 10 – 1446.5 Werner 06 x 1180.5 Pukos 07
1111 Sawtelle 08 – 1556 Werner x sibb
1308 Todd 10 – 50 Todd x 901 Hunt- 2010 CO State Record
Three of these seeds are from Colorado and one seed from Wyoming.
So let me explain what each name means for those of you interested in giant pumpkin growing as each seed name gives important information.
Let’s take the 895 Grande 08. This seed came from an 895 LB pumpkin and the grower’s last name is Grande and was grown in 2008. The rest of the information is the genealogy of the 895 Grande that I’ve provided. So 1016 Daletas was the mother plant and was a 1016 LB pumpkin and the grower was Daletas and no year given. The father plant (pollinator) was 1385 Jutras. So this pumpkin weighed 1385 LBS and the grower was Jutras with no year given.The reason you should go back and look at the parents is you can see that the 895 came from some huge pumpkins.
The 895 Grande produced my NM Giant Pumpkin State Record of 448 LBS back in 2011. Last year I grew the 448 Cabossel 11 (nicknamed MAX) but didn’t break my previous record so I’m going back to the parent 895 Grande to try again. My record gotten broken last year. The current record is 530 LBS so I’ll try to regain the State Record this year! Notice I’m also growing seeds from much bigger pumpkins as well but with our short growing it is very hard as I lose about a month of time other growers get. Wish me luck!


