Giant Vegetables Coming SOON!

Me with a giant marrow growing in 2010

So someone asked me, ‘Hey Jannine, how come we haven’t heard about your giant vegetables yet?” Well, I’ve sort of been preoccupied with getting the tomatoes in the ground lately but all the giant vegetables are still in the house all cozy under my gro lights just waiting to go out. We still have some cold nights ahead in the next few nights so I want to wait a little more. Also all my peppers and eggplants are still inside as well as they HATE being cold more than tomatoes do. One cold night can stunt a pepper plant all season so I suggest you protect them with something the next few nights if yours are already out.

But back to the giants-I have 2 giant pumpkins, one giant ‘greenie’ squash, 2 giant marrows (think supersized zucchini), 1 giant pear gourd, 2 long gourds and 6 giant tomatoes. I’m shooting for next week to get them out. Don’t worry, I’ll be talking alot about giant vegetable how-to’s once they get going. Here is what I still have to do for the GIANTS:

I still have to do a final mixing of my soil and add some amendments in the giant vegetable patch I have.

I still have to get out my low tunnels for the giant pumpkins and greenie to go under to protect them from our intense sun and cold nights.

I still have to build a super tall arbor for the long gourds which can get as tall as 109+ inches. But I can still get them in the ground and build the arbor around them. If you build it, they will come!

I still have to create the drip system for a new giant tomato bed.

I still have to do a drip system for the GIANT VEGETABLE PATCH

I don’t know where the giant pear gourd is going yet! I think Bri’s GIANT VEGETABLE PATCH (named after my beautiful horse Bri who is no longer with us) is going to be really full this season!

GIANT PUMPKIN/WINTER SQUASH-How to Tell Which Direction a Vining Squash Will Grow

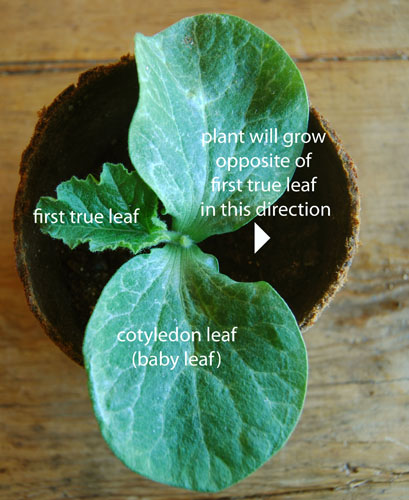
Have you ever planted winter squash and it grew in a direction you didn’t want? Here is a good tip for how to tell which direction a vining winter squash (versus a bush variety) will grow. I will use my giant pumpkin as an example but any winter squash that is a vining squash will act the same.

Let’s say you plant some vining winter squash next to a wall or on the edge of a garden bed and you need it grow away from the wall not into it or into your squash bed not out of it (good luck on that one!) When the plant puts out the first two leaves as I have described in previous posts, these are called the cotyledon leaves (baby leaves) and don’t look like any of the other leaves it will grow afterward. All leaves after the cotyledon leaves are called true leaves.

put mark on side of pot opposite of first true leaf

Sooo pay attention to that FIRST TRUE LEAF.  The plant will GROW IN THE OPPOSITE DIRECTION FROM THE FIRST TRUE LEAF. If I’m growing them inside for a head start, it is easy to mark the container as you will not remember which one was the first leaf (trust me!) when the second one appears. I just take a marker and mark the opposite side of the pot so I know when I transplant it into the ground which direction I orientate it. If I grow directly into the soil, after the first true leaf appears, I gently dig up a big amount around it and gently lift it and the dirt so as not to disturb the new roots and rotate it in the direction I want it to grow. For those who are growing their winter or summer squash seed in the ground, it is too early. Wait till May 15th (our first frost free date) to plant directly into the ground when the soil and weather are hopefully warmer.

Giant Pumpkin Cotyledon Leaves Compared to Tomato Cotyldon Leaves

Here’s a comparison of the giant pumpkin cotyledon leaves (the first 2 leaves to pop out) along with it’s first true leaf compared to a tomato cotyledon leaves along with it’s first true leaf. Notice the size difference! Giant pumpkin cotyledon leaves are the biggest baby leaves I’ve ever seen.

cotyledon leaves on giant pumpkin and tomato

Giant Pumpkins and Greenie are up!

Giant pumpkins and greenie are up! The giant marrow is the small one popping up

The giant pumpkins and greenie squash germinated and are looking GOOOD! I planted the seeds on April 7. The first one up was the greenie on April 12, then the pumpkins followed by April 14. The cotyledon leaves (very first leaves to appear or baby leaves) are huge. My all star lineup so far is:

Giant Pumpkins: 1046 Grande 10, and another  895 Grande 08  (which became my New Mexico State Record for giant pumpkin last year)

Giant greenie squash: 903 Noel 07

They are in 4 inch peat pots on a plant heating mat in a light box and I just see the beginning of the first true leaf on the pumpkins and greenie. Looking good so far! Grow naguas, grow!

Mycorrhizal products here in Santa Fe

Someone just wrote me if I knew a source for Mycorrhizal (also called Mycorrhizae) products here in Santa Fe. So I thought I’d respond in a post in more detail as well as reply to him in the comment sections.

Mycorrhizal is a fungi that help protects plants from many diseases and drought like conditions. It forms a symbiotic relationship with the roots, making water and soil mineral nutrients more available to the roots of a plant while the plant feeds the mycorrhizae sugars it produces. It is found in nature in most UNDISTURBED soils. Gardens do not have undisturbed soil- we work the soil to various degrees adding amendments and tilling soil.

There are two main types of Mycorrhizal.

ECTOMycorrhizal works on more woody crops like trees. I don’t use it myself on my trees.

ENDOmycorrhizal works for most (90%) but not all vegetable crops (some crops do not respond to any Mycorrhizal like Brassica crops, spinach and beet crops). I used myco products for both my giant pumpkins and tomatoes in previous years but will also try it on all my curcubit crops this year as well as they seem to get the most diseases and the prices seem to be coming down on mycorrhizal products as it starts to become mainstream.

I just saw that Santa Fe Greenhouse has some Mycorizzial products. I bought ‘BUSHDOCTOR MICROBE BREW’ (by Foxfarm products) from SFGH and will try it this year. It is a liquid. It says on the directions to use 2 tsp/gal of water every 2 weeks as a drench. I think a bottle would last the whole gardening season for most people. I can’t remember what it cost (I bought it a month ago), but didn’t seem like it was exorbitant. I use to have to order myco on the internet so I’m anxious to see how it works. The Microbe Brew also has a bunch of soil bacteria and microbes in it besides the Mycorrhizal that will be good for the soil and plants as well. All these things help the plants either protect or fight off diseases-all organically.

Growing Giant Pumpkins From Seed (Or What Did I Get Myself Into)

Article first published by me as Growing Giant Pumpkins From Seed (Or What Did I Get Myself Into) on Blogcritics.

growing giant pumpkins

Giant Pumpkin growing season is once again upon us. Why grow giant pumpkins? Why not? Hey if every veggie gardener grew a giant pumpkin, the world would not be hungry! World famine banished!

For all those nuts who grow giant pumpkins, now is the time to start your engines (I mean seedlings) indoors, that is unless you live in Hawaii in which case you probably already have a new one started several months ago!

To start seedlings you must first get your hands on some giant pumpkin seeds- the usual variety being Atlantic Giant Pumpkin. You can buy some from Amazon or you might get some from someone who grows these monsters. Many of us are willing to give away our seeds. Did I say us? Yes it’s true I am one of these nuts. When I first saw the film, “Lord of the Gourds”, there were giant pumpkin growers in the film who babied their giant pumpkins by playing them music, naming them, feeding them high octane food, hugging them, and even putting blankets on them when the weather turned cold. I saw this and I said, “What a bunch of nuts” and the next year I became one of them. Well almost. I don’t play them music.

So after you score some seeds, you need to dedicate the next 6 months to growing these monsters. They become your mistress. So if you have a family, better put them in therapy now for their abandonment issues they will develop and resentment issues over vacations they won’t be able to go on. Who wants to go on vacation anyways? Gas is too high this year. Still interested? Ok, then the next step is to plant them inside your house, pointy side down in seed starting soil in a four-inch peat pot. Then place them on a plant-heating mat (the one you need to buy) under that grow light box you just built and wait for them to germinate. What grow light box you say? The one you’re going to build for these monsters. Are you with me so far? Good. Welcome to giant pumpkin mania…

Starting Giant Pumpkins, ‘Giant Greenie’ and Giant Marrow

I planted all the seeds for my ‘All Star Lineup’ of giant pumpkins, giant marrows and also new this year is a giant ‘greenie’ squash (think green pumpkin) and 2 long gourd on last Thursday, April 7.

Here is a picture of a Giant Green Squash-'Greenie'-not mine!

-For the pumpkin and greenie (giant green squash) seeds I filed the edges just a little so the seed can absorb water more readily to help it germinate. Then I planted them in a 4 inch peat pot about 2 inches deep pointed side down. For the Giant Marrow I just planted the seed point side down.

-I put all of them on the plant heating map to keep the soil warm for germination. They are in the light box and get watered every day. Hopefully they will all germinate.

Keeping a Vegetable Gardening Journal for Each Year

Pumpkin Journal (left), and Vegetable Journal (right)

You might consider keeping a fruit and vegetable journal for 2011. I actually have 2-one for giant veggies and one for the regular veggies. In this you could put the date you start your seeds outdoors, in your greenhouse, and inside with information like temperature of soil, air, temperature inside what day you started, how long it took to germinate, what the weather was like during this time period, what varieties you started, how much water you supplied, if you presoaked any seeds, etc and then continue this journal throughout the season as to how the varieties do,  when they blossom or when you get your first fruit, what pests or diseases appeared and when, what you did to rectify the issues, what varieties were your favorites and why, etc. I bought a nice notebook (something you will want to keep-not just loose sheets of paper that get lost) that I have kept for the last 3 years and add to it for each new year. Every few days I put down what is happening in the garden in the evening when I have some time. I have found it invaluable in future years to look back (in winter) to help me determine what I would do the same and what I would change for the new season. You’ll be amazed at what you will read the next year.

Closeup of Vegetable Journal

I’ve been trying to tweak out my timetable for starting my seeds inside and have referred back to the journals. For instance, 2 years ago I started seeds inside in February and found for me that was too soon-just too cold and I had to replant a lot of seeds in March. Especially tomatoes-they don’t like cold nights (or days) and get stunted and the leaves turn purple. This is because of a phosphorus deficiency where it is not available to plants when the soil and air temp is too cold. Read my post, ‘Learn from my mistakes when starting tomatoes!’ on how to remedy this. Also for you greenhouse people read this forum from Organic Gardening. Luckily that year, I was able to sneak a lot of the ones I had restarted out in mid April with protection because of the mild winter we had even though the plants were smaller- but they were not leggy.

In contrast, last year I planted seeds inside under lights in early March (thinking I had waited long enough to start). But we had such a harsh cold spring that the plants (which looked great) had to stay inside too long and got too tall because I couldn’t put them out till much later (many plants in June) because of really cold nights (27° F till June 6th). How would I have remembered this and what I did differently without a journal. Every year is brings new challenges to us growers in Santa Fe, NM so having a journal that I can refer back to is helpful. Besides it’s fun..

KONG BREAKS NEW MEXICO STATE RECORD!!!!!!!!!!!

Saturday, Oct 1, 2010/GPC Old Colorado City Weigh-Off, Colorado Springs, Colorado-

Kong broke the New Mexico State Giant Pumpkin Record today coming in at 421 lbs beating the old record of 404 lbs! The record comes home to Santa Fe which is quite a feat considering our high altitude and short growing season. Kong also got a ribbon for third place in the weigh-off for 3rd biggest pumpkin out of about 25 contestants and $100 (yea-paid for my gas to get up there!).  The first place was a 1109 lb monster pumpkin grown by a Colorado grower named Marc Sawtelle and second place was over 800 lbs grown by another Colorado grower named Doug Minix. These guys are my heros-they are really nice and share information about growing these monsters. My pumpkin was little by comparison but still bigger than all the rest of them. My giant marrow, ‘Big Zuc’, also got a ribbon for Best Squash and also set a new New Mexico record. What a way to finish the gardening year. Couldn’t be better!!

So the weigh-off day went as follows:

Got up at 4:30 am and left by 6am to get up to Colorado Springs by 10:30am. We unloaded Kong at 10:30 and waited till weigh-off time at noon. We met the mayor of Colorado Springs who told us the sorid story of the city when it was a mining town and one side of the main street (that we were on) was for the brothels and other side was the respectable side.  He told us the story of how the men would drop off their wives at the opera on the respectable side, go into some tunnels to cross the street over to the brothels and come back again to pick up their wives after the opera! Hmm! He looked like the guy in Monopoly (I think the banker?) I also met Buffalo Bill Cody (I think reincarnated)! Lots of people and families came.

At noon when they went to turn the digital scale on they couldn’t get it to work! Arg! I was freaking out inside as I really wanted Kong weighed and didn’t want to go all the way home without doing that. Talk about how anticlimactic that would of been! Anyways they worked on it for about 40 minutes while I’m dying inside and finally they got it fixed. Phew! Talk about a freak out! Where were the ‘tums’?

Then they started weighing them from smallest to largest. The next thing that made me worried was the entry right before me was a beautiful orange color and looked bigger to me, but only weighed in at 375 lbs. Sheez! Did I measure wrong? Marc and Doug(the two biggest growers there) told me later that color (as in bright orange) always weighs lighter than the salmon color pumpkins. Then the big moment..and Kong weighed in at 421 lbs. Elodie and I were screaming and yelling as they announced I broke the NM State Record! Such a thrill! Then they put my giant marrow, ‘Big Zuc’ (think zuccini) on the scale and it weighed 43 lbs. Biggest fricking zucchini I ever grew! Also a NM State Record! Icing on the cake! So I got ribbons for third place for Kong and Best Squash for ‘Big Zuc’ and of course the sweetest was breaking the NM State pumpkin record. What a way to end the giant pumpkin season! Here is a slide show of the weigh-off.

This slideshow requires JavaScript.

Kong Gets A Lift To Colorado!

LOADING KONG

Friday Oct 1, 2010/8:30 am-Up early today getting ready for the gang to come and help pick up Kong into the truck. My friends who helped are some big dudes and I couldn’t have done it without them. Thanks guys!  Kong measured 269 OTT which means it is around 404 lbs but the three charts that estimate the weight put me between 404 lbs up to 415 lbs depending which chart you look at. I would of liked to cut it off tonight but this is when I could get the whole gang together. Hope I don’t need the extra weight Kong could gain today. We leave at 5 am tomorrow to drive to Colorado Springs for the GPC weigh-off. Here is a slide show of the loading event.

This slideshow requires JavaScript.

Kong reaches 396 lbs…

Kong has reached 396 lbs! I am trying to get it past the state record of 404 lbs by pushing it a little with fish emulsion and seaweed every day. I have to be careful not to blow it up! It will be touch and go until the end when we take it on Saturday up to Colorado Springs, CO for the weigh-off. Every pound is critical now. I won’t know if it beats the record until they officially weigh Kong as I could be wrong on my measurements (wishful thinking?) or it could weigh light (or heavy).  I need at the minimum 10 lbs in 4 days and that is if the measurements are correct. The weatherman is predicting warm days in the 80’s which bodes well for Kong. Grow Kong, grow.. Stay tuned!

Giant pumpkin ‘Kong’ hits 228+ lbs!

This slideshow requires JavaScript.

Here is a mini slide show of ‘Kong’, my biggest giant pumpkin right now. There is an apple on it for perspective. Kong is 35 days old and 228 lbs as of tonight. It’s been putting on between 12-17 lbs a day. I said a day! 17 lbs is the best weight gain in a single day I have ever had with a giant pumpkin. I know others have greater gains but we have harsher conditions and shorter growing season here. Kong is starting to get longer and bumpier. I like its looks! I love going out after work and measuring them every evening. You can actually see a difference from day to day. It is mind blowing!

‘Harpie’, my other big pumpkin, is beautiful, being perfectly round and not gnarly like Kong. It is at 100 lbs and its weight gain varies from 4-10 lbs a day. I will post pictures of it later.

It has been around 47 degrees during this past week so I have to put a blanket on both of the pumpkins over their row cover so they don’t loose so much heat at night. The pros say to blanket them when the temperature gets below 60 degrees at night. That way they don’t have to wait to warm up in the morning to continue growing. The row cover is to provide shade during the day (think like a light weight covering) so their skins don’t get hard. It is easier for them to grow when their skin is soft.

This is my pumpkin mantra, “Grow Naguas, grow” (grow pumpkins, grow). I say it everynight when leaving the pumpkin patch!

Baby giant pumpkins are putting on weight

I actually measured the baby pumpkin on the N. Harp main vine yesterday and today because it is starting to grow (at least for now). It is about the size of a soccer ball now. Circumference was 27″ yesterday and today it was 28.5″. A gain of 1.5 inches in 24 hours . This evening I measured using the OTT method which is more accurate and Harp’s total measurement was 51.5 and the 895 Grande main was 47 OTT. The measuring chart doesn’t go down that low so I’m not sure how much they weigh yet  but should sometime this week as they start to really grow.

Giant Pumpkin Sex 101a

Ok, here’s the skivvy on giant pumpkin sex 101. I’ve been talking about giant pumpkin pollination a lot and have been giving bits and pieces of info and so want to be clear about WHY we choose to pollinate them and HOW we hand pollinate giant pumpkins.

First WHY do we pollinate them?

If I was growing regular pumpkins I wouldn’t pollinate them, I’d just let the bees do it but giant pumpkin growers want to know what genetic material is being passed from the male flower to the female flower of a pumpkin. why? Because it doesn’t affect this season’s pumpkin, but the next year’s seeds of that pumpkin. That way we can grow bigger pumpkins,  prettier pumpkins, oranger pumpkins, rounder pumpkins, etc. next year. If we let the bees do it, we wouldn’t know which pumpkin plant the pollen came from as the bees visit many flowers from many plants.

So we grow several different pumpkins from seeds from different giant pumpkin growers. For instance, I have 3 growing right now and one that I hand pollinated  the other day was from the seed of a 895 lb pumpkin seed grown by a grower named Grande in 2009 (hence it is called an 895 Grande 09) and I crossed that female flower with the male flower from a seed of a 945 lb pumpkin seed grown by a grower named N. Harp in 2010 (hence it is called 945 N.Harp 10). Why would I do it? I’m trying to cross 2 top notched pumpkins and see what I can get. I hope to get a round really orange pumpkin with great weight. The 895 Grande was really pretty but the 945 N. Harp came from great genetics. I know which pumpkins they came from because those growers list that with their seed. I can also look up the grandparents as well. If we let the bees do it, we would not have this information to help us decide.

Second question is HOW we do we hand pollinate the female flower?

male flower side view

female flower side view

First all pumpkins produce both male and female flowers on each plant. The male flowers show up first and then the female flowers start showing up. I watch the closed green female flowers closely for when they start to get big and slightly yellow orange on the tip of the flower but the flower is still closed. When I see that, I know it will OPEN THE NEXT MORNING. So I cover it the night before  and  some male flowers as well so the bees won’t get to it first with unknown pumpkin pollen. Then I get up EARLY the next morning as we have a 4 HOUR

male flower inside with stamen

female flower inside with stigma

WINDOW TO POLLINATE THE FEMALE

FLOWER, (GENERALLY 6-10AM) and find some newly opened MALE flowers (or uncover the ones from the night before) from the plant I want to cross the female flower with. It could be from the same pumpkin plant or a different one. Now remember we can tell the female flowers because it looks like a little pumpkin is attached at the base of the flower while the male flowers are on skinny stems only. See pictures. Also the inside of male and female flowers are different and when the flowers are open you can see the differences. Male flowers have stamens  (kind of look like a penis-I told you we would talk sex) that have the pollen on it which looks like grains of powder all over it. The female flowers have a stigma (think vulva) and if the timing is right (remember 4 hour time period) will accept the pollen from the male flower.

male flower with petals peeled off revealing the stamen

So as a giant pumpkin grower I take a male flower and peel off the petals leaving the stamen and take that flower and brush the stamen loaded with pollen like a paintbrush on the inside of the stigma and also around the outside of the stigma as well. Then I close up the female flower with a twistie so no other pollen can get in. I keep it closed for one day and take off the twistie afterwards and wait to see if the pollination takes which could take quite a few days. Sometimes they abort when they are a little smaller than the size of a basketball.

male stamen pollinating female stigma like a paintbrush

Inside each female flower are many immature eggs waiting inside immature seeds holding half the genetic material. The pollen holds the other half of the genetic material. If the female receives the pollen, the pollen will germinate and move down inside the stigma to the egg within an immature seed and fuse its genetic material with the genetic material of the egg stored  in that immature seed inside that tiny pumpkin. PRESTO! FERTILIZATION has taken place. Every egg fertilized becomes a a viable future seed. And every seed fertilized holds the genetic material for a future pumpkin If not enough pollen as passed, the baby pumpkin will self abort. (or if it is too hot-90 degrees or hotter, they can abort too) COOL, HUH?!  The so next time you need to talk to your kids about sex, you can talk pumpkin sex as an example!

Ok, have I given you too much info? I figure this way we won’t have to go over this again.!

giant pumpkin flower pollinated!

945 N. Harp 5 segment stigma

So the 945 N. Harp pumpkin flower that I said was almost ready to open, did this morning as pictured above. That was really fast to open. So I got some male flowers off the same plant that had pollen and broke them off, stripped away the petals and used them like a little paintbrush to go all around the outside and also inside the stigma. Notice this stigma has 5 segments. Most big pumpkins have 4 or 5 segments and some have 6 but many of the six segment ones abort due to insufficient pollination.

female flower with male flowers around it after hand pollination

The next picture is of the flower after I hand pollinated it with the ‘spent’ stamens in front of it. I almost feel like smoking a cigarette!

The last picture is where I closed up the flower with a twistie tie so the bees won’t accidentally pollinate it with another pumpkin’s pollen. By controlling pollination, I try to control (somewhat) what the future seeds of the pumpkin will be but it won’t affect this year’s pumpkin and what it will look like only it’s seeds.

pollinated giant pumpkin flower closed with twistie

I will cross pollinate some of the other female blossoms with some of my other pumpkin plants to see what the next generation’s seeds will produce next year. But this one I self pollinated it. So on the same pumpkin plant you could have some pumpkins that were self pollinated and others that were pollinated with other pumpkin plants.