69 tomato plants in the ground! 5 more to go

IMG_3912

The tomatoes in their Wall of Waters to stay warm at night. Doesn’t look like much now but come July the tomatoes should look like a jungle.

What a whirlwind week. Elodie Holmes and Mernie Elsesser helped me plant 35 tomato plants on Monday and on Friday Janet Hiron helped me plant 24 more tomato plants for a total of 59 in the main garden. Great to have such good friends help with what would be an overwhelming task for one person! Thanks to all!

Sunday I planted 10 more in the greenhouse and still want to plant 5 more in the raised beds by the house but the bulk of the work is done with the tomatoes. There will be a total of 74 tomato plants this year for the Tomato Lady. We put wall of waters around each plant. Even though we are past freezes at night here in Santa Fe, tomatoes (and peppers) do not like the cold nights and 45°F is cold to them right now. They don’t like any temperature from 55°F and lower and it will be a while before we get above 55°F at night. The wall of waters act like little greenhouses keeping your tomatoes and peppers warm at night after absorbing all that sun in the daytime. By the time the tomatoes outgrow the wall of waters, the night temperatures will be warmer and we can take them off.

This week: Planting giant pumpkins and the start of the rest of the veggie garden

Beets to try: Chiogga, Touchstone Gold, Detroit Dark Red, Cylindra and Craupaudine

getimage

Detroit dark red beets

Beets – Also known as ‘Beetroot’, they have many health benefits with antioxidants in them. Both the leaves and the roots can be eaten.

I never liked them when I was a kid because I only had them pickled. I didn’t like them that way then and still don’t like beets pickled. Then I discovered them steamed and roasted. Wow-What a difference in flavor! This year, I’m growing more beets than I ever have. They have a fantastic shelf life if stored in the refrigerator. I love beets now in a lettuce salad with a dab of goat cheese with sunflower seeds and a lite vinaigrette—divine. Also slow roasted in the oven-more divine. Now I love beets! Here’s what I’m growing this year and why.

Chiogga beets hail from Chiogga, Italy and are beautiful with red and white concentric circles inside when you cut them. I like them because of their beauty and they are sweet. They make a nice contrast to other beets.

Touchstone Gold beets– OP variety. New to me this year, I wanted a yellow beet to compliment the red beets. This has a fine, buttery texture, very sweet, and does not bleed like red varieties do. Can’t wait to try it.

Heirloom Detroit Dark Red beets are an old standby. This is not the hybrid variety of ‘Detroit Red’ but a heirloom variety so don’t be confused. It has very good sweet flavor and does well here. You can get the seeds from Baker Creek Heirloom Seed Co.

Cylindra beets come from Denmark and are excellent. The are long cylinder shaped instead of round and slice more uniformly than the round type. They grew well here. Very sweet-they are my second favorite. You can get the seeds from Baker Creek Heirloom Seed Co.

Craupaudine beets are my favorite beet of all time. Oldest beet variety in existence. Incredibly ugly and incredibly delicious. Very sweet beet and fantastic when wrapped in foil after you rinse it, (leaving the water on the beet) and placed over a BBQ where you add a few wood chips and smoke it slightly as it cooks till tender. The water on the beet helps to steam them a little too. To cook it like the French do go to my other article, ‘Rouge Crapaudine’ Beets-say what?!! They are a little harder to germinate so plant more seeds then you think you need. They are only available in the states from Baker Creek Heirloom Seed Co.

The last three are harder to find so I gave the source for getting seeds. Chiogga and Touchstone Gold are commonly available through many seed companies.

What unusual vegetable seeds are you trying this year?

seeds

I’m always interested in what unusual seeds people are trying (or have had success with).  So I’m sharing what seeds I will try, where I got them and I hope some of you will do the same. For a complete list of all my crops for 2014 go here.

2014 unusual seeds that I will try:

African Bushel gourd-big round gourds the size of a bushel basket! Suppose to be good to use as containers after they dry out. You know me and giant things!

White Egg gourds-from Southern Exposure Seed Exchange-small egg gourd-looks like white chicken eggs-sounds like fun! Now I can pretend my old girls are still laying!

Tarbais beans-from Baker Creek Heirloom Seeds-a pole bean that you dry out and cook for bean stews, soups and cassoulets. More delicate flavor than navy beans. These use to be hard to find in the states but thankfully Baker Heiloom Seeds has carried them for 2 years now.

Eyesines de Galeux-from Baker Creek Heirloom Seeds-a salmon warty winter squash that tastes divine. The more ‘worts’ the sweeter it tastes. More worts=more sugar in it.

Sweet Meat-Another great winter squash-so sweet you don’t have to add anything to it to sweeten it. Also a great keeper-I just finished eating our last one in February.

Peredovik sunflower seed– from Southern Exposure Seed Exchange-this is the black oil sunflower seed that your birds eat in bird seed food.

Jimmy Nardello pepper-a red ‘chili’ looking pepper but sweet-from Southern Exposure Seed Exchange-a sweet long red pepper delicious when sautéed.

Bullshorn (Corno Di Toro) pepper-a red ‘chili’ looking pepper but sweet-from Southern Exposure Seed Exchange-another sweet long red pepper delicious when roasted or sautéed.

‘Canoncito’ landrace red hot chili pepper-This one I got from the Santa Fe Farmer’s Market and is a local seed from north of Espanola.

Charentais melon-from Baker Heirloom Seeds-one of the most flavorful melons from France or so they say.

Purple Bumblebee tomatoes-from Baker Heirloom-small purple and green striped larger cherry tomato. Part of the new Artisan tomatoes out this year.

Round Black Spanish radish-from Baker Heirloom Seeds-I got one from our local organic market and it was delicious so I’m gonna try them this year.

Craupadine beets-from Baker Heirloom Seeds-one of the ugliest but sweetest tasting beets ever-from France.

Early Spring Planting-Three Important Factors

Three important factors should be considered before planting seeds in early spring:

Amount of daylight hours-In the winter the sun is weaker in the northern hemisphere and we have less daylight hours. If you plant seeds too early either outside or in a greenhouse, the seedlings will be spindling when they germinate. Once we have 10 hours of daylight (we currently have over 10 hrs), we can start planting our cold hardy seeds. So in Santa Fe, we now have enough daylight hours. But wait, there are several more factors we need to consider before we plant seeds.

Soil temperature for germination for different vegetable seeds

Soil temperature for germination for different vegetable seeds

Soil temperature-If you are thinking of planting OUTSIDE, forget about it, your soil is probably frozen so of course you can’t plant anything! Even if it’s not frozen, it’s probably still too cold to plant outside. However it will warm up soon. How can you tell what temperature your soil is? You’ll need a soil thermometer. I prefer a compost thermometer that is about 18″ long so you can check both the soil and a compost pile. A soil thermometer is invaluable, as different veggies like to germinate at different soil temperatures. Insert it about the depth of the root zone of the plants, about 4”-6″ in the soil to see how warm it is. Notice the chart above gives an optimum range for each veggie.  If you have a cold frame, hoophouse or greenhouse your soil is probably much warmer already. So are you ready to plant? Not quite. There is one more factor to consider.

Air Temperature-The air temperature is also important and is the main thing people think of in considering when to plant seeds. It’s too cold at night to plant most veggie seeds outside or even in a greenhouse without extra protection BUT there are some wintergreens that are very cold hardy, some even hardy below 32°F at night. Even in an unheated cold frame or greenhouse, the temperature dips below freezing at nights so if you have a one, I suggest you put some row cover (winter weight-.9-1.0 mm.) over your beds. If you don’t have a greenhouse and will be planting outside in early spring, definitely put row cover over it at night but don’t forget to check your soil temperatures too.

I’ve compiled a list of these very cold hardy crops that can be started in a greenhouse now if the soil temperature and daylight hours are good. Many of these cold hardy crops can be planted outside as soon as the soil warms ups in March. For the list go to my blog at: http://giantveggiegardener.com.

Winter greens for the greenhouse or early planting outside

I can’t wait anymore! I got this newly completed greenhouse and am antsy to try it out. I’ve done a lot of research on which plants might do well in the winter and am ready to rock n’ roll! So I am planting cold hardy seeds this week inside the house. I will transplant them into my new greenhouse when they are bigger. I’m also going to try some direct seeding in the greenhouse in the raised beds like arugula, spinach, kale, baby bok choi and mache in mid-February-all of which can handle some pretty cold weather. How cold? We will see soon although you wouldn’t know it by this week. I will also plant other greens like some winter hardy lettuces, peas, and a winter hardy variety of chard called Argentata at the end of February-beginning of March. Everything planted in the greenhouse will have to have row cover over it even in the greenhouse at this early date because of our cold nights. For those of you who do not have a hoophouse, or cold frame, the seeds in the list below will do well outside only you have to wait a little longer.

Here is my list of cold hardy crops to try in the greenhouse. You can also plant these outside in March once the soil is not frozen and cover them with row cover:

From Johnny’s Seeds:
‘5-star greenhouse’ lettuce mix
‘Space’ Spinach

From Southern Exposure Seed Exchange:
‘Even’ Star’ Winter Arugula
‘Winter Bloomsdale’ spinach

From Kitazawa Seed Co:
‘Mei Qing Choi’ (dwarf pak choi)-recommended in ‘Four Season Harvest’ by Eliot Coleman
‘Tatsoi’ (pak choi)-recommended in ‘Four Season Harvest’ by Eliot Coleman
‘Golden Yellow’ pak choi
‘Astro’ arugula

From The Cooks’ Garden:
‘Red Grenoble’ lettuce
‘Forellenschluss'(speckled trout) lettuce
‘Rouge D’Hiver’ lettuce-recommended in ‘Four Season Harvest’ by Eliot Coleman

From John scheepers Kitchen Garden:
‘Argentata’ Chard-recommended in ‘Four Season Harvest’ by Eliot Coleman

From Agua Fria Nursery: transplants ready to plant
mache (corn salad)-recommended in ‘Four Season Harvest’ by Eliot Coleman
endive-recommended in ‘Four Season Harvest’ by Eliot Coleman
‘Winter Wonder’ lettuce
‘Marshall Red’ romaine lettuce

Heating the Greenhouse using passive solar methods?

wide angle view of GH interior

I like this wide angle view of the inside of the greenhouse

I want to heat the greenhouse in the winter using passive solar methods. There is nothing growing in it so far this winter but I’m doing some experimenting to see how warm I can get it (my goal is around 32°F or warmer) at night. To this end I’m experimenting using compost to help heat it, putting some barrels with water in them to act as a heat sinks and I’m insulating the structure inside a little better so as not to lose so much heat at night. If the sun shines, it gets between 70-80° in the day right now (which is delightful) and I’d like to keep some of that heat in at night and not lose it. Of course I had the opposite problem last summer when it got too hot but that’s another problem I’ll address this summer!

GH inside winter

The center bench has compost underneath it in a raised bed

The compost pile is only 1/2 a yard so is probably not enough to keep it significantly warmer  inside the greenhouse but what if it adds a degree or two? I’ll take it. Everything helps. The compost pile got up to 112°F  while the surrounding soil in the two raised beds is 40°F. Not that I’m planting in the compost but it shows it is significantly warmer. Now it has cooled down to 60°. The night temperatures are still below freezing inside.

Since I didn’t have a chance make shutters for the screen windows before winter set in, my friend, Jody, thought of putting plastic on both sides of the open screen ‘windows’ to trap warm air and slow the heat loss. I’ve done that now.

bubble wrap down on windows

The vents are covered with plastic and bubble wrap is on all the windows

I just put bubble wrap on the windows to hopefully act as insulation to slow the loss of heat at night as well. Plus I added bubble wrap on the ceiling between the rafters. Elodie said probably a lot of heat is loss up there through the uninsulated fiberglass roof. Now the green house looks like a  bubble wrap house on the inside! The night temperatures are still below freezing inside.

I painted the rain barrels black and filled them with  water to act as heat sinks

I painted the rain barrels black and filled them with water to act as heat sinks

I also have 4 rain barrels that I painted black and filled with water and installed hose bibs on the bottom so I can empty the water out at the end of winter. I put them under the growing tables and the night temperatures are still below freezing inside. And lastly I plugged up a lot of leaks where the roof meets the rafters.

Did it work? Are my nighttime temperatures above freezing? NOPE. I’ve only been able to keep it about 5 degrees warmer than the outside temperature which make me go to plan B.

What is plan B? Try planting only super cold hardy winter greens and see what happens. Stayed tuned…

HAPPY NEW YEAR! This year slow down!

hard_work_ant_droplet

Sometimes I feel like this ant!

I just read an article ‘Regenerate Yourself’ by Andrew French from the Permaculture Research Institute email newsletter that I get. A great story about a couple working on changing their property into a Permaculture paradise and all the hard work needed to transform their property into their dream. The above picture from the article shows a very hard-working ant moving a drop of water many times its size. Sometimes I feel like that ant when I seemingly have an insurmountable task to do. I think we should all read this article, whether a gardener or not.

The article hit home for me because it speaks to how hard we work and how little we care for ourselves. We keep on trudging and working until we are either exhausted or injured (or both) trying to meet our goals. Whenever this happens I think it’s the universe’s way of actually making us slow down and now after many years, I listen. I try to slow down and take care of myself (sometimes I’m not so good at this). I look not only at what needs doing but what I’ve already accomplished. This is a great read and seems perfect at this time of year when most of us are doing a little reflecting and recharging our internal batteries, getting ready for the 2014 gardening season.

May you all get excited about what crops you are going to try this year but do please stop and listen to what the universe is saying to you as the season progresses. Maybe 6 hours in the garden is too much (your body will let you know) so why not do 3 hours or less if needed. It will still get done and you’ll be less sore. As I get older I realize taking things in small bites is actually wonderful, letting me enjoy the process instead of just the end goal. It slows me down, let’s me see, smell and feel what is going on in my garden. I become more in touch with what I’m doing, what I’ve already accomplished and this wonderful universe we live in. So slow down, take care of yourselves this year and enjoy life while doing all your projects!

Reflections on the gardening year

winter veg garden

Here is the veggie garden in winter-now asleep

Happy Solstice! Yea-the days get longer now-and here it is the end of the year. As I look at winter, the first two months of winter-November-December are done and only two more months of winter (January-February) to endure. Then its early spring and off to the races! But let’s slow things down a bit. December is a great month to reflect on the gardening season and look at what worked and what didn’t work in the garden during the past year and what I might do differently.

So what worked and what didn’t?

-I only lost 10% of my tomato crops vs. last year’s 50 % tomato crop loss to the dreaded beet leafhopper.  I covered almost all of my tomato plants with row cover from May 15th until the first week of July. The leafhopper leaves when the rainy season comes and this year they hung out till the beginning if July when it started raining. -The downside of this is I really don’t like NOT SEEING my plants hiding under the row cover-I like watching them grow, but that seems to be a tradeoff. Also I want to try to transplant my tomatoes outside earlier than May 15th to try to get tomatoes earlier.

IMG_3363

-Rotating my crops seem to help with diseases. I have everything on a three-year rotation, which is why I made an additional 1000 sq ft section last year, giving me a total of (3) 1000 ft sections.  I move the crops around so they only return to the same section every 3 years. The pumpkins use to have their own additional section in the horse corral but now that I have a horse (Koko), I will put them into the rotation in the main veggie garden since the corral has been reclaimed by Koko.

-Speaking of pumpkins, I need to find a way to keep critters from eating them although it was almost impossiblerabbit damage to keep the rabbits away early in the season when food was hard to find for them-even with 2 fences and row cover over the pumpkins, something ate my prized potential pumpkin plant, so I’ll be thinking on that one a lot more this winter. Plus I want to get the plants outside earlier too if I’m to have a chance to break the state record again…

-I covered my eggplants with row cover for a while this year thereby avoiding the first hail storm’s devastating damage. That first hail storm set back many of my vegetables due to the severe damage by about a month. The downside was aphids found the eggplants underneath the row cover and it was a battle to get rid of them. The aphids also went after the summer squash and peppers with all the rain we got. I controlled them with strong sprays of water on them and insecticidal soap. Also lady bugs appeared and came to the rescue eating many aphids (and I didn’t have to buy them). I think I need to remove the row cover earlier.

The almost finished greenhouse was unbelievably hot last summer-110°F. Too hot to grow anything which was ok as it wasn’t ready anyways. So after I work to button it up this winter, I will have to find ways to cool it down next summer. Still, I have a greenhouse! I’ll take the challenges it will present.

swiss chard hail damage-I have to say I enjoyed all the rain we got after 4 years of an extreme drought. The fruit trees loved all the rain but 2 more hail storms almost wiped out the vegetable crops especially the chard and squash. It was amazing anything survived plus the one week of rain that we got-about 3 inches-watered down the flavor of the tomatoes for about 2 weeks but then they bounced back.

Most of the problems came from Mother Nature and there is not much one can do about her-she does what she wants and we need to adjust. We always think we have everything in control and then wham! She does a number on us!

-I will grow more tomato plants and other veggies to sell at the Farmer’s Market as many people seemed excited to try some of the different varieties I grow. To this effect, I think the greenhouse will be great asset this spring.

So now I will be going over all the catalogs that are coming in and start to plan the veggie garden for 2014.

Happy Holidays!

Lookee What I Found!

Yesterday I found all kinds of things!  Now I’m not the greatest at putting my tools away after I’m done with them. In fact it’s like leaving a trail of breadcrumbs for anyone to see where I’ve been. So I decided to walk around the gardens here at the house before the Arctic Blast comes in this weekend to see what tools I could still find outside. I wanted to do #9 in my earlier post of 10 Things to Do for December’.

found _lopers

First I found one of my lopers (my best one) hanging on a chair on the deck—and it was in plain sight. I’ve must have walked by it a hundred times and never saw it before!

found _leaf rakeI was wondering where that leaf rake went! Here it is leaning on the arbor in the shadows!

found_rake and apple pickerAnd on the other side of the arbor is a fence and I found an extension cord,  mini leaf rake and apple picker leaning on it (what’s that apple picker doing there? There are no apple trees up by the house!)

found_coffee cupAnd lookee what else I found! My favorite coffee cup still filled with coffee!  Yes that is a cup (the handle is on the other side). I was wondering where I left it cause it’s been MIA for a while. That will be fun to scrub out!

found_sawAnd then when I went to the shop I found the circular saw that I had at the house that mysteriously disappeared.  I took it back to the house so I can finish the greenhouse!

10 Things to Do in December

xmas clip reindeer

HO! HO! HO! Here are 10 things you can do in December for your garden. I wrote in green where I’m at with this list!

1. Don’t forget to feed your worms in your vermicomposting bin! They get hungry too! Also if it has been dry, give them a some water on a warm day. Don’t give them so much food that it just sits there and freezes. For an outside plastic bin, maybe wrap it with a water heater blanket or surround it with straw bales to help keep the worms from freezing. You try living in a plastic box all winter without insulation! For bigger outside vermicomposting areas, put straw bales around the perimeter to add insulation. Also put straw on top.  (I covered mine with about 8-10 inches of straw on top of everything and will check them in about 2 weeks to see if I need to add more food)

2. Reflect on what worked in the garden and what didn’t. What could you do differently next year? (Where do I begin? I’ll write more on this later)

3. Order your new catalogs. That way you’ll have them by January. (Done!)

4. Speaking of catalogs, go through those old catalogs and throw them out! (Done!)

5. Research on the internet new and different veggies you may want to try next year while you are waiting for your catalogs to come in. I’m always wanting to try something new. Start a list of possible veggies and add to it as you find more. You may not try all of them but at least you won’t forget them! (I started mine and keep adding to it)

6. Water your trees and perennials if you don’t get precipitation. We got a great snow in November so that let us off the hook but if Dec is dry, water later this month on a warm day. Forget about it if your tree has snow around it and the ground is frozen-the water won’t soak in frozen ground. (Since it snowed, I didn’t water-yea!)

7. If you feed birds, be sure you give them a source of water too. If my waterer is frozen, I boil water in a teapot and add it to my waterer to melt the ice. If you have bees, keep providing to them water too. (I check daily to make sure they have both food and water)

8. Take a walk around your frozen tundra (garden) and start to plan your next year’s  garden. Walking around when it is barren can reveal problem areas. It’s hard to ‘see’ when the garden is going on in the middle of the season with all the greenery. Perhaps you want to make a new bed or fix an old one…or maybe you could be a nut like me and add a whole new 1000 sq ft section in the garden Now that was a big project in 2011. Was I insane or what?! (This year I vow to finish the greenhouse by early spring.)

9. Organize your garden shed. Find all those tools you left outside-they’re  easy to see on the ground now that the the garden is done! (Still have a few floating around that I need to collect)

10. Ask Santa for some gardening stuff! Give them suggestions of things you want! (Done!)

Tomato Tasting Contest

tomato contest1

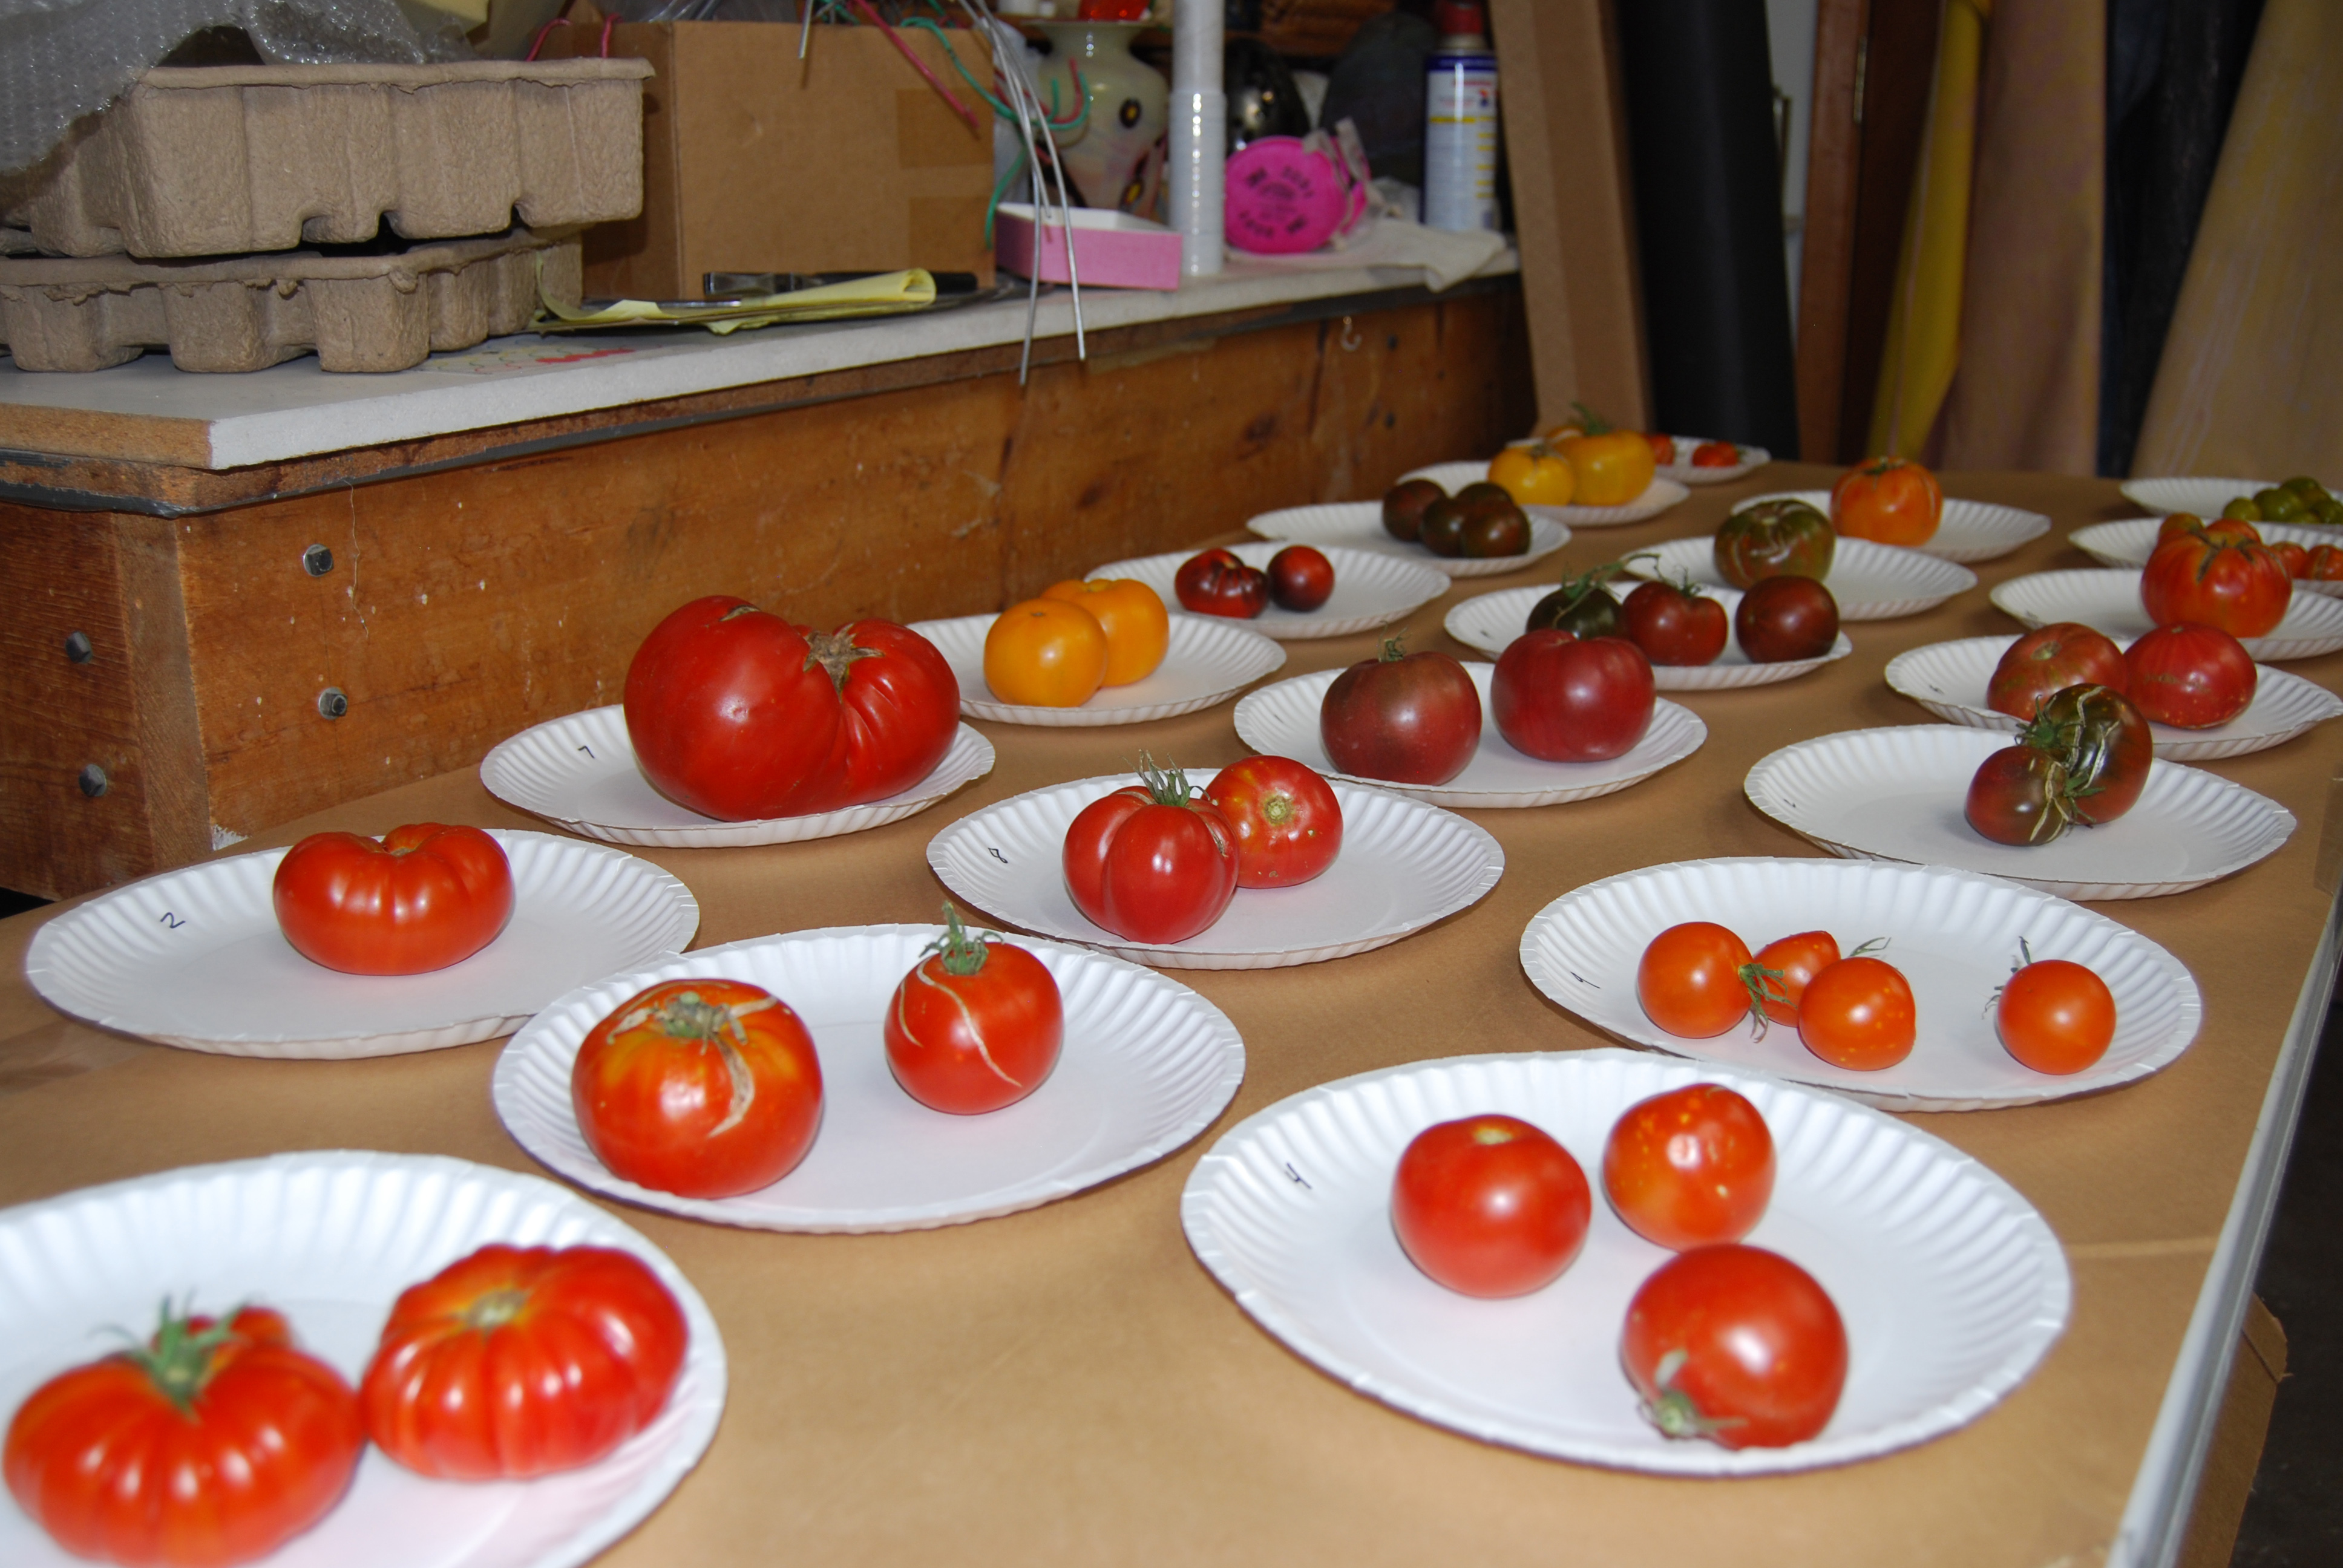
Today I held a tomato tasting contest with some of my friends. I have to say I was very disappointed. Not with my friends but with my tomatoes. I went last to taste them and could not believe how many of the tomatoes were either bland or watery. Some seemed weak in flavor. I’ve eaten them all summer and couldn’t remember them like this. They were not at all like the sweet flavorful tomatoes I ate last month.

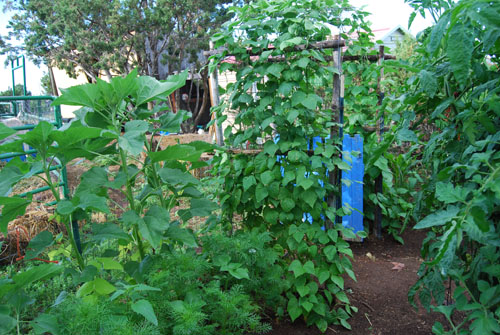
Then it hit me-the 3 inches of rain we had this past week really weakened the flavors. I have had many split their skins this week from taking on so much water and that explains why so many of my favorites were rather bland vs a month ago they were very flavorful. They say if you want the flavors more intense, cut back on watering during harvest time which I did. Usually we don’t have an over-abundance of rain, but we have this year. I haven’t had the drip system on in 2 weeks but mother nature choose to give us more rain than I can ever remember getting at this time of year.

This slideshow requires JavaScript.

Never the less there were some outstanding tomatoes. Below is the ranking of the ones we tasted. There were many ties. I found it amazing that 7 of the tomatoes in the top ten were black or purple tomatoes. 6 were yellow and only 1 red tomato in the top ten. (Remember there were some ties which is why we have more then 10)

Many of the rest of the tomatoes were red which is interesting as most of us like to use red tomatoes for sauce where cooking brings out the flavors but don’t like to use other colors for sauce.

I think if I had had the contest 2 weeks ago before the rain, the results may have been very different but still feel the black tomatoes would have outshine the rest. Can you tell I’m partial?!

Thanks to all for helping out with the tasting and grading!


2013 TOMATO TASTING CONTEST

TOP TEN

1st place-Paul Robeson-black tomato

2nd place-Indigo Apple-black tomato

3rd place-Brandy Boy-black tomato

4th place-Black and Brown Boar-black tomato

4th place-Big Sungold Select-yellow cherry tomato

5th place-Cherokee Purple-black tomato

5th place-Southern Nites-black tomato

6th place-Sungold-yellow cherry tomato

7th place-Juane Flamme-orange tomato

8th place-Ananas Noire-green/black tomato

8th place-Virginia Sweet-yellow tomato

8th place- Porkchop-yellow tomato

9th place-Galon De Melon-yellow cherry tomato

10th place-Bloody Butcher-red tomato

———————————————————————————

11th place-Marmande-red tomato

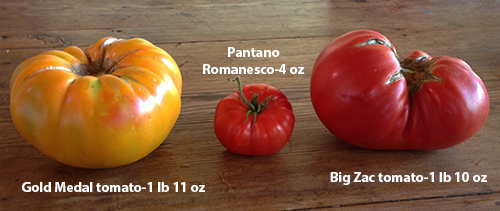
12th place-Big Zac-red tomato

13th place-Costoluto Genevese-red tomato

14th place-Pantano Romanesco-red tomato

14th place-Green Grape-green cherry tomato

15th place-Cour Di Bue-red tomato

15th place-Gold Medal-yellow tomato

16th place-Orange Wellington-orange tomato

Biggest tomatoes 2013

tomatoes_biggest_2013

Here are the two biggest tomatoes so far this season. The yellow one on the left is 1 lb 11 oz Gold Medal and the red one on the far right is a 1 lb 10 oz Big Zac. I got second place at the State Fair with a little smaller Big Zac tomato but if I had found this Gold Medal I would have had first. It’s ok though as I took 5 first places, 1 second place and 1 third place at the State Fair. Can’t be too greedy.

The runaway

giant marrow 08-10

A BIG runaway! DISCLAIMER: This one is way too big to eat! I entered this in 2010 in the State Fair instead!

At this time of year if you’re a vegetable gardener, you’ve experienced it—zucchini runaways. One day you go out and see this cute little zuke and think I’ll give it one more day and the next day you go out and it grew into a baseball bat. It’s like overnight it got on some steroids and went ballistic.  Now it’s too big so what do we do with them besides hide them under the bed in case an intruder comes in? Well you could use them as door stops or take them to the fair but here are 4 ideas to eat them!

Savory Zucchini Pancakes
Take 2 cups of grated zucchini, add two beaten eggs, 2 tablespoons of flour, and 2 teaspoons of some fresh herb you have and 1 cup feta or mozzarella or cheddar or whatever cheese you have (please, no Velveeeeeta). If you want more, then just up the ingredients like 3 cups zucchini, 3 eggs, 3 tablespoons flour, etc. Just don’t up the herb, keep it at 2 tsp so not to overwhelm the flavor of the zucchini (what? zucchini has flavor? Yes, at least two varieties do – Costata Romanesco and Benning’s Green Tint (not a zucchini but a delicious summer squash). All the others, in my opinion, are worthy of either the compost pile or the chicken coop or both) Then saute them in olive oil until brown on both sides. This is my favorite way to cook super-sized zucchini.

Garlicky Zucchini Medallions
Slice them into medallions and saute them in olive oil with some crushed garlic cloves until tender in a BIG fry pan. Sprinkle lightly some red pepper flakes and add fresh grated Parmesan cheese on top and cook a few minutes more till melted. This is also great with a little left over spaghetti sauce drizzled over them.  (Can you really drizzle spaghetti sauce. No—but you get the idea-don’t drown them.)

Zuchinni Soufflini (This one comes from my mom-thanks mom!)
1 1/2 lbs zucchini
1 large onion, chopped
3 TLB butter
1 cup shredded cheddar cheese
1 tsp salt and 1/4 tsp pepper
2 beaten eggs
1 1/2 cups soft bread crumbs
2 TLB butter

Cook squash whole for about 5 minutes in boiling water. Cool. Dice into cubes. Saute’ onion in 3 TLB butter and add to zucchini. Stir in cheese and seasonings and allow mixture to cool before adding beaten eggs. Spoon into buttered 1 quart casserole. Toss bread crumbs with 2 TLB melted butter and sprinkle over casserole. Bake 30-40 minutes at 350°F about 30 minutes or until knife inserted comes out clean. Serves 4-6 people.

Of course there is always the infamous zucchini bread but how about chocolate zucchini bread? I got this recipe from a friend many moons ago and it is excellent. Your kids, friends, spouse or partner will never know they are eating something healthy!

Chocolate Zucchini Bread
2 ¼  cup all-purpose flour
½ cup unsweetened cocoa powder
1 tsp baking soda
1 tsp salt
1 ¾  cup sugar
½ cup butter
½ c vegetable oil
2 eggs, large
1 tsp vanilla extract
½ cup buttermilk
2 cup unpeeled zucchini, grated
6 oz choc chips
¾ c chopped walnuts

-Preheat oven 325 degrees. Butter and flour a 13” x 9” x 2” baking pan
-Sift flour, cocoa powder, baking soda, salt into large bowl.
-Beat sugar, butter and oil in large bowl until well blended. Add eggs 1 at a time, beating well after each addition. Beat in vanilla extract. Mix in dry ingredients, alternate w/ buttermilk in 3 additions each, fold in zucchini. Mix in choc. chips + nuts. Pour into the baking pan. Bake until toothpick inserted in center comes out clean in about 50 min. Cool completely in pan.

So the next time you get a runaway, don’t despair, now you have some ideas on how to use them besides hiding them under your bed!

2013 Garden Pictures

entrance insideout

I’ve been taking some photos of the vegetable garden the last few days. The light is so beautiful at 8 am every day that before I started weeding, I took these photos. Slowing down and and really looking how beautiful the garden is makes all the work worthwhile. Enjoy!

This slideshow requires JavaScript.

Pickle class a success!

pickle class

Duskin with picklesPickle making class went well today. We processed 15 lbs of cucumbers into about 15 pint jars. Pictured above are some of the finished pickles. Duskin, who co-taught the class with me brought his giant pressure cooker. We didn’t use it as a pressure cooker this time but instead filled the big pot with water to sterilize the jars and to use for processing the pickles using the water bath method. I brought my camp stove to make the brine and syrup. It was a beautiful day for making pickles outside instead of over a hot stove. After a short talk on the how to process food safely, everybody got involved—Duskin sterilized the jars, while the students cut up the cucumbers and garlic, mixed up the brine and syrup, added all the ingredients and cucumbers into the hot sterilized jars as they came out of the pot, poured the brine and syrup, wiped the lips of the jars and put the lids/caps on them. Then we put them back into the hot water and brought the water back to boiling and adjusted the processing time for our high altitude. While we were waiting for them to finish processing, Duskin showed them around Milagro Community Garden. When the pickles were done, we pulled them out of the hot water and let them cool enough and then the students took home a jar of each type of pickle. Good job folks!

Here is the one handout that wasn’t available today that I told the students would be available tonight:

Preparing and Canning Fermented and Pickled Foods

Here are the handouts that were given out in class:

General Canning Information

Duskin’s Favorite Pickle Recipes

Lastly, here is the Lemon Dill Refrigerator Pickle recipe that Randy asked for:

Fresh-Packed Refrigerator Lemon Dill Pickles