Cherry tomato varieties review

cherry tomatoes group

There are many varieties of cherry tomatoes but this year I had 7 different varieties of small or cherry tomatoes. Six were heirloom or OP (open pollinated) varieties and one was a hybrid. Open pollinated varieties will be the next new heirlooms when they get to be 50+ years old. Six are shown above from left top row – Juane Flamme, Indigo Cherry Drop, Bottom row from left Artisan Blush Tiger, Artisan Purple Bumblebee, Artisan Pink Bumblebee and Sungold – not shown Black Cherry tomatoes (forgot to take picture!) I think it was way too many cherry tomatoes because of the time it took to harvest all of them every week (exhausting) but having said that, they were all very tasty. Three of the tomatoes pictured above were completely new to me. So let’s look at those above and review them.

tomato_juane flamme

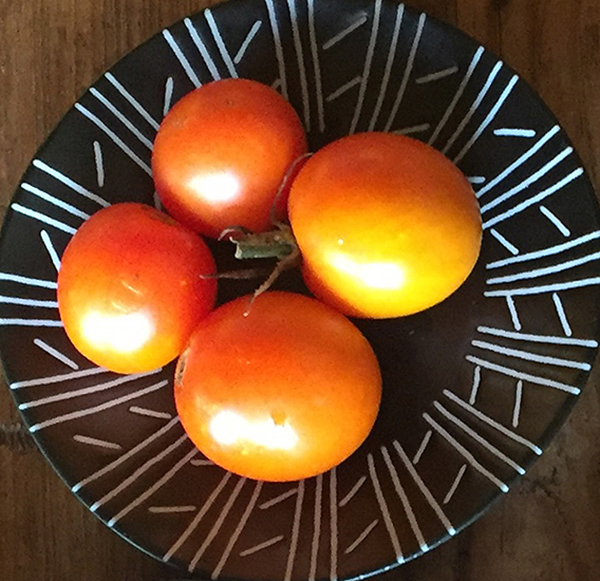
Juane Flamme tomatoes

Juane Flamme – heirloom variety, mid-season tomato – originated by Norbert Perreira of Helliner, France. Extremely prolific. A favorite of my patrons at my Santa Fe Farmers market stand. Yellow turning tangerine color when ripe. Very sweet. Bigger than a cherry tomato but still small, about the size of a golf ball. The only problem I’ve had is in my garden, it was susceptible to Early Blight getting it 2 years in a row. Since I didn’t use any fungicides this year (but I did last year), I’m not sure that is fair although all my other tomatoes didn’t get Early Blight till the right at end of the season which I consider normal as they get more susceptible to diseases as they get old. Still if you like a very sweet tomato, you might try it and just be sure to use an organic fungicide early on to control it and you’ll be fine. You’ll need to get seeds unless we can talk the nurseries into growing them next year. Recommend it.

tomato_indigo cherry drops

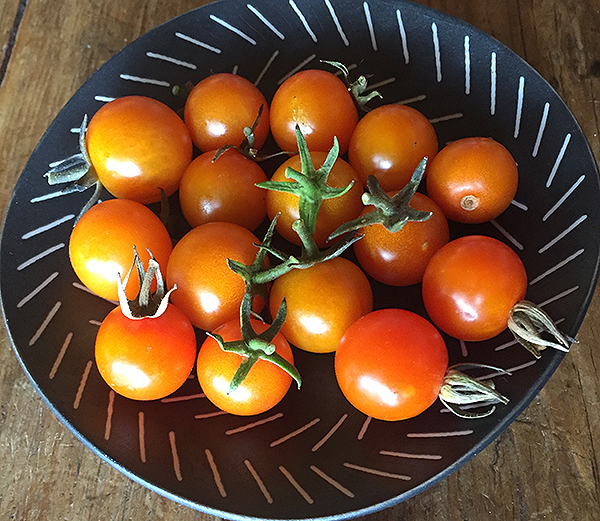
Indigo Cherry Drops and Indigo Rose tomatoes mixed

Indigo Cherry Drop – OP (open pollinated) variety, early mid-season tomato-NEW to me this year. Excellent sweet flavor and incredibly large yields 1 inch cherry tomato. Part of the famous Indigo family where the shoulders are black and bottoms are red. Indigo Rose was the first tomato to come out and is a cross between a South American and Galapagos Island tomato. Any Indigo tomato-Indigo Rose (2-3 oz), Indigo Blue Beauty (4 oz) , Indigo Apple (4 oz), Indigo Blue Berries (too tiny to bother with) are the new darlings at the market and all the varieties have to do with the size of them as they all taste the same-excellent flavor hard to describe. Many of the Indigo varieties are available at the nurseries as starts in spring. Extremely prolific. I like them. Bigger Indigo varieties recommended but not the Cherry Drop-too small

tomato_artisan blush tiger

Artisan Blush Tiger tomatoes

Artisan Blush Tiger-OP (open pollinated) variety from Artisan Seeds, mid-season tomato. NEW to me this year. Unique julienne cherry tomato that is yellow with subtle pink stripes-very beautiful. Everyone loved this new variety. It has a fruity sweet, tropical flavor. Feathery foliage is different from regular or potato leaf types so don’t be alarmed – it’s normal. Did well and was disease resistant in my garden. You’ll need to get seeds unless we can talk the nurseries into growing them next year.  Recommend it.

tomato_artisan purple bumblebee

Artisan Purple Bumblebee tomatoes

Artisan Purple Bumblebee-OP (open pollinated) variety from Artisan Seeds, mid-season tomato. I actually grew these last year and liked them enough to grow again. They are dark purplish with green stripes. They have a superb sweet flavor. Very productive. You’ll need to get seeds unless we can talk the nurseries into growing them next year. Recommend it.

tomato_artisan pink bumblebee

Artisan Pink Bumblebee tomato

Artisan Pink Bumblebee-OP (open pollinated) variety from Artisan Seeds, mid-season tomato. NEW to me this year. I love this tomato as it has a very bright sweet flavor-a burst of flavor when you bite into it. Good disease resistance. You’ll need to get seeds unless we can talk the nurseries into growing them next year. Recommend it.

tomato_sungold

Sungold tomatoes

Sungold-hybrid variety. My only hybrid cherry tomato-early season. I’ve grown this for years as it is a supersweet tomato and when people ask for the sweetest tomato, I recommend this. Small yellow cherry tomato turns orange when ripe. Ripens early.  Extremely prolific. Available at the nurseries in spring. Recommend it.

Black Cherry tomato

Black Cherry tomatoes

Black Cherry Tomato – Heirloom tomato originally from Russia, mid-season tomato. I have grown this for years as it is a favorite of mine and the patrons at the Farmers market. Sweet, earthy complex flavors so common with dark purple or black tomatoes. Good size cherry tomato that is a dusky purple. Available at the nurseries in spring. Recommend it.


Lookee! A new bench for the garden!

new bench

I have been so busy harvesting and preserving the garden food that I haven’t had time to share something that my friend Tom surprised me with last month.  He told me to come over to his house as he had a surprise. When I arrived, he opened up his garage door and there was a beautiful bench he built for my garden sitting area where I take breaks. It’s incredible!

greenhouse_Tom and JCTo give you a little background on Tom, he was the main friend who helped me finished building my greenhouse a year and a half ago (or should I say I helped him). I could not have finished it without him. The upright posts had been in the ground for 3 years with no progress until he came over and offered to help. We worked every Friday on his day off till we got it done. greenhouse in augustWe were like a dog with a bone-we couldn’t let go of it till it was done. That was a lot of Fridays he gave up for me and my project.

Then last fall he came back and built some great shelving that essentially doubled my space for starts in the greenhouse and now this bench! He now has a lifetime supply of any veggies from my garden that he may want in the future. Tom your the best! Thank you!

Glass Gem corn experiment

Glass Gem corn 1

I like to do experiments in the garden and try different things. Last year I grew for the first time Glass Gem corn which you can read about in my post Glass Gem corn. When I harvested it at the end of the 2014 season, I got fantastic colors when I picked it. It truly is a special corn. But of all the many ears of corn with different colors, I got only little 2 ears of a gorgeous pink color which was like no other. I saved the pink kernels and cataloged all the colors i harvested which you can see in my post, Glass Gem corn colors. It was the only corn I grew and no neighbors grew corn so I feel reasonably certain that it is pure. This year in 2015, I decided to grow out those pink kernels and only them. I wanted to see if I would get more pink ones. Now since all the glass gem corn cross-pollinated with themselves, one would think I might get a great mix of colors this year again with such a big genetic pool, but not so.

glass gem corn ears pink

The majority of the corn was pink! Out of those 2 ears of pink corn (didn’t plant all the kernels), I got 27 ears of corn this year. I got 18 pink (3 not shown). That’s 66%. The pinks were in many different shades of pink as well.

glass gem corn ears mixed

I also got 6 mixed colors with very little pink if any and 3 more that were predominantly pink but had some purple in them too. If you include the other predominately pink ones as well, then that would be 77% of the corn I planted was in the pink family. That astonished me.

So what would happen if I planted the pink that I got this year for next year? Would I then gt 100% pink? Probably not. I think I would have to keep growing it out for about 5 years to keep eliminating any other color genes but it was a great experiment. Now there is something to be said about maintaining diversity. It tends to make stronger strains but I just might try it again next year in 2016 from this year’s corn and see what happens!

First REAL winter storm Nov 16

winter storm_ Nov 2015a

Sure we had some light snow on November 6th but it only lasted a couple of hours and promptly melted off but it still felt like fall. This Monday November 16th we returned a day early from the San Juan River fishing trip because of a storm coming in. Didn’t want to be caught hauling an RV trailer on icy roads. Good thing we did as it turns out we had our first major snow and now it feels like winter. This pic was taken about 4 pm on Monday after coming home. We got about 5 inches total by Tuesday morning. Yikes! The garden is dead but isn’t out yet. I have to get it out soon before the ground freezes!

I’m finished with tomatoes for the year 2015!

JC at Farmer's MarketFinally this week there are no more tomatoes sitting around in the house! FINITO! NONE! DONE! Nice to see the kitchen table again! This week I made the last batch of tomato tapenade and the last batch of raw tomato sauce (24 frozen gallon bags of raw tomato sauce). Phew! As a friend Deborah says, ‘That’s the part no one tells you about’-preserving your produce. It goes on and on and on for months. Soon before Christmas, I will have to can some spaghetti sauce from some of the bags of frozen sauce. But not now-I’m gonna take a week off!

JC with fishIn fact right now I’m on a flyfishing trip on the San Juan River below Navajo Dam in our cozy SCAMP trailer. It’s cold outside tonight-going to get down to a lovely 20F° but the trailer is nice and warm inside (thanks Nevan for getting that great heater!) and do you believe it, we have internet access which is great as you want to be inside by dark because of the cold and going to bed at 6pm is a little early for me. Tomorrow we start fishing for some big ol’ trout HOGS. The fishing shops said today the dry fly fishing has been great. So I hope to catch some montrous fish and get some R&R while here for a few days. Better get some sleep (what me?!), although I don’t plant (freudian slip meant to say plan) to be out too early tomorrow…

Kale

winterbor_russian red kale

Russian Red Kale on left and Winterbor Curly Kale on right doing well with the cold nights

This year I grew 3 different varieties of kale-above is the Russian Red and Winterbor Curly kale growing together

lacinto kale

Lacinto kale (also known as Dino kale) It is the dark green in front of grape vine

Here is the Lacinto being shaded by the grape vine with carrots growing in front

Of the 3 varieties, Winterbor Curly Kale is my favorite and it is the most cold hardy. I started growing them the last week of July just before the Home Grown New Mexico Tour I was on. I had some holes in the garden so I ended putting some kale there. The Lacinto was partly shaded by a grape vine so it did not receive full sun. The Lacinto got heavily attacked by aphids. I sprayed all of them with water to help keep the aphid numbers down. But the Russian Red and Winterbor were planted elsewhere in the garden. I put them next to some tall tomato plants on one side and some tall sunflowers on the other side so they never got full sun either. They do well in our hot summers with some partial shade. They were not attacked by aphids. All three are still doing well. I’m not a great fan of kale so I’ve been looking for recipes that make me want to eat it. Here’s one wonderful way to eat it.

Kale Chips– you can use any variety of Kale to make this. This is now my favorite way to eat kale-dried! Kind of like potato chips but way more nutritional. Here’s a great simple recipe.

Kale Chips recipe courtesy of http://www.somastudio.net/2013/02/crispy-kale-chips/

Crispy Kale Chips
This kale chip recipe is easy to make and is so tasty you’ll want to make a double batch!

Ingredients:
2 big bunches of kale
1/2 cup raw tahini
1/4 cup olive oil
1/4 cup wheat free tamari
1/4 cup raw apple cider vinegar
1/4 cup nutritional yeast
2 cloves garlic
1 teaspoon onion powder
1 tpsp maple syrup
optional 1 tsp of chilli flakes

Instructions:
Rinse, de-rib, and rough tear the kale into a giant bowl.
Put all the other ingredients into a food processor or blender and mix until smooth or use a hand blender
Pour the mixture over the kale, and use your hands to toss it all together. Squish Squish! Get it good and covered.

Oven method:
Spread the kale out evenly on lined or oiled cookie sheets. You want them to be as ‘dehydrated’ as possible, instead of baked.  250º for 4 hours (ish). Every oven is different so you’ll need keep an eye on it and be your own judge. Just remember that too much heat will change the flavor.  Don’t overcook them!

Here is the recipe in PDF format for printing:
Kale Chips recipe

___________________________________________

MORE METHODS

Dehydrator method by http://www.giantveggiegardener.com :
Spread the kale out evenly on the dehydrator trays. Set temperature 115°F° or lower for about 4 hrs or more. Chips should be dry and crunchy when done. Every dehydrator is different so drying time may vary. This is still considered raw food done this way.

Raw food is food that is dehydrated at 115° F or lower to be the most nutritious and not lose vitamins. Above that and you start losing the nutritional value.

Here is some visuals of the process:

kale_squishing

Put cleaned, dry kale in bowl with the recipe ingredients below and squish with your hands so kale is well coated.

kale_putting on trays

Put on dehydrator trays

kale_drying

Dried Kale chips

kale_dried in jars

Store in jars or zip-loc baggies-I like storing in jars as the pieces don’t break up so much.


.


2015 honey

bees on bar

Bees on a brood bar capping honey

Before I talk about how our bees did this year, here are some mind boggling facts about bees and honey that should make you appreciate them.

—Bees need to visit 2 million flowers and travel about 50,000 miles to make a pound of honey.

—In its lifetime a bee makes about 1/12th of a teaspoon of honey so it takes 36 bees to make a tablespoon of honey.

Honey bees make little flakes of wax about the size of a pin head. It takes 500,000 flakes of wax to make one pound of bees wax.

—Bees pollinate about 90% of our food crops.

In a strong hive there are 70,000 – 100,000 bees in a hive in the summer and their numbers go down in the winter.

—Bees do not hibernate.  They stay inside their hives maintaining a temperature of about 95-96-degrees at the middle of their cluster all winter by beating their wings to stay warm.  Bees rotate from the outside of the cluster to the inside as they get cold while the ones on the inside rotate to the outside, all the while keeping the queen warm.


honey in jars

Our 2 hives produced over 8 lbs of harvestable honey this year which is wonderful as we haven’t collected honey in two years. We always left them with enough honey to get through winter which sometimes didn’t leave us any. With all the rain and flowers this year, they were super busy making honey and there was plenty for all. We left lots of bars of honey for them for winter. In our land with many droughts, plenty is not a word we use a lot when it comes to honey production. For other areas in the country, this may not seem like a lot, but for us it makes us appreciate our girls more. Oh yea, all the bees that you see outside on the flowers are girls-go girl power!

Based on the info above, our bees visited 16 million flowers to make that 8 lbs! Unbelievable! So next time you spread that tablespoon of honey on your toast, think about all 36 bees it took to make it and appreciate all the bees for their wonderful gift.

honey final_2015

We’ve put them to bed for the winter last month in October. We’ve put a false wall to make their living area smaller so they stay warmer and straw bales around each of their hives to give them extra insulation from the wind and cold. We hope they make it through winter.

UV light – bees – and gardening

UV morning glory folded

UV light on a folded morning glory

Being a beekeeper, I’ve been fascinated that bees can see a broader spectrum of light than we can see with our eyes. Bees can see ultraviolet (UV) light and always wondered how flowers might look to them with their UV vision and why they like certain flowers. I read that some flowers have UV colored runways that attract bees and other insects to land on them and lead them toward the pollen and nectar in the center of the plant. This was created by the flowers to help with pollination. Ingenious isn’t it?  Mother Nature really knows what she’s doing! We see the sky as blue but bees see the sky as Ultraviolet (UV). What color is ultraviolet? Well, it is the next ‘color’ past violet in the color spectrum. We can see violet but ultraviolet is invisible to us because we don’t have cones in our eyes that can see UV light. As an artist, this is fascinating to me. I would love to be able to put on a pair of glasses (kind of like the glasses we get when we go to the 3_D movies but see UV light instead).

Then I read that one can spot tomato hornworms with a UV light. Ah ha! First I didn’t know that about hornworms and second I didn’t know there are UV portable lights! After investigating UV lights I got a UV flashlight just before the last frost came and ran down that night to see what the flowers looked like in the garden even though most of them were finished. I knew the hornworms were gone by then also so I’ll have to ‘see’ if that is true next year but it makes sense because white really glows with a UV light and the tomato hornworms have some white stripes on them.

This slideshow requires JavaScript.

Anyways there I was holding the flashlight in one hand and trying to take pictures in the other hand in the cold night. There weren’t many flowers left but I got a few and the results were interesting. Some glowed in the UV light and some did not. I can’t wait till next year when the flowers are all out. I will be taking lots of pictures with the UV light. Of course I’m also anxious to see if the flashlight helps spotting the hornworms on the tomato plants!

Check this short video out:
Insecta Spectra
Simulated Butterfly and Bee vision

How to Save Tomato Seeds

Some of you may still have the last of your tomatoes inside your house ripening. If you would like to save the seeds or if you don’t have any seeds but would like to learn how to save them for next year then read on. It’s a simple procedure where we must remove the gel from around the seeds before drying them.

But before that, the first thing to consider is if the tomato is a hybrid or an open pollinated (OP) or an heirloom tomato. Don’t save hybrid tomato seeds as they won’t grow out true meaning they will not grow out to be the same tomato. They revert to one parent or the other and are unstable so you won’t know what you’ll get. If you have open pollinated (OP) or heirloom tomatoes you can save the seeds as both will grow out into the same tomato. An exception to this might be if you plant cherry tomatoes close to the tomatoes whose seed you want to save. Cherry tomatoes could cross-pollinate with other tomatoes but most heirloom tomatoes do not cross with each other. Just grow your cherry tomatoes away from  your other ones.

Put tomato seeds in a small jar of water (viewed from the top)

Put tomato seeds in a small jar of water (viewed from the top)

First you want to save a tomato that is really ripe and soft. To save the seeds from tomatoes we must remove the gel from around the seeds. Cut the tomatoes open and squeeze the tomato with the gel and seeds into a jar and add about 2-3 inches of water. Cover the jar.

white mold grows on top of the water

white mold grows on top of the water

In a few days you will notice that there is a white mold growing on top of the water and most of the seeds will have sunk to the bottom of the jar. Don’t freak out, this white stuff is fermentation working on your seeds.

drain the tomatoes and stuff off

drain the tomatoes

After about 4 days, strain the tomato seeds in a fine sieve or strainer and wash the yuck and tomato stuff off of the seeds. If you wait too long the seeds will start to germinate which will ruin them.

Put your seeds on wax or parchment paper. Write down the variety.

Put your seeds on wax or parchment paper. Write down the variety.

The seeds can now be put on wax paper to dry. If you use paper towels, the seeds may stick to the paper causing trouble removing them. Be sure to label them so you remember which variety they are. After they are thoroughly dry, store them in a plastic bag or jar for next year. It’s fun to save seeds and see what happens next year.

Amy’s Tomato Salad

tomatoes in sherry vinaigrette

I don’t know about you but I still have a lot of cherry tomatoes that I picked the other day. I love to serve them as a tomato salad in a sherry vinaigrette. It’s divine with the sweetness of the cherry tomatoes. A friend of mine, Amy Hetager, who is no longer with us was kind enough to share it with me.  I call it Amy’s Tomato Salad. Here’s the recipe below.

Amy’s Tomato Salad (Cherry Tomatoes in a sherry vinaigrette)
2-1/2 lbs tomatoes cut into same size or cherry tomatoes
1/2 cup red onion, thinly sliced
2 shallots, thinly sliced
1/3 cup fresh coarsely chopped herbs (basil, parsley, marjoram, whatever you got)

Toss everything together with the sherry vinaigrette below. Let it sit for a few hours before serving.

Sherry Vinaigrette Dressing
This is good on fresh kale salads too
1 garlic clove
3/4 tsp Kosher salt
1-1/2 TBL lemon juice
1-1/2 TBL sherry vinegar (this is sherry vinegar, not sherry wine)
1-1/2 tsp Dijon mustard
1 tsp sugar
black bepper
6 TBL extra virgin olive oil

Blend or shake it all together so it emulsifies before pouring over the tomatoes.

Here it is in pdf format for printing:
Amy’s Tomato Salad


Stella’s view

Stella's view

One of our indoor cats, Stella, always sits by a particular window looking out. I’m sure she’s looking at the birds outside and sees a mouse now and then too. It’s like it’s her TV. Yesterday, when I looked out her window with her,  I understood why she always looks out this particular window. The view was stunning with the yellow leaves of the aspen trees and the snow falling softly on the ground. We didn’t get much snow, maybe a half an inch but between the cold wind and the snow, it made me pause to look out with her and enjoy the view.

The last of the summer harvest-Nov 4

late fall harvest

The garden finally froze last night in earnest and I got to say I’m relieved that I don’t have to go out and harvest today. Not bad being that we went up to November 4th before it succumbed. I still have chard, carrots, beets and kale but the rest of the garden is toast. All that cool season stuff will be around awhile until we consistently get super cold at night but the warm season vegetables are gone. It was a big year for me as I grew 125 tomato plants with 31 heirloom tomato varieties. Phew! Just thinking about it makes me tired!

So yesterday, knowing the weather was coming, I picked the very, very, very last of the tomatoes, lots of chard, the last of the beans, some Glass Gem corn, more potatoes and I found 2 more squash. The eggplants and all the peppers were done 2 weeks ago and the cucumbers were done a month ago. This has been the biggest and best garden I’ve ever had especially with all the rain we got this summer and all the wonderful, warm days-not too hot. I didn’t even have to use any organic pesticides or fungicides this year-fabulous!

Mexican Sour Gherkins

MEX SOUR GHERKIN PLANT

This year I tried growing a few new things in the garden. One of them was Mexican Sour Gherkins. What is so cute about them is they look like miniature watermelons. They are about the size of a large olive and taste like a tart cucumber. They are native to Central and South America and are in the Curcubit family like a cucumber but are not cucumbers but are a cousin being in a different genus-Melothria scabra. They call them Sandita (little watermelon) in Spanish. They are also known as Mouse Melons and other names. They’ve been domesticated for eons. They were very hardy being drought tolerant and both disease and pest resistant.

MEX SOUR GHERKINS_BOWL

I grew them as novelty items to try out in martinis in place of olives. They are a vining plant and took forever to grow but once they took off, they were very prolific as pictured above.  I harvested them about a month ago and a friend, Mernie, came over and we pickled them using two different recipes. One as a simple salt/vinegar brine with some garlic and red pepper and the other way had all kinds of other ingredients for the martinis.

MEX SOUR GHERKINS_CANNED

Well yesterday we opened up one of each jar after letting them soak up all the ingredients for a month. I liked the simple brined ones the best and imagined them in martinis (we just ate them, no martinis yet) or served with a cheese plate. I thought they were both a bit too crunchy so I am taking some of my jars and use the water bath method to hopefully soften them up a bit (we used the refrigerator method on all of them) and see how that is. I do think they will be quite the conversation piece when we serve them with martinis (are you listening Jerry and Laura?)! The rest of you can eat them with cheese!

Curing Potatoes

potatoes just dug up

Dig up potatoes when the soil is drier so not much dirt sticks to them.

A friend of mine asked me why a few of her potatoes that she just harvested are soft. I honestly don’t know except that I know we need to ‘cure’ potatoes for about a week before we store them to heal any abrasions, minor cuts and thicken the skins a bit. So here’s how to cure potatoes.

Dig up potatoes in the fall, when the plants are dying, then the tubers will be as big as they will get. When you first dig up your potatoes, don’t wash them right away. Dig up potatoes when the soil is a little drier so not much dirt sticks to them. Discard any bruised, green ones or soft ones. Use up any damaged ones right away. Put them somewhere where it is a little cooler and they get good air circulation out of direct sunlight. I put mine in a basket lined with newspaper (so the dirt doesn’t get everywhere) with the dirt still on them inside my pantry as it is darker in there. If I had a garage, I’d put them in there but I don’t. They just need to be out of direct sunlight. Then after about a week, I take them out and brush off the dirt well with my hand but I still don’t wash them. I wash them as I use them. You want the skins to be dry. I also again look for any soft ones and discard them as they can ruin the rest and I put them back where the sun don’t shine as I don’t want them to turn green. Don’t eat any green ones as the skin has some photo toxins in them from being exposed to too much sunlight. I’ve never gotten sick from eating one as it is mildly toxic but why eat anything that is toxic. That’s the point of organic gardening right? I use to think store bought potatoes tasted the same as home grown potatoes but not so. Nothing better then fresh potatoes. They’re fantastic and not so starchy tasting.

TOM-TOM 2010-2015

Tom-Tom

This slideshow requires JavaScript.

A beloved member of our family died today—Tom Tom our black cat. I found him in his cathouse on Sunday morning after calling and calling him outside Saturday night to no avail. At least I found him instead of not finding him at all. Turns out he probably herniated his diaphragm on Saturday night and the doc thought he would be able to repair it today but his organs went up and put pressure on his heart and he had a cardiac arrest. The doc hadn’t even operated yet but was trying to prep him for surgery when it happened. We are all in shock and his buddy and partner in crime, BT (our gray cat) doesn’t realize what happened yet. We got BT and Tom Tom about 2 years ago. He use to be an outside cat only but we got him and BT to come in at nights after about a year. He was very friendly and loving but also skitterish with others. The other cats keep looking for him-so hard to lose a family member we all love.