Identifying Tomato Curly Top Virus (CTV)-more info

Photo credits: curly top disease - photo courtesy of http://ucanr.org/blogs/blogcore/postdetail.cfm?postnum=3352

Curly Top Virus (CTV) on tomatoes
Last year, the Beet Leafhopper which transmits ‘Curly Top Tomato Virus’ was rampant in our gardens and devastated many of our tomato plants. I lost only 4 plants out of 74 to it but only because I take extraordinary measures to protect them. Here is some information on the beet leafhopper., how to identify it, symptoms and how to protect your plants.

The Beet Leafhopper flies in on the winds in early June through July, jump on the tomato plants and taste them. It is a big problem in the Southwest and inland in California where it is hot. They don’t even like to eat tomato plants but sample them, transmitting the disease in the process, then fly off to visit other plants.

Identifying Beet Leafhoppers
The beet leafhopper is very small-about 1/8 inch long, pale green to light brownish green and has wings that look like a tent when folded up vs spread out like a moth. See photo on left. They come when conditions are dry, hot and windy. Sound familiar? This is typical June weather here in the greater Santa Fe area.

I notice they leave after the monsoons come in July when it is cooler and wetter. You will know if they are in your garden as they come in and when you walk around your garden, you’ll see jumping little green bugs that fly off when you walk by. Then they leave—flying to the next garden. Because of this, you can’t really spray anything to get them because they hop so fast and only stay in the garden a short time—here today, gone tomorrow. By the time you notice something is wrong with your tomato plant, they are long gone. It takes about 2 weeks for symptoms to show up.

Symptoms

closup of leaves of curly top virus

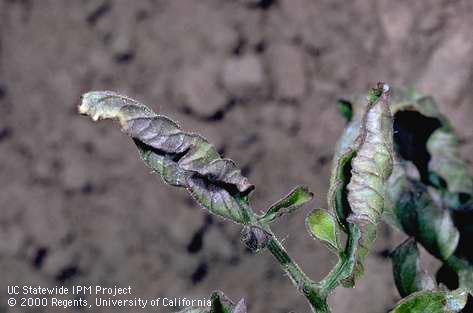
Your tomato plant leaves will start to curl and the underside of the leaves and veins will turn a purplish color as pictured above.


curly top virus_helthy plant

Tomato Curly Top Virus-beginning stages and advanced stages


The leaves then start to wilt and the plant will look stunted. You might think it needs water but it doesn’t, it is sick and won’t recover. ‘Curly-Top Virus’ is only transmitted from bug to plant and is NOT transmitted from plant to plant hence you will see a healthy plant next to a sick plant. The pictures above show 2 plants with curly top. The first one is beginning to be sick with curly leaves and the veins will turn purple.  The second plant in the picture is advanced.

Now there are three cases where you may think you have curly top virus but may or may not have it.

Denver Downs Farm, Anderson, SC;  High temperature on black plastic; lower leaves only.

Physiological Leaf Roll-Photo courtesy Clemson University

The first condition that may not be Tomato Curly top Virus is Physiological Leaf Roll that can happen on some tomatoes and could be caused by various factors including stress and that is not necessarily curly top-if you plant has rolled leaves but no purple veins as shown above, it possibly has physiological leaf roll and look for why it may be stressed. It is getting enough water, too much water, too much nitrogen? Also drought, pruning, root damage and transplant shock can all be reasons for leaf roll. For more info on this condition go here.

purple tomato_purlple leaves

Phosphorus deficiency in tomatoes happen when the weather is still cold-not in June.

The second condition is early in the season, sometimes the leaves turn purple when it is still cold outside. This is a phosphorus deficiency. This never happens in June or later when it is warm but more in May if you plant early and it is still cold outside.

The third condition (no pic) is if you are growing a purple or black variety of tomato your plant may have purple veins so don’t pull it unless it start to looks sick with the curly leaves and looks like it needs water.

Remedies
There is NO CURE for this virus and if your tomato (or pepper for that matter) shows signs of the disease, you should pull the plant. You could leave the plant in BUT if another wave of leafhoppers come by and a healthy leafhopper bites your sick plant, it only takes 10 minutes in 90°F weather for it to be able to transmit the disease to one of your healthy plants. The best thing to do is pull any sick plant and dispose of it. I don’t compost ANY tomato plant that shows disease.

Here are some remedies:
• Leafhoppers do not like shade and if your plants are partly shaded, that may help keep them off but since most of us grow tomatoes in full sun that might be difficult.

Create a physical barrier with row cover

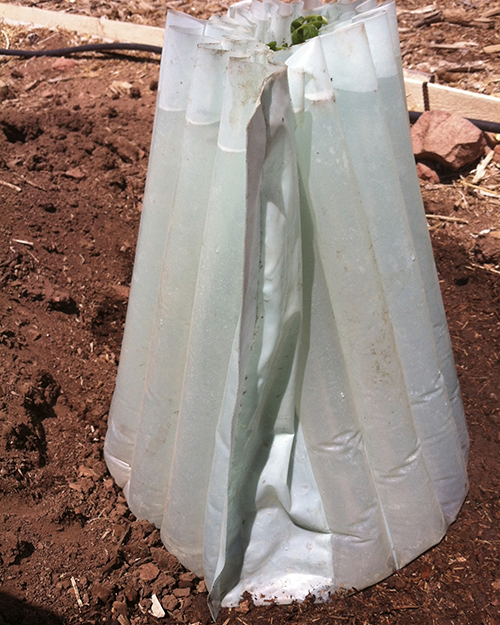
Put row cover over tomato plants

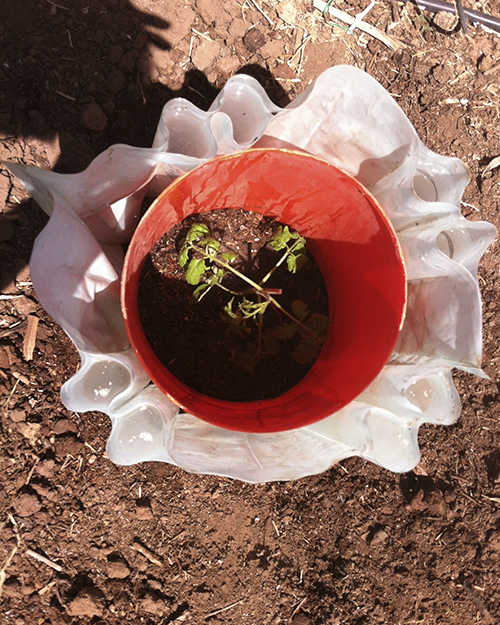
• The main thing I do is create a physical barrier between the bugs and the plants.  I now cover all tomato plants with row cover until the bugs pass. Wrap the row cover around your tomato cage and put a piece on top of the cage BEFORE they come.

• Lastly you could put out some tomatoes later in the season after the bugs leave but you’ll have to put in early season varieties so you can still harvest before the season ends. I buy gallon size at that point so as not to be too far behind. A couple of years ago when I was out at the Santa Fe Community Garden, I noticed many rows of sick tomato plants but one row of perfectly healthy plants and when I asked about them, it turned out they were put out about a month later than the rest of them and by then the leafhoppers were gone.

Dry, sunny, windy weather are perfect conditions for the leafhoppers so look out this summer-conditions are ripe again!

I remove the row covers after the monsoon season comes. They usually leave or are suppressed by then. Monsoon season historically comes in early-mid July.

May 21-ALL TOMATO PLANTS IN

growfood,not lawns

It’s time to get growing!

Now is the time to seriously get into your garden. This is the busiest time of the gardening season with everybody wanting to get everything in their gardens. The day temperatures are now in the mid-high 70’s and the evenings are in the mid-high 40’s. PERFECT PLANTING WEATHER! Here is what’s been going on at my place. I feel I’m ahead so I actually have time to post something.

May 21-I waited to plant till after that last snow right after the May 15 date. All 120 tomato plants were in the gardens by May 21 with the help of Elodie Holmes, Lava Ewersmeyer, Mernie Ellessner and Janet Hirons and of course me! Many thanks to all my friends for their help! Boy, was I tired by the end of last week. This is the most tomato plants I’ve ever planted-hopefully it will be a great year and I will have many tomatoes to sell at the Farmer’s Market later this summer! I have 31 varieties this year. My favorites plus many new varieties. They are all in Wall of Waters (WOW) and I wouldn’t attempt to plant them at this date at our 7000 ft high altitude without them. Later the WOWs will be removed once the tomato plants reach the tops of them which will be sometime in June.

May 24-Meanwhile I’ve already put SEEDS in for Atomic Red carrots, Cosmic Purple carrots, Cylindra beets and Craupadine beets, transplanted broccoli-raab, Lacinto kale, Ruby chard, Argentata chard, Burgundy Amaranth and Zino fennel bulbs as of this week. All got row cover over them to give the transplants time to adjust in their new environment.

May 25-The peppers and eggplants are still inside, the little finicky darlings, basking in the windows as the nights are still too cold to plant them yet. If it stays warm I will put them in by the end of the first week of June.

May 26-I will NOW plant bean, corn, cucumber seeds, many flower seeds AND my giant pumpkins. I will also put row cover over them till they come up about 4 inches to keep the birds from eating them.

HAPPY GARDENING!!

Great Weather! Time to Plant?

RAIN5

Wow! Great weather this weekend with no wind, warm temperatures and wonderful rain today. I hear tomorrow brings more rain. Today we had some great rain and boy is it welcomed. The native plants and trees and all of our plants are sucking it up. I can’t remember getting this much rain at this time of year in May. A great big plus is the night temperatures are starting to warm up too with the next 10 nights suppose to be from 35°F- mid 40’s. Pretty cold but above freezing.

So can we plant tomatoes? Is it time? Well that depends on whether the nighttime temperatures remain above freezing. Of course the first frost-free date is officially May 15th historically speaking, but back in 2011, we had a very warm May and many of us planted early as it never got below freezing that May. Is this one of those Mays? Who knows, unless you have a magic ball. By the way, I waited to plant my giant pumpkins till later in 2011 (as they are so frost tender) and my 2010 State Record got broken that year by someone who went for it early. I guess I should have put them in but I just didn’t want to chance it. You have to be a bit of a gambler to put your plants in now.

tomatoes in wall of waters 1

But if you are a gambler and want to plant your tomatoes early, be sure you plant using wall of waters (WOW) as shown above.  If you use them, and the temperatures dip below freezing, they will protect your new tender plants. I always use them even when the nighttime temps are in the 40’s as I feel they provide more heat at night and keep them from setbacks. The cells of water warm up all day and give back the warmth at night to the plants like little greenhouses or cloches. Once they outgrow the WOW’s  (like in the photo above), take them off  the tomatoes, which will probably be late May. Do not leave them on all summer.

Curly Top Tomato Virus and Beet Leaf Hoppers

Photo credits: curly top disease - photo courtesy of http://ucanr.org/blogs/blogcore/postdetail.cfm?postnum=3352

Photo credits:
curly top disease – photo courtesy of http://ucanr.org/blogs/blogcore/postdetail.cfm?postnum=3352

Curly Top Tomato Virus
Last year, the Beet Leafhopper which transmits ‘Curly Top Tomato Virus’ was rampant in our gardens and devastated many tomato plants. I lost 50% of my tomato plants. The Beet Leafhopper flies in on the winds in early June through July, jump on the tomato plants and taste them. They don’t even like to eat tomato plants but sample them, transmitting the disease in the process.

Identifying Beet Leafhoppers
You will know if they are here as they come in waves and when you walk around your garden, you’ll see a lot of jumping  little green bugs that fly off when you walk by. Then they leave—flying to the next garden. Because of this, you can’t really spray anything to get them—here today, gone tomorrow. By the time you notice something is wrong with your plant, they are long gone. It takes about 2 weeks for symptoms to show up.

Symptomscurly top virus_helthy plant
Your tomato plant leaves will start to curl and the underside of the leaves will turn a purplish color The leaves then start to wilt and the plant will look stunted. You might think it needs water but it doesn’t, it is sick and won’t recover. ‘Curly-Top’ is only transmitted from bug to plant is NOT transmitted from plant to plant hence you will see a healthy plant next to a sick plant.

Remedies
There is NO CURE for this virus and if your tomato (or pepper for that matter) shows signs of the disease, you should pull the plant. You could leave the plant in BUT if another wave of leafhoppers come by and a healthy leafhopper bites your sick plant, it only takes 10 minutes in 90°F weather for it to be able to transmit the disease to one of your healthy plants. The best thing to do is pull any sick plant and dispose of it.

Leafhoppers do not like shade and if your plants are partially shaded, that may help keep them off but since most of us grow tomatoes in full sun that might be difficult.

Create a physical barrier with row cover

Row cover over the tomato plants in my garden

Another thing you can do is create a physical barrier between the bugs and your plants. This year, I’m covering my tomato plants with row cover until the bugs pass. Wrap the row cover around your tomato cage and put a piece on top of the cage BEFORE they come.

Lastly you could put out some tomatoes later in the season after the bugs leave. Last year when I was out at the Santa Fe Community Garden I noticed many rows of sick tomato plants but one row of perfectly healthy plants and when I asked about them, it turned out they were put out about a month later than the rest of them and by then the leafhoppers were gone.

Dry, sunny, windy weather are perfect conditions for the leafhoppers so look out this summer-conditions are ripe again!

Wall of Waters 101

I think Wall of Waters are one of the best early season aids for tomatoes and peppers in cooler areas of the country acting like little greenhouses keeping the plants warm at night, protecting them from our ferocious winds in spring and for getting a great head start for growth but they can be hard to put up around the plants especially if you are trying to do it yourself. I have another post addressing what amendments I use when planting  and how to plant tomatoes  but this primer is about wall of waters. You can still use wall of waters right now as the nights are still very cool for tomatoes and peppers.

1wow begin by watering

Here is the planted tomato with a big well around it. If the well isn’t big enough than the wall of water will sit lopsided. (I still had to put the drip line around the plant BEFORE I put the wall of water on it). Notice the green wall of water on the ground and the 5 gallon bucket. Some tomatoes are too tall for the bucket so I cut off the bottom of this 5 gallon bucket, first using a drill bit to drill a hole big enough so my sawzall tool could get inside and cut off the circular bottom. The bucket can go over the plant without smashing it over tall tomatoes.

2wow placing over bucketPut the bucket over the plant and then slide the wall of water (henceforth known as WOW) over the bucket.

3wow waterer

Another great tool for filling the WOWs is this watering wand. I like this one because it has an on-off switch and a lever for control of how fast the water comes out. Here I took off the end so it will fit easily inside each cell. (this is my favorite gardening shoe-can you tell-well worn?!!)

4wow-begin filling

Now put the wand into each ‘cell’ and fill with water. The 5 gallon bucket will keep the WOW from falling on the plant.

5fill cells each side

Fill a couple of cells, then go to the OPPOSITE side and fill a couple of cells and do this on all 4 sides instead of starting on one cell and going around where it will have a tendency to collapse. This will help the WOW to stand up better as you fill up the cells.

6wow finished

After filling all the cells, reach in a pull the 5 gallon bucket out and the WOW will now support itself. A perfect little greenhouse. But sometimes…

7wow REPAIRED

a cell will get a hole and leak after the WOW is a few years old. This is a problem as the WOW needs every cell  full to support itself, so…

8wow replacement cell

So you can buy replacement cells or make your own. Just take that leaky WOW and cut some good cells out of it for use as replacement cells for other leaky WOWs.

9wow installing rep cell

Take your replacement cell and fold it lengthwise in half as shown and slide it into the cell where the water leaked out.

10wow w replacement cell

Then fill up the replacement cell with water and it will hold up that cell. Now one last thing…

11wow finished with stakes

I put 3 bamboo stakes inside the WOW’s right next to the walls and make a tee-pee out of them and tie them together at the top in case the WOW wants to collapse from the wind, the tee-pee will hold the WOW up so it doesn’t crush the plant. These plants have been inside the WOWs for a while and I will take off the WOWs now. Just grab the WOW on opposite sides and pull them off the plant and dump the water back in the wells.

44 tomatoes planted today!

This slideshow requires JavaScript.

Phew! What a day. Three of my friends came over this morning and all together we planted 44 tomato plants from 8:30-12:30! What a bunch of busy beavers! Janet started out the morning before the others came and screened all my vermicompost and filled three-5 gallon containers. Then Lava showed up and Janet and her put in all my amendments in each hole (I had previously dug out most of the holes and Bob Z came by yesterday and finished digging them for me-another great friend)! Then today, I could barely keep ahead of the girls, me setting out plants, making sure each plant had a drip to it, name tags, map of all the tomatoes, providing stakes and wall of waters while Lava planted them and Mernie and Janet followed up behind putting the wall of waters on all of them. Then we all had other things to do and off we all went.  A wonderful day to plant- not too windy and not too hot-it was overcast! A huge thanks to Lava, Mernie and Janet for helping me today and to Bob for helping me yesterday-would of taken me days to get that far. It takes a village to do this much! Mucho gracias!

Soil temperature is Important When Planting Tomatoes

TOMATO COSTOLUTO

Now is the time to start planting our tomatoes and other warm season veggies outside in our gardens. So often we concentrate on only the air temperature to decide when to plant these crops but the soil temperature is actually just as important. Tomatoes should be planted when the soil temperature reaches a minimum of 60°F in the daytime. If you plant too early in cold soil, tomato (and pepper) seedlings sulk and will not be happy. Root development is very slow and the roots have difficulty absorbing nutrients. The plants could show phosphorus deficiency which shows up as stunted plants with purple leaves on the underside. If your plants get this, top dress them with some powdered rock phosphate and water in.  Nothing is gained from planting too early in the ground. This may account for why we always seem to get the bulk of our tomatoes in August and not earlier when planted outside no matter when we plant. The tomatoes will just sit there until the soil temperature is optimum.

To measure the soil temperature, use a soil thermometer. I prefer using a compost thermometer because they are much longer, usually around 24″ and can be used to check both the temperature of my compost pile and the soil in my vegetable bed before I plant tomatoes. Remember to push it in deeper into your bed as the tomato plant won’t be in the top 3″ but more likely planted deeper where the soil is cooler. I find the short soil thermometers just aren’t long enough to measure the soil temperatures more than about 5 inches and quite often I plant tomatoes much deeper. I got my compost thermometer online but I recently saw some at Payne’s Nursery here in Santa Fe.

To warm up soil sooner, you can put black plastic over the bed to pre-warm the soil. I use black plastic garbage bags that I tack down with rocks. That way I can reuse the bags later instead of buying a roll of black plastic. Leave it on for 1-2 weeks and take the temperature to see when the soil warms up to the optimum temperature. Many warm season vegetables could benefit from planting in warmer soil.

Here is a chart I found from Farmerfredrant giving the optimum soil temperatures for planting vegetables. I’m showing it here but also listed it as a pdf (soil temperatures for veggie seeds ) so you can print it out as well.

soil temperatures for veggie seeds

Santa Fe Spring Garden Fair this Saturday April 27

SFMGA_SpringFair13_Flyer_02

This year’s theme is Food for Thought, with speakers, exhibits, clinics, and demonstrations all tied to the idea of nourishing ourselves, our land, and the creatures that share the land with us. There are 3 speakers this year.  I will be one of the guest speakers and talk on tips for growing tomatoes and other vegetables. Anne Schmauss will talk about providing habitat and food for birds and Les Crowder will talk about bees, how we can help them and what we can plant to support them. Here is the speaker schedule:

Jannine Cabossel       10:45am
Tips for Terrific Tomatoes, Making the Most of Your Vegetable Garden

Anne Schmauss         12:00 noon
How to Attract Birds to Your Backyard Year-ound

Les Crowder               1:15pm
Honeybees: Landscaping with Bee friendly Gardening Practices

You don’t want to miss this event if you are a gardener here in the greater Santa Fe area!

My favorite sauce tomato to grow-Goldman’s Italian American tomato

Goldmans Italian American tomato

Psst, I’ve got to let you in on a big secret of mine-Goldman’s Italian American Tomato. I think it’s the best heirloom tomato to grow for sauce bar none. It’s a big, meaty, ribbed, pear-shaped red tomato with exceptional flavor. Not too acidic, not too sweet.

Every year I grow a couple of plants of this tomato but never sell it at the Santa Fe Farmers Market as ‘The Tomato Lady’ because I’m too selfish! I want all of them for making the various pasta sauces I make. I sell all my other varieties of tomatoes, but not this one. A friend of mine said, ‘Well why don’t you grow more to sell?” A novel idea I should consider! It’s only downside is it does take 80 days to mature so you’ll get some of them sun-ripened and have to bring the rest in before it freezes. No matter-they ripen in the house just as well as outside. The plant gets big about 6-7 foot tall so you’ll need some space but it will be well worth it.

The Heirloom Tomato book

Amy Goldman found it at a roadside stand in Italy, and named it after her father’s grocery store in Brooklyn. Amy Goldman wrote the book, “The Heirloom Tomato” and I use it as the gospel for helping me pick my tomatoes to grow each year.

I start the seeds inside sometime around the beginning of April each year under lights and on a heating mat. You’ll have to get the seeds online as no one sells either the seeds or the starts around here. I get my seeds from Baker Creek Heirloom Seeds here.

Fall-Time to trim tomato blossoms off

As the tomato season starts to wind down in the fall, I believe it’s time to redirect the plants’ energy so I trimmed off most of my blossoms on the tomato plants. This helps ripen the remaining tomatoes on the plant.  I also cut off those crazy branches that are overgrown (and have blossoms) back to the last tomatoes that have been set on that branch. The idea here is to redirect the plant’s energy to stop making blossoms and put its energy into ripening as many tomatoes as possible before it freezes.

I also trim off any diseased branches where the leaves are dying or turning yellow and spray with Serenade again (probably for the last time). Late in the season, tomato plants are getting older and are more susceptible to diseases so my hope isn’t to cure any diseases but just keep it under control so we can still get many tomatoes. Besides we want all those green ones still on the vine that we have been patiently waiting for!

Why we don’t have ripe tomatoes right now

So if you still have tomato plants after the curly top virus hit many of our plants, congratulations! I had 84 tomato plants and am down to 48. Thankfully I planted more this year or I wouldn’t be at the Farmer’s Market. I’ve gotten many questions on why we don’t have many ripe tomatoes now. Lots of green ones, but few ripe ones and normally we would have LOTS of ripe tomatoes now. The reason is we had an unusually hot July with day temperatures over 90°F almost every day and the blossoms dropped back then, failing to set fruit.  The number one reason for blossom drop is high temperatures over 90°F  during the time blossoms would normally set in July (the number two reason is cold temperatures under 55°F). Once the temperatures dropped below 90°F in August they resumed setting tomatoes again hence the green tomatoes we are seeing now. So basically we are a month behind but should start seeing most of the tomatoes ripening.  Ahh, the challenges of growing vegetables in the high deserts!

Curly Top Virus -tomato problem right now

I’ve noticed a few of my tomato plants have got curled leaves, lost their bright green color and their veins turn purple and I’ve got several friends with the same problem who have contacted me about what this might be. I’m pretty sure its Curly Top Virus transmitted from the beet leafhopper which has been really prevalent this season. This is not to be confused with leaf roll where the tomato leaves roll. I think the combo of leaf roll and purple veins is the key. Read on.

Here is some info on Recognizing Tomato Problems from Colorado State University website. http://www.ext.colostate.edu/pubs/garden/02949.html

‘Curly top virus is transmitted by the beet leafhopper. This problem is common in western Colorado but seldom found in eastern Colorado. Infected plants turn yellow and stop growing. Upper leaflets roll and develop a purplish color, especially along the veins. Leaves and stems become stiff; fruit ripens prematurely. It is difficult to control because leafhoppers migrate from southern areas. Hot, dry springs with predominantly southwest winds usually indicate increased problems with this disease. No chemical controls are effective. Use row covers to protect tomato plants from the leafhopper.’ Of course this is for Colorado but applies here as well.

Unfortunately after tomatoes get the virus, you should pull the plants. I’m concerned that a leafhopper might bite an infected plant and then bite a healthy plant and infecting it.  So far 4-5 of my plants have this. I’m pulling them tomorrow..

Make a great tomato cage

Tomato in cage, drip underneath, trimmed up off the ground, straw mulch in well and staked to t-post

You need to ‘cage’ your tomatoes before they get unruly. I hate those tomato cages they sell in the store. They are too little and flimsy and the tomato plant will quickly outgrow them. I found a great way to make cages in ‘The New Victory Garden‘ by Bob Thompson.

First use concrete reinforcement wire to make your cages. It is heavy-duty wire that has 6 inch openings so you can get your hand through the openings with a fat tomato. Think optimistically – you’re gonna get a 2 lb giant juicy tomato on you plant and need to get out of the cage! You can buy it by the sheet, which is 4 ft high, or by the roll which is 5 ft high. One sheet will make one cage. The only trouble with the 4 ft height is it is too short for many heirloom tomatoes but some people stack two of them together to make an 8 ft high cage!

I buy the roll, which isn’t cheap, but is a one-time cost and the cages you will make can also be used for beans and cucumbers, in fact almost anything you want to grow vertically and will last a lifetime. A roll is 120 ft in length and will make about 18 cages so if that is too many than I suggest you go in with another gardener friend (or 2) and share the cost. Cut the wire with bolt cutters or an angle grinder not hand wire cutters-your hand will be wrecked-I speak from experience. Here’s how I do it:

1. If using a roll unwind it and hold it down with some BIG rocks or bricks so it doesn’t wind back up. Count 13 squares and cut off one side of the wire leaving it long.

2.  Then bend the long wire into a ‘u’ and hook it back on itself as shown in this photo.

The cage will be approximately 24 inches in diameter when finished. Then I cut off the bottom leaving all the ends pokey (not shown) so I can push the ends into the ground so it won’t blow over.

3. If using a sheet, I wouldn’t cut the bottom edge as I do with the roll to keep as much height as possible.

4. Stake either cage with a 3 ft high green t-post pounded next to the cage and tie the cage to the green post to keep the cage from falling down from wind as shown in the top photo.  This is important when the plant gets top heavy. If you are next to a fence, you could tie it to that. The point being that you don’t want your tomato plant to fall over. Some people growing in pots just put the cage over the whole pot and the pot keeps the cage from falling over as the plant gets bigger.

More tasty tomatoes and peppers with Epsom Salts

Get more tomatoes with Epsom Salts

Epsom Salts May help increase blossoms in tomatoes and pepper plants. Increase in blossoms means more tomatoes and peppers!

Epsom salts contain magnesium sulfate, two important elements for plant growth.

Magnesium– can become depleted in soil usually later in the season. Magnesium helps strengthen plant cell walls, helping the plant to absorb nutrients. It also helps to increase blossoms.

Sulfur– improves the growth and overall health of plants, it may also help our high alkaline soil here in the southwest.

There are two ways to use Epsom salts for tomatoes.

1. Mix 1 tbsp of Epsom salts into the soil at the bottom of the planting hole when transplanting tomatoes or peppers or mix 1 tbsp in a gallon of water and water the transplant. It may help plants absorb Calcium and other nutrients from the soil.

2. Use as a foliar spray of 1 tbsp per gallon of water when the plants flower. Epsom salt helps set more blossoms.

I’ve used Epsom Salts on my tomatoes, peppers and even roses for years. It will help roses produce more flowers. Scratch in 1/2 cup of  Epsom salts in soil around rose bush and water in.

Started planting tomatoes May 11

15 TOMATOES PLANTED

I started transplanting tomatoes into the new garden section. My friend Tom, and I got 15 of them in the soil-all ready to go. We added to each hole: more compost, yum-yum mix, mycorrhizal fungi (for root growth), worm castings, epsom salts (for many blossoms), and dry milk (adds calcium to avoid blossom rend rot later). And this year to (hopefully) conserve on water usage, I’m trying silicon gel granules and some volcanic ash, both of which will keep water longer around the plant root zone.  All this stuff is mixed up with some of the existing soil in the hole.  Then we put the tomato plants in (and if they are rootbound, open the roots up a little), made a well around each one and water each hole several times to get the soil wet. Then I go back a third time and water in some Superthrive and seaweed fertilizer (helps with plant transplant shock). Afterwards I put a drip line around each plant and then put a wall-of-water around each of them to keep them warm at night because just when we think we are out of the woods weatherwise, it gets cold again.

To keep the wall-of-waters from collapsing when the wind gets blowing hard, I put some bamboo stakes inside the walls as shown in the second picture. Overkill? Maybe. But I will get some fantastic tomatoes during the season. I still need to put the main drip hose (1/2 inch size) around the perimeter of the patch and connect each individual drip line to it but I can hand water every other day for now till I get to it. Planting is the hands on intensive part-later it will be a breeze watching them grow..

Tomorrow-May 16, Amy Hetager, from Home Grown New Mexico, is coming with her students from Americorp to plant some more tomatoes. No shortage here-still got 55+ tomatoes to put in the ground!