Soil Testing For Your Garden

Gardeners should consider getting their soil tested to see where their soil is at-if it has adequate organic matter, what the Nitrogen, Phosphorus and Potassium levels are at, what the pH is of their soil, how high the salt content is, and calcium, sulpher, iron, magnesium levels and much more. The problem is we use to be able to give soil samples to our county extension agent and he would send it off to the state lab for analysis but that service is no longer available to us here in New Mexico. You can still get a soil analysis done but will have to send it away.

I like A & L Labs in California and have used them before. It was well worth it as I found out a lot about my soil. The first time I submitted samples and the form, I had someone walk me through it as it seems complicated but is not. So here’s how to submit your soil samples to A & L labs. This one is in California but there is another one back east if you like. They offer many different kinds of tests but you only need a soil test.

1. Go to their site http://www.al-labs-west.com/

2. Click on ‘Analytical Services’ . They have many different services but you want the  ‘Soil Analysis’ section.

3. Click on ‘Sampling’ to see how to collect the soil specimens. Follow their procedures and send the samples (I put mine in a big ziploc baggie) to the address listed along at the bottom of the ‘Sampling’ section with the money $35.00. The price may seem a little steep but when you consider how much money we spend on gardening, it is not a lot to find out about your soil.

soil analysis report

SAMPLE-Soil Analysis Report-say what??! I didn’t understand this!

Graphical Soil Analysis Report

SAMPLE-Graphical Soil Analysis Report-I can understand this much better!

4. Then go back and look at ‘Example Reports’. See examples above. I got the ‘Standard Soil Report’ and be sure to get the ‘Graphical Soil Report’I didn’t understand everything in the standard soil test but you have to get it to get the graphical soil test which is easy to read and understand.

Scan

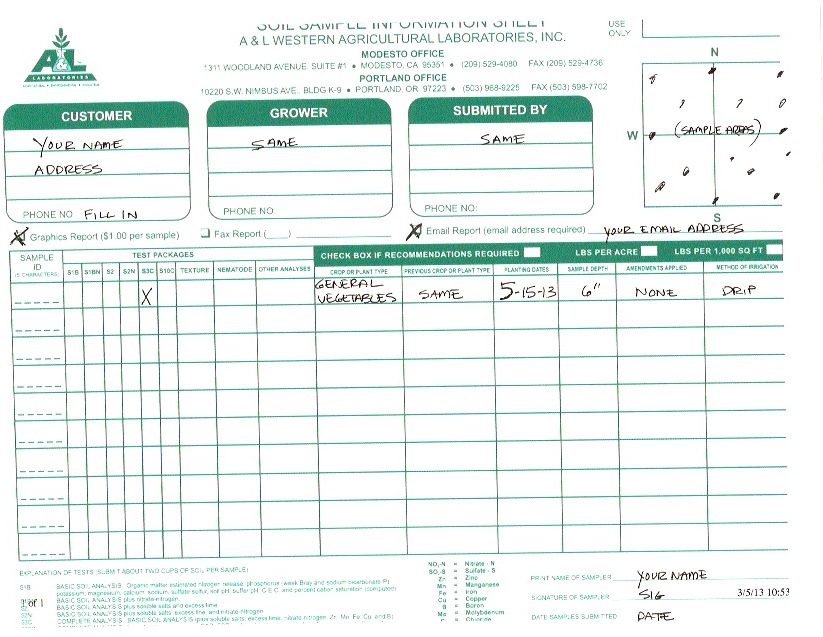
5, Next print out the ‘Submittal Form’ and fill it out.  See example above. Put what crops you are growing and other information they ask for. I just put in general vegetables. Check off  SC3 report (complete analysis-$35.00) and check off Graphical Soil Report-additional-$1.00. (The ‘soil analysis fees’ are in the blue column on the left side of the web page if you are wondering where I got these)

6. Mail soil samples, money and form back to them. Be sure to check off email return on the form as you will get it sooner than snail mail. It takes about a week to get the results after they receive it.

Make a Soil/Rock Sifter for New Garden Beds

My friend Adam made a sifter to sift out rocks from soil when creating new garden beds. It is a simple contraption made with stuff I had lying around. He found a pallet and cut it in half. Then he screwed 2 layers of chicken wire onto the pallet. He used two 2×4 as portable legs to lean it up on an angle. Then you just put a shovelful of your rocky soil on it and the dirt falls through while the rocks roll off. The soil is light and fluffy and ready to add compost or horse manure to it. When I later looked up how much one is you can buy online, they were $250! Here is Caleb using it on a new garden bed.

Worm Farming-Vermicomposting

Finished vermicomposting area

Last spring when I planted my tomatoes I put worm castings in each hole before I put the plant in. Worm castings are a form of composting that are from (do I dare say it?) WORM POOP! I paid $25.00 for a 5 lb bag for this POOP at one of our local nurseries and I thought, next year I’m going to do this myself and save the money. Plus you don’t have to turn it like regular composting (now there is an idea I like-less work)! Worm castings protect the plants from soil borne diseases, conditions the soil and is a mild natural fertilizer with 1% Nitrogen. People also use it in their compost teas for their plants. I created a vermicomposting area a few weeks ago in my abundant free time (lol)! Here’s how I did mine.

I found out we need a certain type of earthworm called a Red Wiggler (decided not to show the worms-not a pretty sight!). It is a different from our regular earthworm (although they are great in the soil as well). This red wiggler worm has a huge appetite and will eat manures, peanut hulls, oak leaves, humate and other ingredients such as kitchen scraps-non meat-they are vegetarians!! lol

I put together an outdoor vermicomposting area right next to the chickens so they can go to work! Some people put them in special bins inside their people house (not chicken house) so they don’t freeze. Forget that noise-although if you don’t mind…

I decided to use straw bales to ‘frame’ my outside area. I heard they will go into the straw in winter and lay their eggs and they come back (I think they freeze and their babies come back) when it’s warmer but I had this soil cable that will keep the soil about 70°F and decided to try it to keep them from freezing this winter and keep them working. (Crack that whip!)  We’ll see if it works this winter. Here I put the cable down (above pic) .

Then I put some hardwire cloth over it and wired it on with some twistie ties from my garbage bags. Make sure the wire is underneath the hardwire cloth. I did this so when I shoveled the compost out later, I won’t accidentally cut the wire.

Next I covered the wire with straw and newspaper to make a bedding for my new wiggly friends. I wet down the area so the materials were damp but not soaking wet. Worms like their environment moist but haven’t learned to swim yet!

After that I put some food down for them. What else but pumpkin! I have lots of that! Looks like they won’t starve this winter! (I heard they love pumpkin-good thing!)  I wonder if someone talked to them and the worm said, “We love pumpkin”. I mean how do we know for sure ?!! I also put in some old chicken manure, squash and coffee grounds for variety! Then I had a friend give me some of these wigglers and I put them on top of this so they would burrow in and feast! I forgot to take a picture of this and when I went back less than 1 minute later to take a picture they were already ‘down under’ this stuff.

Last I put more straw over the whole pile and wet it again so everything was moist. Now I check every week and pull up the top layer of straw and add more ‘food’ as needed. Also be sure to keep pile moist so sprinkle with water periodically. This winter when the hoses are frozen I will take a sprinkling can out to wet it. If you don’t get a soil cable, don’t worry, just follow the rest of this post.

One last thing to make it easy to separate the worms from their castings next spring, I divided my vermicomposting area in half and put a board between the two sections-you can see this in the very first picture at the top of this post. They are in the left section now and later when I see the castings I will stop feeding them on the left side and put the food on the right hand side. The worms will migrate over to the new food source leaving the castings for me to take (at least that’s the theory). I hope they are reading this too!

So now I’m a worm farmer! I can’t wait till next spring to get my very own free worm poop! YEE HA!!

Getting beds ready

I started getting the beds ready in the fall by adding some amendments but couldn’t get to all of them because of the weather changing to snow. So yesterday as the weather was beautiful-50 degrees and the ground wasn’t frozen,  In my future giant pumpkin patch particulary where I will put the plants, I mixed up some compost, mushroom compost (small amount), horse manure (somewhat composted), Winterizer Yum Yum Mix, and pelleted gypsum which helps break up the soil and adds calcium which pumpkins so love and need. I still need to put some composted horse manure all over the patch but that will be another day.