I’ve been taking some photos of the vegetable garden the last few days. The light is so beautiful at 8 am every day that before I started weeding, I took these photos. Slowing down and and really looking how beautiful the garden is makes all the work worthwhile. Enjoy!
Pickle class a success!
Pickle making class went well today. We processed 15 lbs of cucumbers into about 15 pint jars. Pictured above are some of the finished pickles. Duskin, who co-taught the class with me brought his giant pressure cooker. We didn’t use it as a pressure cooker this time but instead filled the big pot with water to sterilize the jars and to use for processing the pickles using the water bath method. I brought my camp stove to make the brine and syrup. It was a beautiful day for making pickles outside instead of over a hot stove. After a short talk on the how to process food safely, everybody got involved—Duskin sterilized the jars, while the students cut up the cucumbers and garlic, mixed up the brine and syrup, added all the ingredients and cucumbers into the hot sterilized jars as they came out of the pot, poured the brine and syrup, wiped the lips of the jars and put the lids/caps on them. Then we put them back into the hot water and brought the water back to boiling and adjusted the processing time for our high altitude. While we were waiting for them to finish processing, Duskin showed them around Milagro Community Garden. When the pickles were done, we pulled them out of the hot water and let them cool enough and then the students took home a jar of each type of pickle. Good job folks!
Here is the one handout that wasn’t available today that I told the students would be available tonight:
Preparing and Canning Fermented and Pickled Foods
Here are the handouts that were given out in class:
Duskin’s Favorite Pickle Recipes
Lastly, here is the Lemon Dill Refrigerator Pickle recipe that Randy asked for:
Food Preservation Class TODAY-canning pickles
Do you have too many cucumbers? Do you want to learn how to make pickles? It is much easier than you think! Today from 12 noon – 3 pm I will be teaching a preservation class on pickling for Home Grown New Mexico.
Those who show up will learn how to make two types of pickles-bread and butter pickles and dill pickles. We will review canning safety at high altitudes and then make the pickles using the water bath method. This is a hands-on class.
Pickle Making Class- 12 noon-3pm
Milagro Community Garden – located in parking lot behind:
2481 Legacy Ct, Santa Fe, NM
Tomato Lady of Santa Fe at Farmer’s Market this Saturday
Saturday I will return to the Santa Fe Farmer’s Market as the ‘Tomato Lady’. I don’t have lots of tomatoes yet but everyday more are ripe so come early to get the best choices like the beauty pictured above from Italy called “Costuluto Genevese”. I have 12 new varieties as well as the ones I grew last year.
Weeds!
I came back from a flyfishing trip at the San Juan River last week to out of control weeds EVERYWHERE! Ever since the monsoons kicked in (thank god they did) so have the weeds. Amazing how the seeds lay dormant for years until the right time and water show up. Boom! An explosion of weeds. Now I know how they feel back east having to weed all the time with all the water they get.
I finished weeding the main vegetable garden yesterday-did the last 1000 sq feet in section 3 in one day! Oh, my aching back. My main vegetable garden is divided into 3 sections, each section being about 1000 sq feet. Section 1 is the most fertile, being the original section built on 13 years of composted horse manure 6 years ago in 2008. Section 2- I built originally for my giant pumpkins 5 years ago but I moved them (being the gorillas that they are) after they took over the rest of the garden and Section 3-I built last year so I could get my tomatoes (50 plants this year survived) on a 3 year rotation cycle since I grow a fair amount for the Santa Fe Farmer’s Market. I rotate them to one of the three sections every year. Meanwhile my giant pumpkins moved over to the unused part of the horse corral about 3 years ago and they have 2000 sq feet all to themselves. Well almost-I have 14 more tomato plants over there. The only part left to weed is the paths around the gardens, the apple trees and about half of the pumpkin patch. Progress!
This whole weeding thing has been pretty overwhelming this year so the only way I can get my head wrapped around it is to break down the big tasks into smaller tasks. I just keep chipping away at it-a little bit every day. Plus I have to tend to the veggie plants, keeping ahead of problems that come up from time to time and now harvest time is upon us and that is intense too. All part of the joy of gardening! If I didn’t love those fresh vegetables and those fantastic tomatoes that we all wait for every year, I might not garden at all. But those tomatoes keep me coming back!
Tomato Talk
Later today I’m going out to the Eldorado gardens to ‘talk tomatoes’ with a group of gardeners out there and tour their garden. We will discuss growing tomatoes and disease and insect control on their plants.
For the color pics/descriptions of tomato diseases and control:
Here are the other handouts for anyone interested:
Hail damage
Well all this rain has been great but many of us have also experienced hail damage over the last few weeks. I escaped the hail storms in my vegetable gardens until last Friday. I was out-of-town at the time (which was a blessing as I would have been super upset). My house sitter called and told me (before I came home) that it was hit pretty hard. I came home 5 days later and this is what I found. The chard, zucchini, beans, cucumbers and a few tomatoes got hammered so hard they were skeletonized. But most of my tomato plants were covered with row cover (to protect them from the dreaded leafhopper) and they were fine. Four tomato plants that I didn’t cover also got severely beat up. The eggplants that were covered with row cover were fine but the grapes got severe bruises on the fruit and the fruit will be a total loss but the plant will recover.
So what do we do when nature strikes hard with a devastating hail storm. Not much I’m afraid. Sometimes the plants are beyond self repair and sometimes they bounce back just fine. I left everything as is for few more days before going out and upon inspection, most were already putting out new baby leaves – if the center of the plant wasn’t demolished. Yesterday and today we trimmed back all the demolished leaves leaving new growth and tomorrow I’m going to spray all the plants with some fish emulsion, an organic fertilizer, to help with more new growth and mix in some ‘Serenade’, an organic fungicide with the fish emulsion to help prevent any possible fungal diseases that might have resulted from the beating they all got leaving the plants weak. Sometimes taking a wait and see versus yanking them out right away is a better approach. It is amazing these plants are recovering nicely.
I am always amazed how strong the will to live is. I may have lost a few weeks but at least I didn’t lose the whole season. And I was very glad that everything that had row cover on it was protected. Here are some pics of the damage and recovery.
July 7, 2013—1.25 inches of rain! Woo Hoo!!
We have a terrible drought going on for the last 3 years here in Santa Fe. Came home from a movie this evening to discover in my rain gauge, we got 1.25 inches of rain! Many little rivulets in the driveway and the arroyo we cross to get to the house had been flowing. Of course this is huge news considering we haven’t had any appreciable rain in months and months and months. I wish I had been here to see it come down! Gonna turn off all the drip system for a few days! YEA!!!
Anyone else get any appreciable rain today?
Is it a weed? White Horehound
There is a plant that grows everywhere around here and I’ve always wondered what it was. Grows like a weed so to speak. I knew it was in the mint family as the stems were square but was definitely not a mint. I just ID it from a book, Weeds of the West.
The plant growing in my gardens is white horehound which is a herb. There are two types of horehound—black horehound and white horehound. Black horehound can be toxic while white horehound can be beneficial. They are easy to tell apart because black horehound has little purple flowers while white horehound has little white flowers.
Since ancient Egypt, white horehound has been used as an expectorant. Native American and Australian Aboriginal medicines have traditionally used white horehound to treat respiratory conditions. Some people make homemade cough drops out of them and some use the dried leaves to make a tea. They actually sell the seeds in Baker Creek Heirloom Seeds but around my place it definitely grows like a weed on its own without my help. I use to pull it out because it is not a particularly attractive plant and frankly grew where I didn’t want it to grow.
But since I became a beekeeper, I noticed the bees are wild about it with its small white flowers, so now I leave it for them. The US Food and Drug Administration banned its use in US made cough drop saying it has no proven benefit. However it is widely used in Europe and you can buy it in European cough drops, just not US made ones.
I recently had pneumonia and a dry hacking cough that would give me fits. The only cough drop that would help stop the coughing that I tried is called ‘Ricola’ Cough Drops’, which is a Swiss made cough drop. Guess what is in those cough drops? Horehound! Only I didn’t know about white horehound, or Ricola cough drops or what that weed was growing in my gardens. I found all this out while I was recovering and on the computer a lot-how serendipitous!
Happy bee-day!
Today was a great day! I had my teacher/mentor Les Crowder come over to the house because my bees have been struggling since April. In late April the existing queen disappeared and a hive without a queen is a doomed hive. So I ordered a new queen and after the proper introductory period released her and they ‘seemed’ ok with her but after 2 more weeks there was a new capped queen cell and the new queen had ‘disappeared’. I thought they must have killed her and figured I did all I could do. Then I noticed the capped queen cell was opened but still could not see the queen. Still with no brood or eggs I figured the hive was failing. Then 2 days ago I noticed some larva but still couldn’t see if there was a queen or if one of the worker bees (called an intercaste queen) had tried to take over the job which doesn’t work-they still would be doomed. Today when Les came by he found a real queen, lots of brood and eggs and thought the hive will be fine! What a relief! They wanted to do supersedure queen (natural requeening) instead of an outside queen and the reason I couldn’t see her is she has stripes like the worker bees instead of the normal dark bottom. She is big and beautiful and laying well. Best gift from the universe for my birthday today!
Herb garden
I use to have a great herb garden but then built the studio here at the house on top of where it was located and had to tear it out. What a mistake. I thought it would be easy to recreate that herb garden-but it hasn’t been. I’ve struggled with my ‘new’ herb garden space for the last three years. First, the drip system clogged up (I wasn’t paying attention) and the plants weren’t getting any water and died. Now for the last 2 years the bunnies, who aren’t suppose to like herbs, have leveled them to the ground because there is so little to eat out there. Last year I tried 3 different types of basil in a large pot on the deck because of the bunnies eating them and they did great. The bunnies won’t come up on the deck. This gave me the idea of growing them in containers.
So this year I decided to take the little 2 inch starts that we get at the nurseries and give them a head start inside in April. They are now transplanted up in gallon size pots and are outside on the deck. Once I get a fence around the herb garden, I will plant them there. I think starting them inside and letting them get bigger (and keeping the bunnies away) will be the trick to getting a good herb garden again. Shown here are chives, oregano, English thyme, tarragon, lemon thyme and sage which are all perennial herbs I use in the kitchen. I already have kitchen sage, lemon balm, rosemary (arp variety), and lemon verbena tucked into the perennial garden among the other plants and they have all are done well for several years. I also have a winter savory and a garlic chive that did survive the bunnies and drought in the herb garden-must not taste too good to the bunnies.
Pumpkin disaster
Well I started about 5 giant pumpkin plants this spring and am now down to one. Last night a squirrel (or rabbit) did my biggest plant in by chewing through the stem and killed it. Finito. Done. No hope for that one. And it was amazing because it had 2 layers of row cover on it and some shade cloth over the row cover but something must have gotten underneath all that. This is too bad as I started it in mid April in the house and felt it had the greatest possibility to produce a GIANT giant pumpkin. Now I’m down to only one plant (the back up) which is actually the seed from my 2010 NM State Record but it was started a little later as 3 other of my seeds didn’t germinate at all. I’m actually going to plant 2 more seeds directly in the ground now to see if I can get a backup to my back up. The soil is certainly warm enough but I’m not sure I will have enough time now to grow a really big one unless it is some super seed that takes off!
Curly Top Tomato Virus and Beet Leaf Hoppers

Photo credits:
curly top disease – photo courtesy of http://ucanr.org/blogs/blogcore/postdetail.cfm?postnum=3352
Curly Top Tomato Virus
Last year, the Beet Leafhopper which transmits ‘Curly Top Tomato Virus’ was rampant in our gardens and devastated many tomato plants. I lost 50% of my tomato plants. The Beet Leafhopper flies in on the winds in early June through July, jump on the tomato plants and taste them. They don’t even like to eat tomato plants but sample them, transmitting the disease in the process.

beet leafhopper – courtesy of http://www.coopext.colostate.edu/TRA/PLANTS/curlytopvirus.shtml
Identifying Beet Leafhoppers
You will know if they are here as they come in waves and when you walk around your garden, you’ll see a lot of jumping little green bugs that fly off when you walk by. Then they leave—flying to the next garden. Because of this, you can’t really spray anything to get them—here today, gone tomorrow. By the time you notice something is wrong with your plant, they are long gone. It takes about 2 weeks for symptoms to show up.
Symptoms
Your tomato plant leaves will start to curl and the underside of the leaves will turn a purplish color The leaves then start to wilt and the plant will look stunted. You might think it needs water but it doesn’t, it is sick and won’t recover. ‘Curly-Top’ is only transmitted from bug to plant is NOT transmitted from plant to plant hence you will see a healthy plant next to a sick plant.
Remedies
There is NO CURE for this virus and if your tomato (or pepper for that matter) shows signs of the disease, you should pull the plant. You could leave the plant in BUT if another wave of leafhoppers come by and a healthy leafhopper bites your sick plant, it only takes 10 minutes in 90°F weather for it to be able to transmit the disease to one of your healthy plants. The best thing to do is pull any sick plant and dispose of it.
Leafhoppers do not like shade and if your plants are partially shaded, that may help keep them off but since most of us grow tomatoes in full sun that might be difficult.
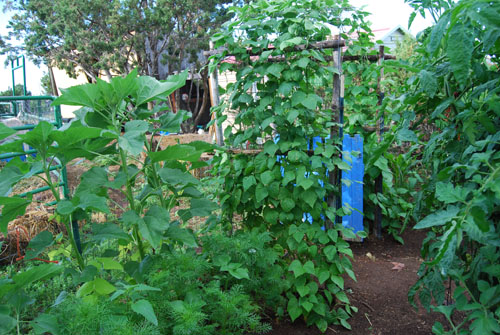
Another thing you can do is create a physical barrier between the bugs and your plants. This year, I’m covering my tomato plants with row cover until the bugs pass. Wrap the row cover around your tomato cage and put a piece on top of the cage BEFORE they come.
Lastly you could put out some tomatoes later in the season after the bugs leave. Last year when I was out at the Santa Fe Community Garden I noticed many rows of sick tomato plants but one row of perfectly healthy plants and when I asked about them, it turned out they were put out about a month later than the rest of them and by then the leafhoppers were gone.
Dry, sunny, windy weather are perfect conditions for the leafhoppers so look out this summer-conditions are ripe again!
The importance of mycorrhizal fungi in the garden
I first heard about mycorrhizal (pronounced my-cor-hi-zal) fungi through my giant pumpkin grower friends. They started using it before most people in the community knew what it is. When I was becoming a Master Gardener, I asked one of my instructors about it and was told it he didn’t know much about it and that it wasn’t proven. So what is this ‘fungi’ that is proving so helpful for plants?
Mycorrhizal fungi are important components of soil life and can be found naturally in undisturbed soil. But when we till, or dig up the soil to garden, we disturb this soil life. Mycorrhizal fungi live on the roots of plants and have a mutualistic relationship with the plant’s roots. To explain it simply, the plant says, “I need water, I need phosphorus, I need resistance to diseases” to the fungi and the Mycorrhizal fungi says, “Ok, I can bring that stuff to you through my hyphae but I need sugars to survive” and the plant feeds it sugars. So they benefit each other. Mycorrhizal fungi cannot live without the plant’s roots so we should be sure to use it close to the roots where it will colonize.
When I had some problems a couple of years ago with some tomato plants, I send off two plants to our state lab see if there was anything wrong with them. The guy at the state lab called me to tell me there wasn’t anything wrong with the plant except they had been exposed to some herbicide (Roundup) an were showing some damage but he did tell me my root systems were huge and asked what did I do and I told him I added mycorrhizal to the soil at the root zone.
We can inoculate the soil with Mycorrhizal fungi by two ways:
1. I put Mycorrhizal fungi granules (RTI brand) from ExtremePumpkinstore.com in the bottom of the hole lightly mixed up with some soil when transplanting. Make sure the granules come in contact with the plant’s roots. I use this on all my giant pumpkins and squash but have also used it with my tomatoes. It is expensive though.
2. I drench the soil after transplanting with a solution of Fox’s Bushdoctor Microbe Brew which contains different kinds of Mycorrhizal and beneficial soil bacteria as well. This stuff works great as you only have to water it in once when you plant to get it down to the root zone. It is much cheaper too. Both of these ingredients can be purchased through the internet and Microbe Brew can be purchased locally at a hydroponics gardening store called All Seasons Gardening ((505) 438-4769) located off Rufina at 1228 Parkway Dr. here in Santa Fe. Call for availability.
You can find more detailed info and other mycorrhizal products online at Mycorrhizal Applications, Inc.©
Saving water in your vegetable garden
Saving water is so important now in our high desert especially with the drought. Last year I read an article on a company who created oasis in the Saudi Arabia deserts where they get less water than us. I noticed the main ingredients used were polymer crystals and a volcangenic sedimentary mineral (volcanic ash) called Zeolite, both of which absorb water and hold it and nutrients close to the root systems where the plant can use both as needed. I didn’t buy any of the company’s product because they had chemical fertilizers in it but instead experimented on my own with those 2 ingredients and adding my own organic fertilizers/amendments. It doesn’t take a lot of these 2 ingredients. The brand of Zeolite I got is called Zeomax Garden Aid
and both that and the polymer crystals came from Amazon.com. The results were amazing.
Some of you may know that I expanded my garden last year by 1000 square feet going from 2000 sq ft to 3000 sq ft in my main garden. I put about a tablespoon of both ingredients along with my usual yum-yum mix, compost and other stuff I put in the bottom of each hole for my tomatoes. Then I mixed it up well and planted the transplant on top of the amended soil in the bottom of the hole. All of my garden is on a drip system.
I expected my water bill to go up substantially. Amazingly there was no increase in my water bills from the previous year-a savings of about 33% (since I had increased the garden by 1/3 its size or 1000 sq ft) and I only used them on 50 transplanted tomatoes in a brand new raw garden that hasn’t been that heavily amended yet (better amended soil =better water retention). This year I’m going to use them on everything I grow. For seeds I plant, I’m going to dig a trough and amend the soil with both of these items, sprinkling it in and plant the seeds on top of it in hopes of saving more water. You can get polymer crystals at Payne’s Nurseries here in town if in a pinch but they are expensive locally and I could not find Zeomax at all locally. Amazon cost less and if you plan ahead before planting this year, I believe you could save some substantial money in your water bill and cut down on your water usage. You can also dig holes around your new plant or an established plant and mix these two ingredients with some dirt and put it back in around the plant being careful around the roots if you already planted.


